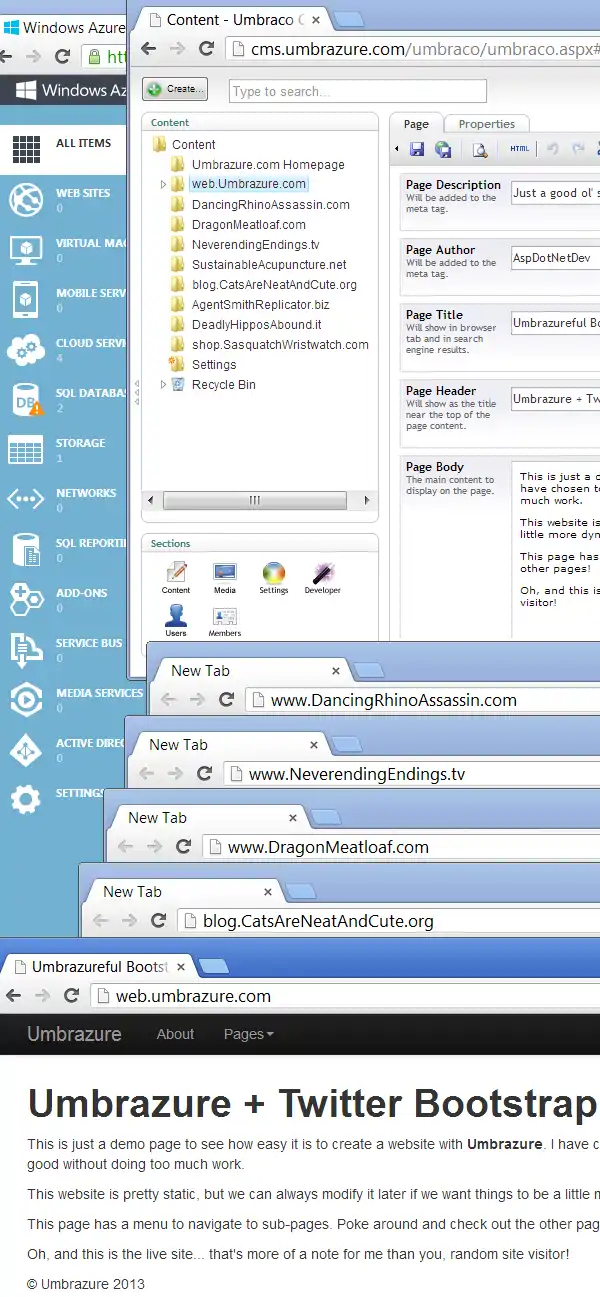
Introduction
Want to setup a cloud architecture that allows you to run thousands of ASP.NET websites for the same cost as a soda a day? Read on, and prepare to have less cavities and a brighter smile (you might even lose some weight too)!
Motivation
Rather than make a simple demo website that just happens to live on "the cloud," I decided I wanted to make something really useful for this article. Instead of demonstrating some cloud features, I wanted to develop a blueprint that I could share with other web developers, so that they could do some impressive work with the websites they work on. That something I decided on was getting a tool I work with every day, the Umbraco CMS (Content Management System), up and running on Azure. I am calling this blueprint "Umbrazure" (a portmanteau of "Umbraco" and "Azure"). On top of that, I wanted to make it easy for other developers less familiar with Umbraco to begin using it with little fuss, and I wanted to make it easy to manage content without sacrificing the ease of software development we Visual Studio developers have become accustomed to. I'm happy to report that I was able to achieve these goals, and this article will walk you through the entire process, step by step, so that you may begin using a fast, scalable, manageable, extensible, highly available website CMS.
Objective
There were a few routes I could have taken to demonstrate how to best use Umbraco, but the one I decided would be of most use to most developers was how to reduce costs by using a highly scalable Umbraco environment to host a virtually unlimited number of websites. By the end of this article, you should end up with enough know-how to be able to run, say, 500 websites (each with their own custom domain name) for less than $30 a month (the cost of an extra small web role, a SQL Azure database, some file space, and some network traffic). If some of your websites become really popular and get lots of visitors, you just have to spend a little more money to increase the size and/or count of your web roles, which can be done at the click of a button.
Appeal
One more thing I'd like to mention is that CMS's have been around for a while, and there are a lot of ways to set them up wrong and make life difficult for visitors, users, and programmers alike. The great thing about the approach that I will be demonstrating is that it will be minimally invasive (unlike some other CMS's... *cough* SharePoint *cough*), which means that you can still customize things just the way you want without the CMS dictating how you need to do things. The build process won't change much (F5 will still work), debugging inside Visual Studio will work like you weren't using a CMS, and your visitors will have no idea you are hosting on Azure or that you are using a CMS (unless they poke around in your HTTP headers, that is). I hope that, by the end of this article, I will have made your life as a software developer easier, not harder, and that you will have a really useful skill set you can start putting to use right away.
Contents
Overview
As I already explained in the introduction, this article will deal with the Umbraco CMS, and getting it running smoothly on Azure. However, before you commit to reading the entire article, I want to give you a high level overview of the specific topics that will be covered.
To start with, we'll get you up and running on Azure. We'll go in baby steps, so you aren't overwhelmed with a ton of new concepts. Even if you've never used Azure before, you will be able to follow along. Once we get you setup with some Azure basics, we'll do some necessary plumbing with Visual Studio and domain management to get them cooperating nicely with Azure. These things are easier to get working without the more complex parts confusing you.
After you are comfortable with Azure, Visual Studio, and domains, we can start covering the real meat of this article, which is the incorporation of Umbraco. Again, baby steps... we'll cover each and every file you have to touch. Since each CMS works a little differently, I'll give you an idea right now about how Umbraco works. Umbraco allows non-technical users to manage a website, and each page on the site is represented in Umbraco as a node in a hierarchical tree, like this one:
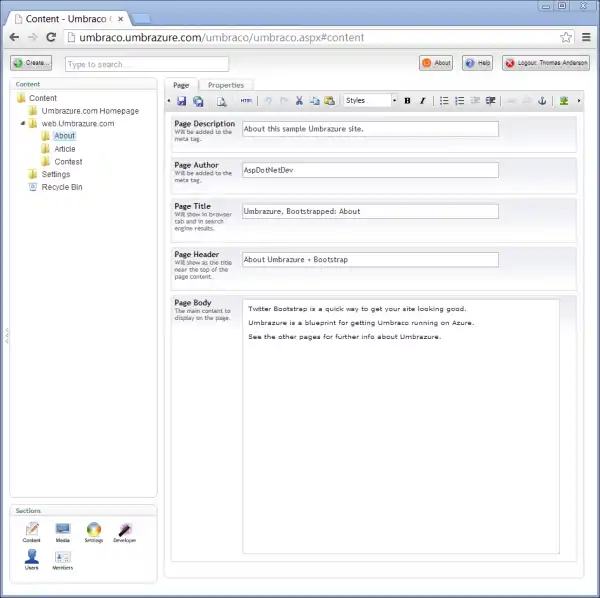
There's much more to Umbraco than that, but that's how most non-technical users will view it. Each node they create in Umbraco will show up on the website as a page (powered either by Web Forms or MVC, as Umbraco lets you mix and match). Well, nodes can also be used to host user-entered data, but most nodes will have a corresponding webpage.
Once you have Umbraco integrated into Visual Studio, installed into a database, and running on Azure, we can start customizing it. A few of these customizations will just be things you'd typically see in websites, such as rewrites for nice looking international URL's. Following those typical customizations, however, we'll dive into making Umbraco function as your websites scale (i.e., multiple web role instances). Part of that will demonstrate some of the features built into Umbraco, such as creating pages and adding data to them.
If you read that far into the article, you will be able to make basic websites in Umbraco on Azure. However, as you read on, we'll cover ways of making development easier, such as creating XML transforms to modify your config files depending on if you are debugging or deploying to the cloud.
Most of the rest of the article will just be a sample website that demonstrates what you might want to make using Umbrazure. If you make it that far into the article, you will end up with something like this:
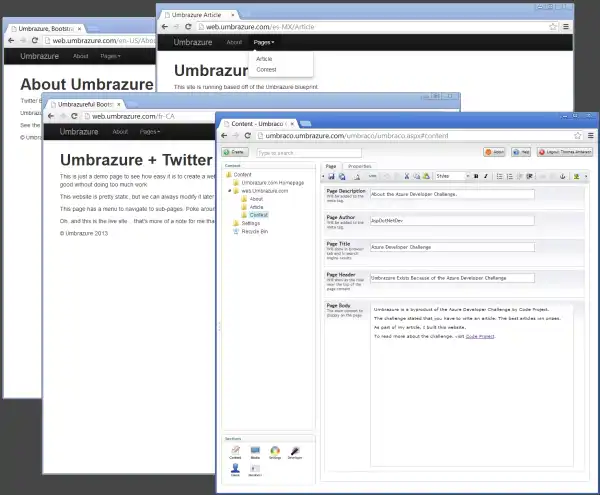
The remainder of the article will be mostly reference information. I'll include information about some pitfalls you'll want to try and avoid, some fixes you may need to employ, as well as a glossary of terms for quick reference (in case your colleagues try to quiz you on this crazy Umbrazure concept you'll be explaining to them).
Prerequisites
To follow along with this challenge 2 article, you will need:
- Visual Studio 2012 (With Update 2)
- Azure SDK and Tools (Installs When You Create Your First Cloud Project)
- Windows Azure Subscription (Free Trial Available)
Azure Setup
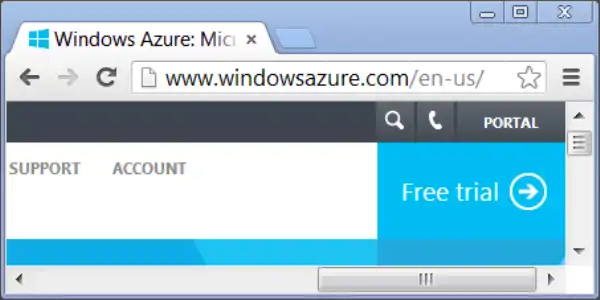
Before we get into the juicy coding, we're going to get as much of the Azure setup out of the way as we can first. In each of these sections, the images will help guide you along the entire process. Your first step will be to navigate to www.windowsazure.com and click the "Portal" button at the top right of the screen. If you don't already have a subscription to Windows Azure, now would be a good time to create one (using the "Free trial" link at the top of the page, shown in the image below).
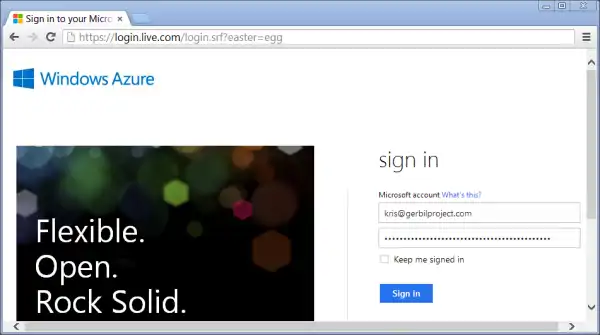
Next, you'll need to sign in. If you don't already have an account, go back to the previous page and create one by clicking "Free trial".
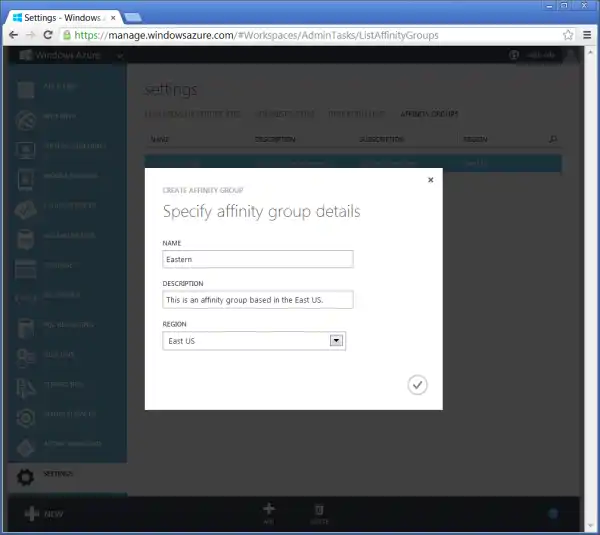
Once you have logged into the portal, you can create an affinity group under "Settings" → "Affinity Groups". When you create web roles and other services in the same affinity group, they are created in the same physical data center. That means they don't incur network traffic costs when they communicate with each other, because they are using an internal network rather than internet bandwidth.
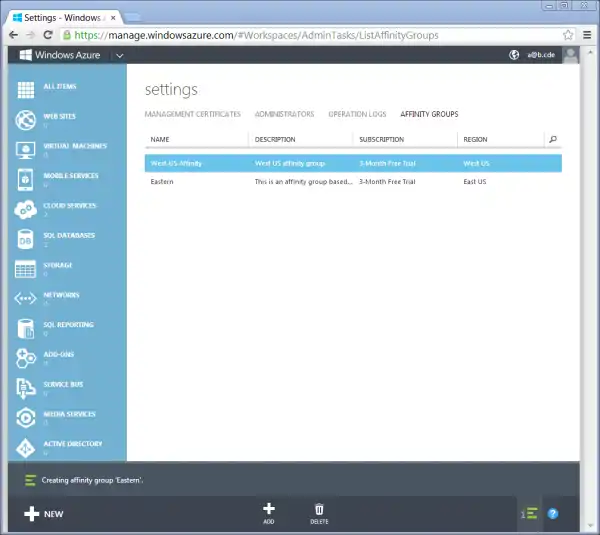
Here you can see a little status popup at the bottom of the screen indicating that an affinity group I just created is being setup. Since this was on the East of the US, I called this affinity group "Eastern". This is the affinity group I will use from now on.
The "Cloud Services" section is where you create web roles. Web roles are what run a website. You can think of them as web servers, but they come with some Azure niceties. Azure is able to scale nicely using web roles, because you can choose to scale vertically (faster computers) or horizontally (more computers). When you scale horizontally (i.e., increase your web role count), Azure load balances all web requests between your web roles. As far as I am aware, load balancing isn't guaranteed to be "sticky", which means that if a user presses a button to do a post back, they might send that request to a different web role than they originally got the first request from. This creates some issues, one being that session state will not be the same between web roles, unless you setup a custom session provider. However, if you can avoid session, that is even better.
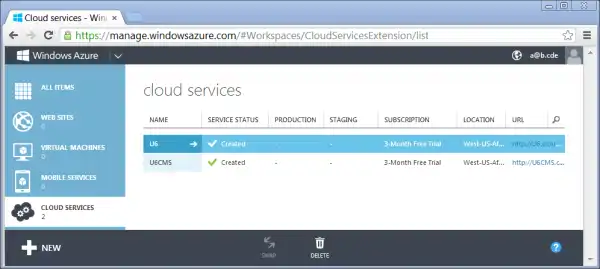
You can see here that I have already created some existing web roles, "U6" and "U6CMS". You can ignore those, as I just created them for some testing before I wrote this article. The way you create a web role is by clicking the "New" button at the bottom left of the page. Then, click "Cloud Service" and then "Custom Create".
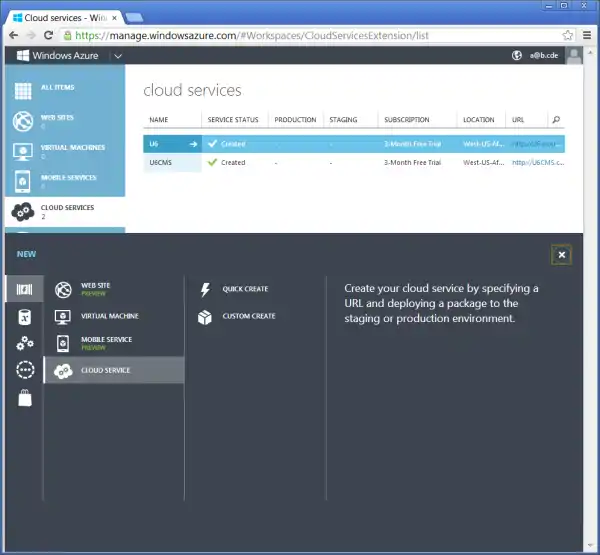
For the purposes of this article, I will be creating two web roles, "keanu" and "jodie". Those can be accessed by visiting the URL's keanu.cloudapp.net and jodie.cloudapp.net. Since I have already created those, you will have to come up with some names of your own. If you are making something for your job, you may want to pick names by some other criteria than your favorite actors and actresses, but I'll leave that up to you.
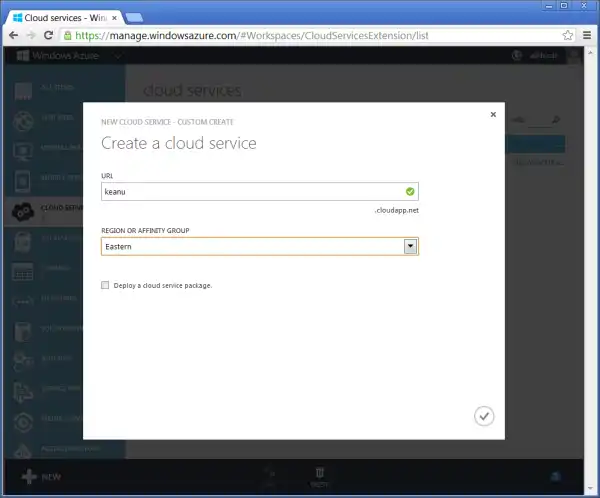
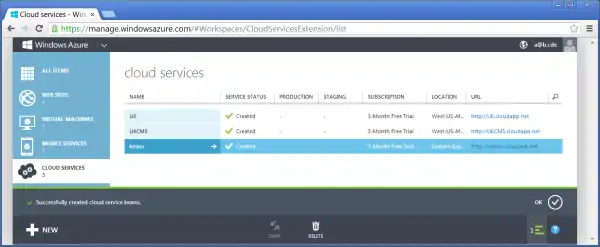
You will see a notification at the bottom once your role is created.
Azure can show you multiple notifications, so feel free to walk away and grab a snack; you won't miss anything.
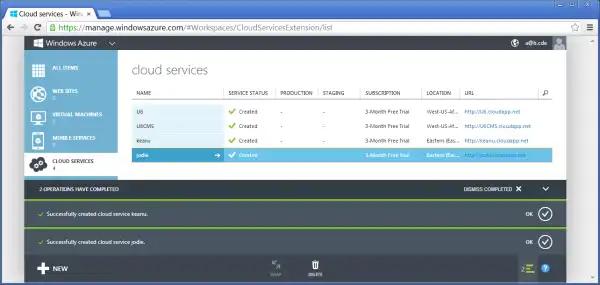
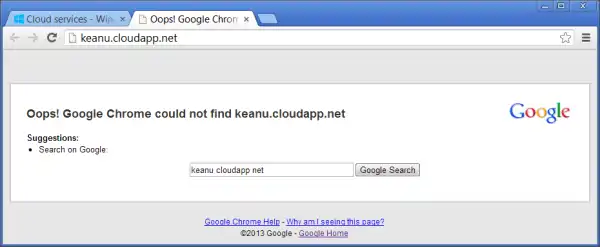
If you try to visit the URL of your web role that you just created, you won't see anything useful. This is because you haven't uploaded a package to it yet. We'll get to that later.
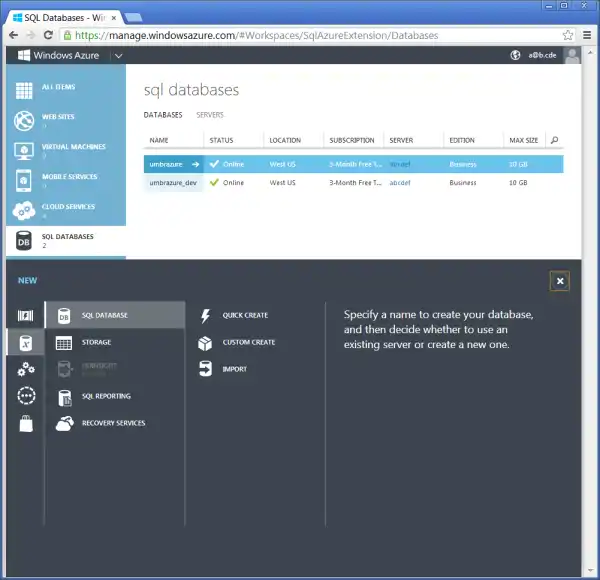
Something else most websites need is a database, and Azure has one called SQL Azure. It is very similar to SQL Server. You can create a database under the "SQL Databases" section by clicking "New" → "SQL Database" → "Custom Create".
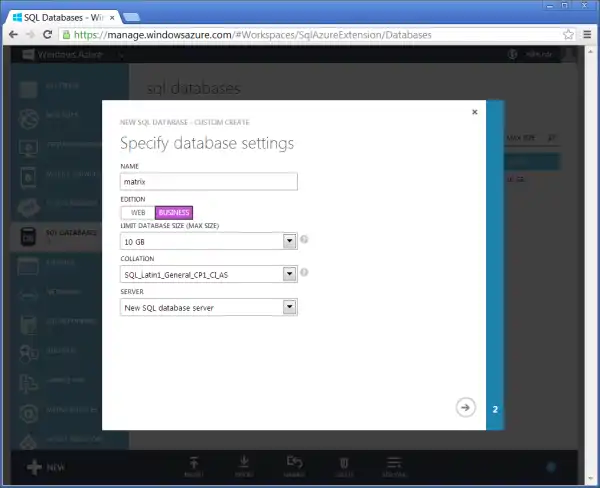
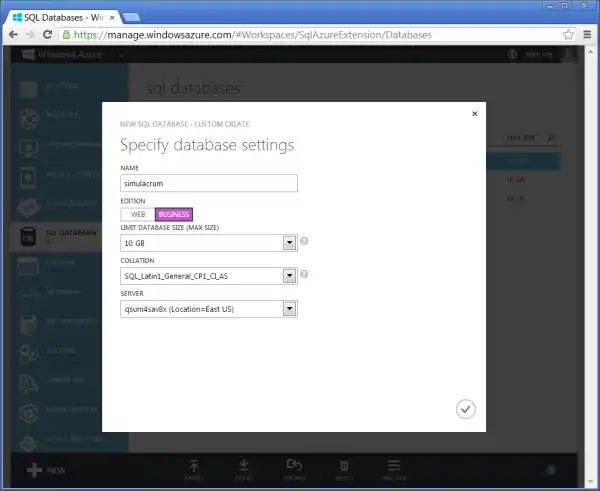
You will need to give your database a name, and indicate the maximum size it can grow to. Once it reaches that size, it will go into a read-only mode and no more data can be inserted into it. This is done to prevent you from incurring any unexpected costs. However, you only pay for as much space as you actually use in the database. If you select 10GB as your limit, but you are only using 5KB, you will only pay for those 5KB.
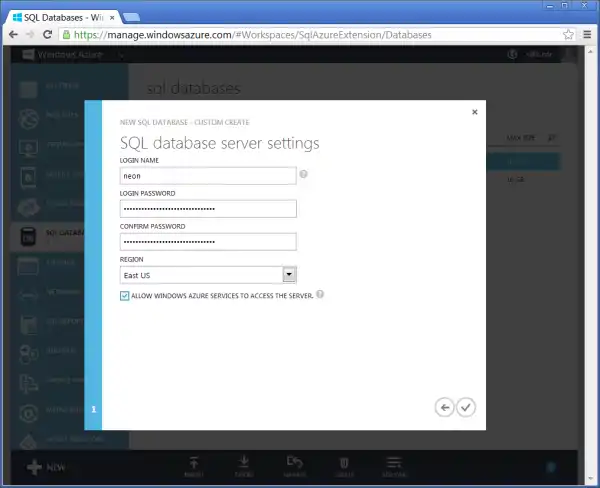
If you are creating your database on a new server (which you will if this is your first database), you will be asked to create a database user. Remember that password, otherwise you will have to reset it later (this can be done from the Azure portal).
You won't be able to use your database until it has finished creating, as shown below.
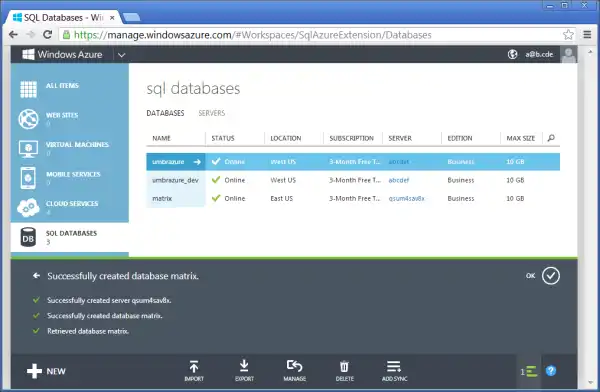
The above "matrix" database is what I will use for my production environment. For my development environment, I will create one called "simulacrum". Call your prod/dev databases whatever you would like.
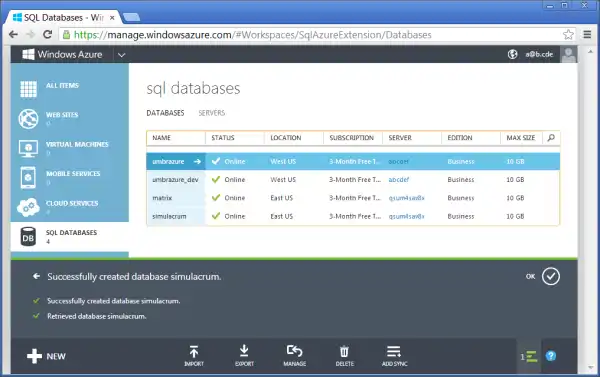
You now have two databases to work with. Keep in mind that you will be charged for them the entire time they exist. Ignore the other two databases I created, as they were done so for testing purposes.
To manage a database, click the link to it in this list. Here, we are going to click the link to enter the matrix database management page.
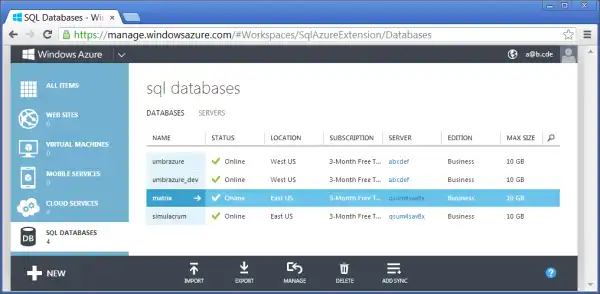
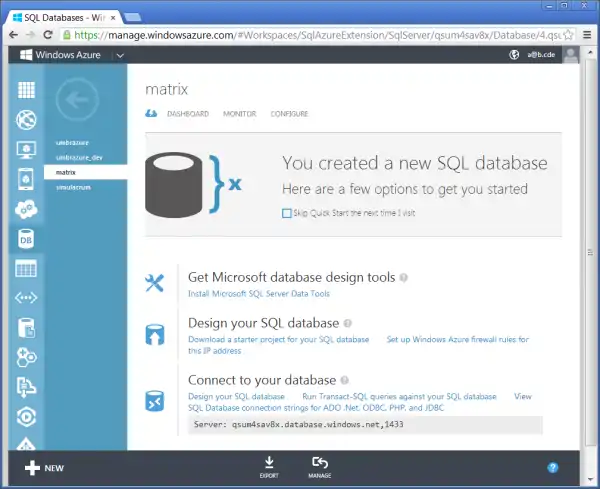
This is what the landing page looks like when you manage a database.
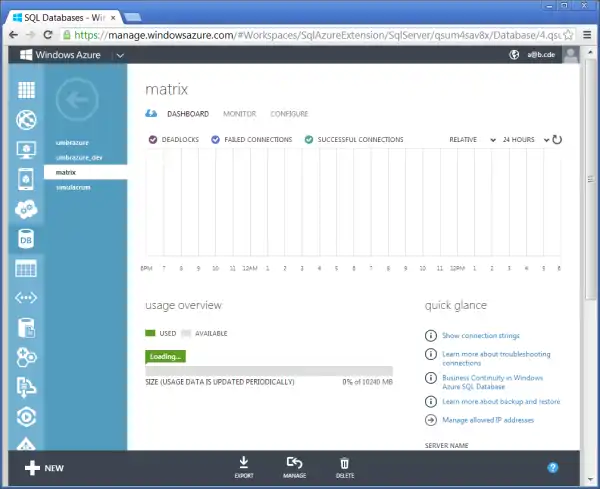
Click "Dashboard" (at the top) and you will see this page. Click the link "Manage allowed IP addresses".
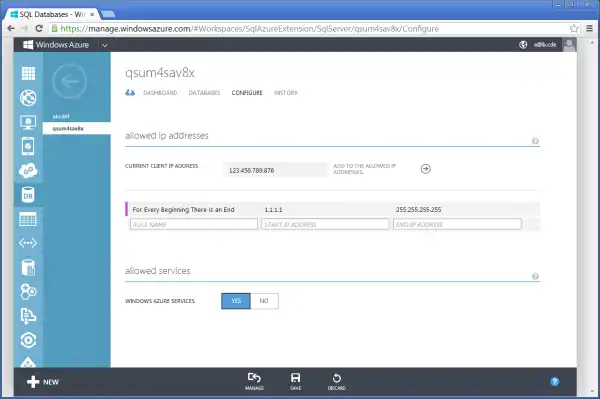
You are going to enter a firewall rule to allow all external traffic to hit your database. Enter the range 0.0.0.0 to 255.255.255.255 (ignore the fact that the screenshot starts with 1.1.1.1... I'm a doofus). Normally, you wouldn't have to do this as most of your traffic is internal, but doing this will make developing against Azure easier for you.
Visual Studio Cloud Solution
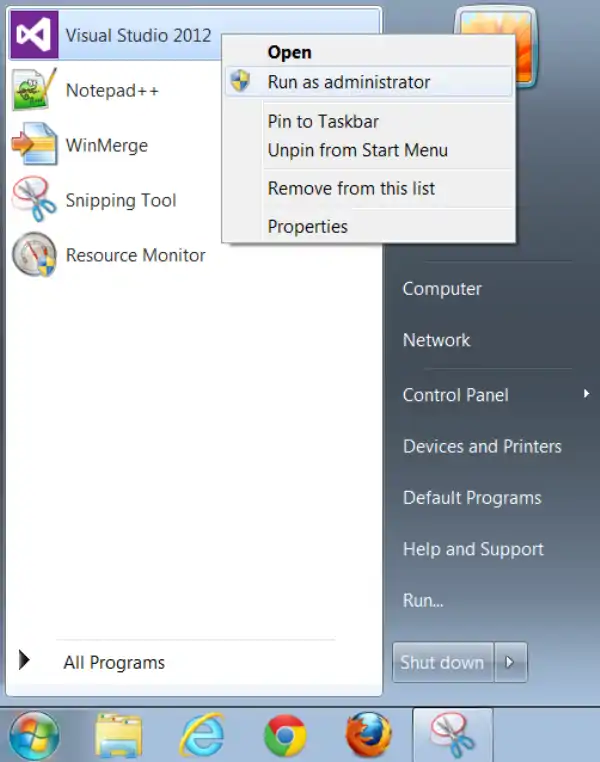
You are done with Azure for the moment. Now open Visual Studio (remember to run as administrator).
If you have installed update 2 (as you should have), this is what you'll see.
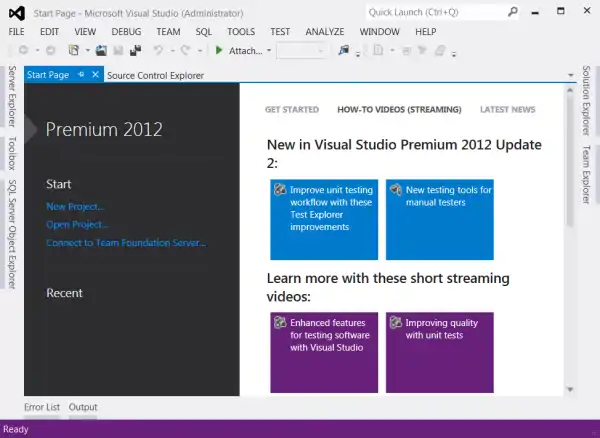
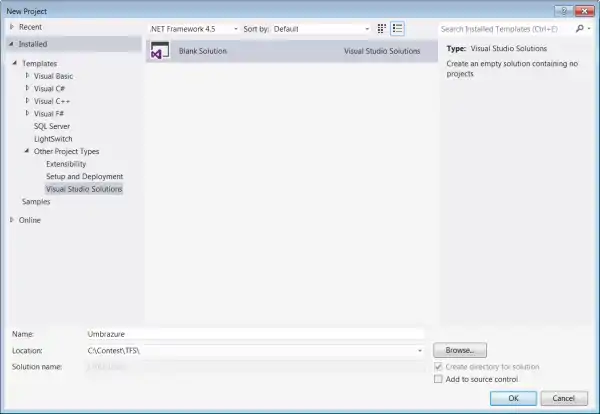
Start by creating a new project. Actually, the project is "Blank Solution", which does not actually contain a project. I like to start clean.
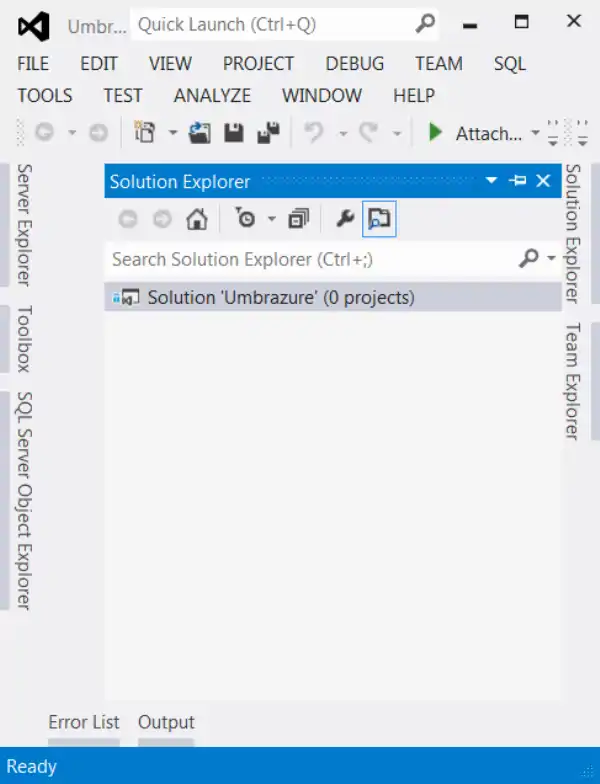
Here is your new solution you'll be doing all your coding in. I called it "Umbrazure", but you can call it what you like.
Add a new project to your solution.
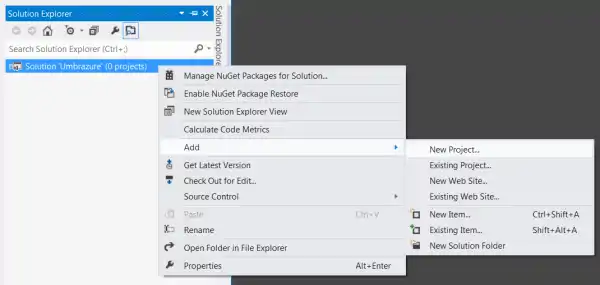
It will be a cloud project. When I name my cloud project, I just suffix ".cloud" to the solution name. Note that I'm using .Net Framework 4.5.
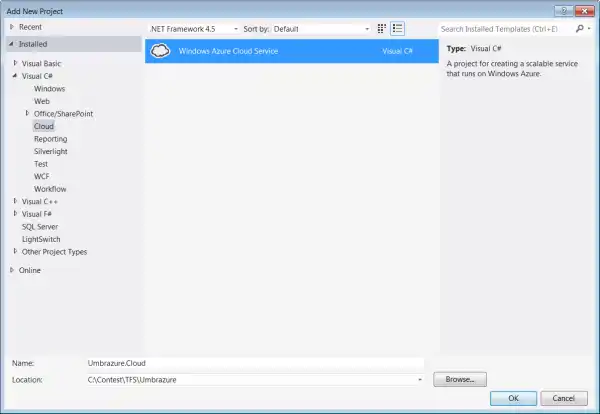
The cloud project wizard will let you choose cloud services you want to add. Create an MVC 4 web role. I called mine "Umbrazure.Web".
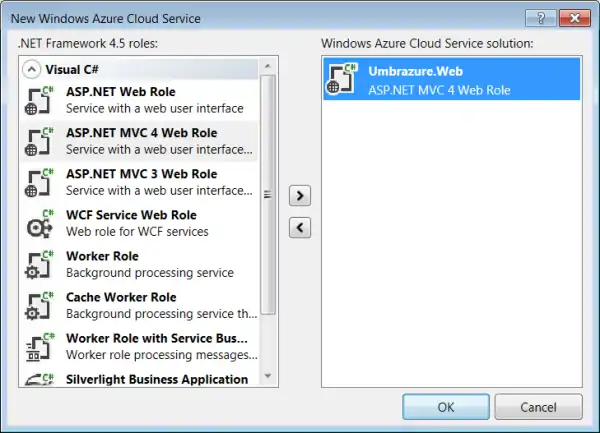
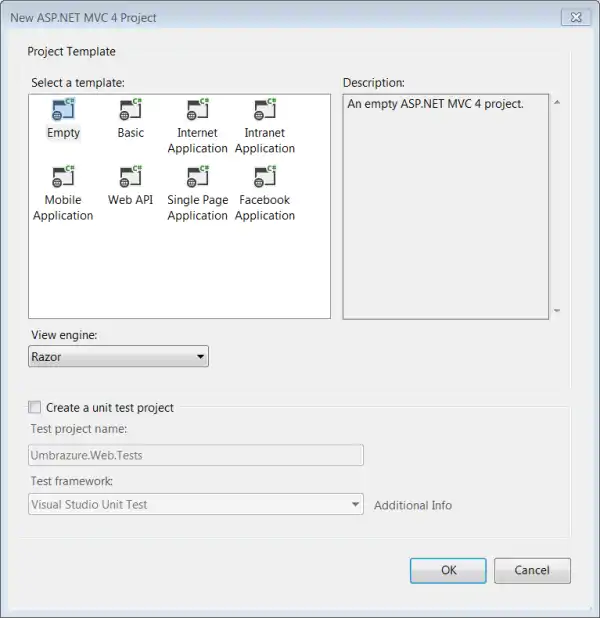
Next, choose options for your MVC 4 web role. You'll create it from an empty template using the razor view engine.
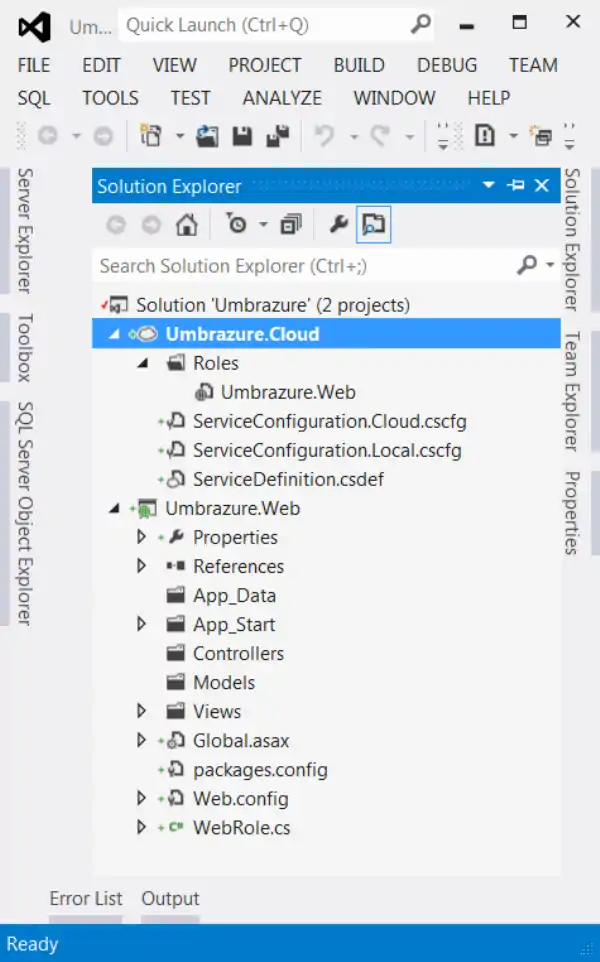
Here are your freshly created projects. One cloud project (does all the Azure packaging) and one MVC 4 project (your primary web role project).
Add another project to your solution. This time, an empty ASP.NET web application. It will serve as your default web application to show when you don't have any cooler web applications to show (like your MVC 4 one).
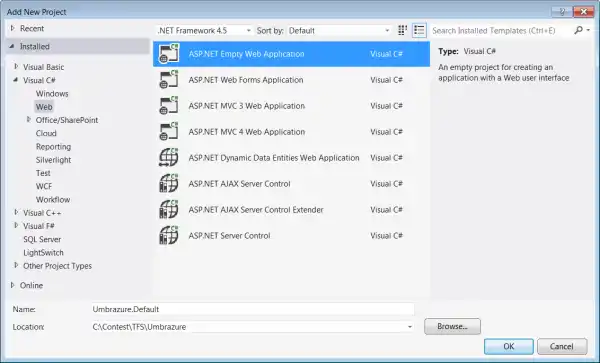
Here are all three of your projects.
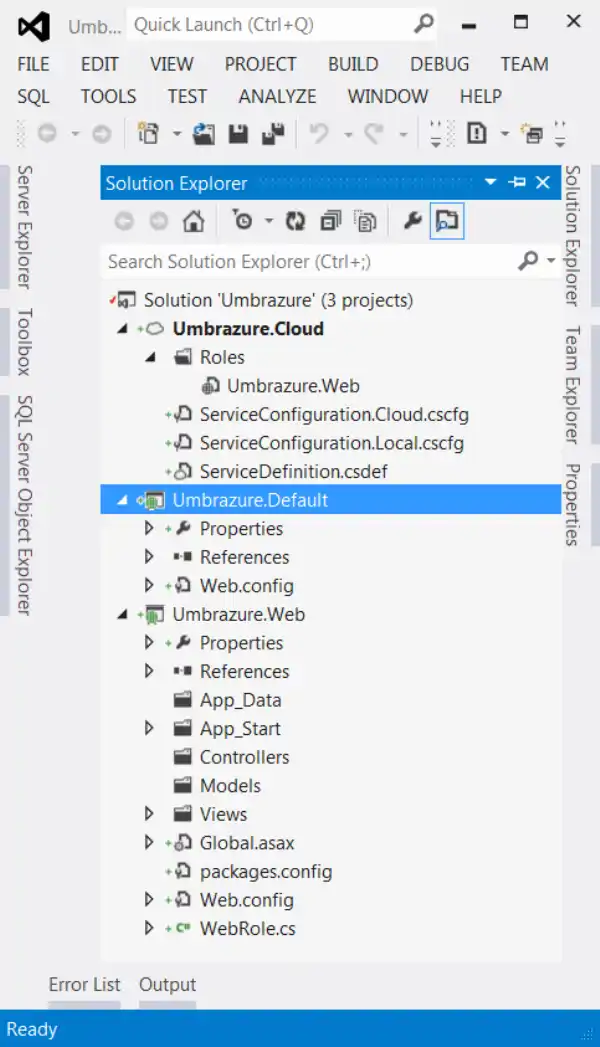
We'll start working in your MVC 4 project. Add a class called "Message" to your "Models" folder and fill it in as shown in the image below. This is about as basic as models come.
namespace Umbrazure.Web.Models
{
    public class Message
    {
        public string Text { get; set; }
    }
}
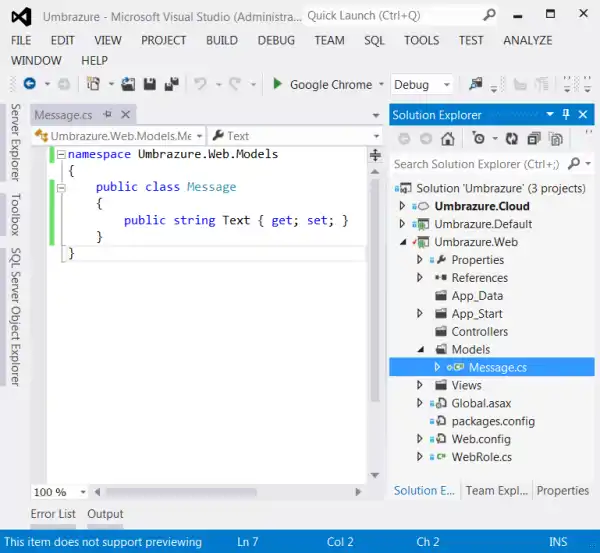
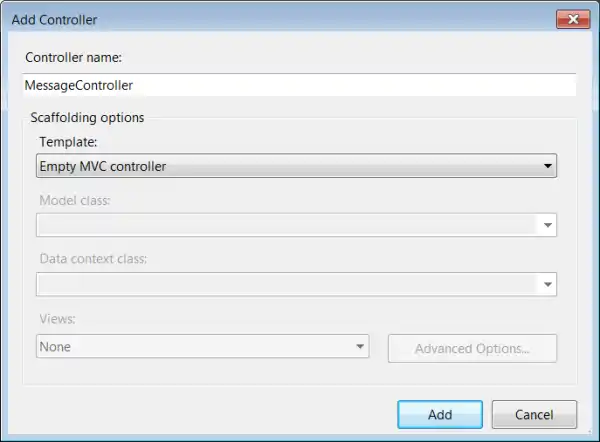
Next, add a controller.
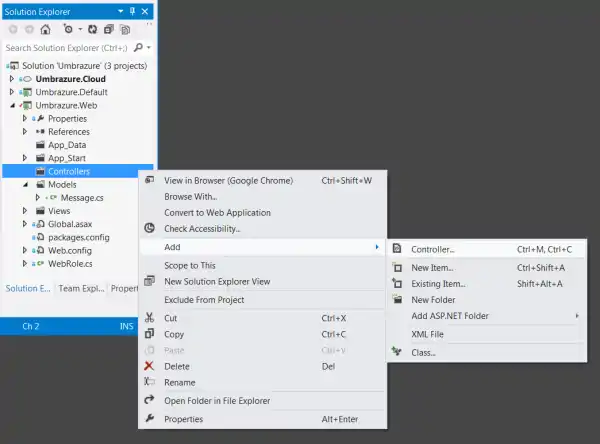
Call your controller "MessageController".
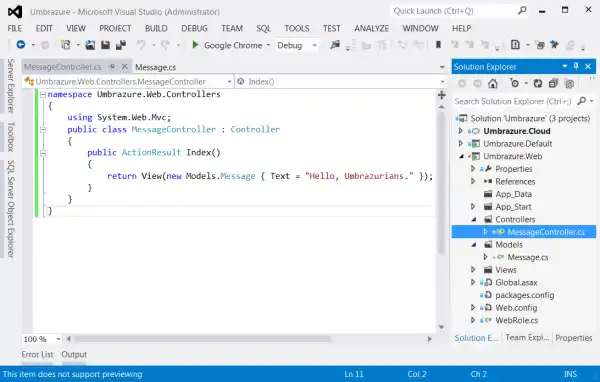
Fill in your controller as shown below.
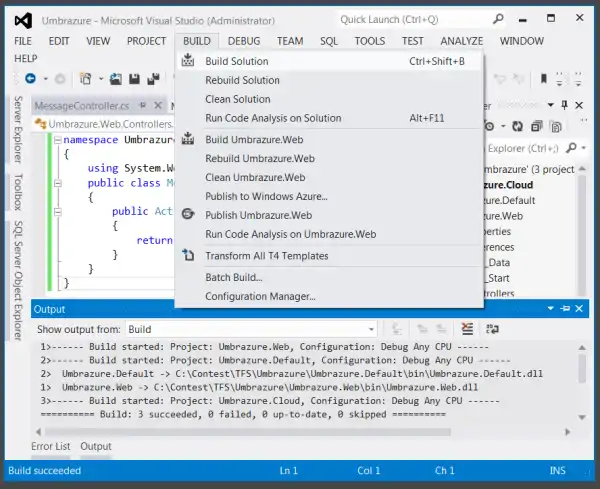
Build your solution. You should do this anytime before you add a strongly typed view (otherwise your model won't show up in the drop down).
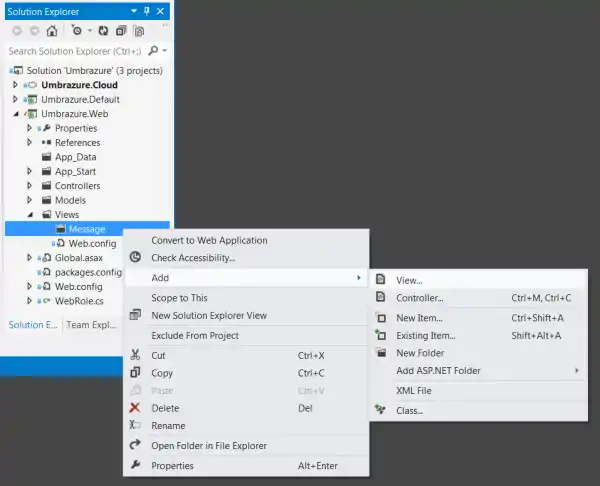
Add a view under "Views" → "Message" (you'll create that folder too).
Call your view "Index". Set it up as shown below.
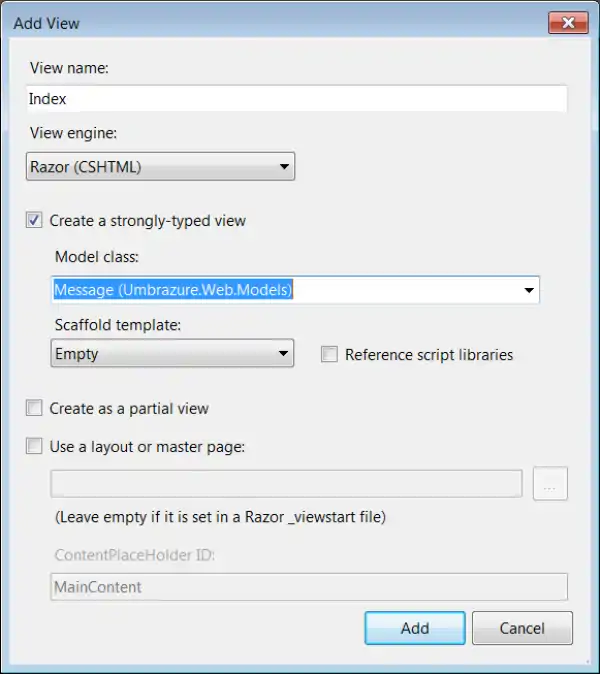
Fill in your view as shown below. It will just render a basic HTML page that shows a message to the user.
@model Umbrazure.Web.Models.Message
@{
    Layout = null;
}
<!DOCTYPE html>

<html>
<head>
    <meta name="viewport" content="width=device-width" />
    <title>Umbrazure Message!</title>
</head>
<body>
    <fieldset>
        <legend>Message</legend>
        <div>
            @Html.DisplayFor(model => model.Text)
        </div>
    </fieldset>
</body>
</html>
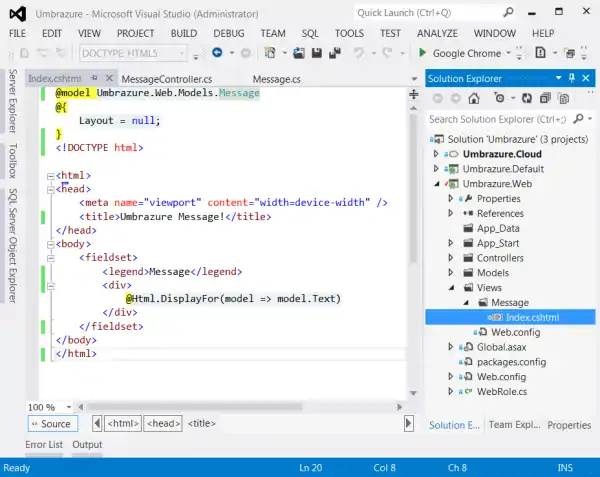
Next, modify your RegisterRoutes function in the RouteConfig class so that you have a way to route traffic to your action method on your controller.
namespace Umbrazure.Web
{
    using System.Web.Mvc;
    using System.Web.Routing;
    public class RouteConfig
    {
        public static void RegisterRoutes(RouteCollection routes)
        {
            routes.MapRoute(
                name: "Umbrazure Message",
                url: "{controller}/{action}",
                defaults: new { },
                constraints: new { controller = "^Message$", action = "^Index$" }
            );
        }
    }
}
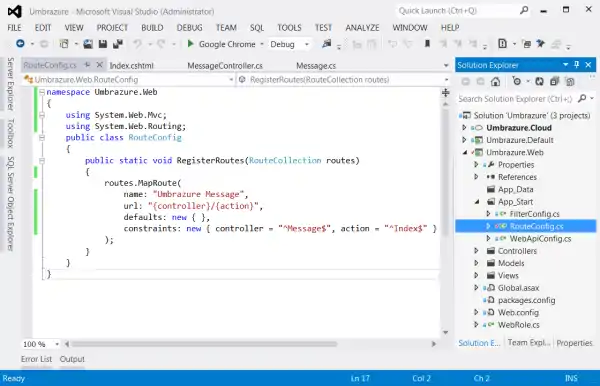
Right click on your cloud project and start debugging.
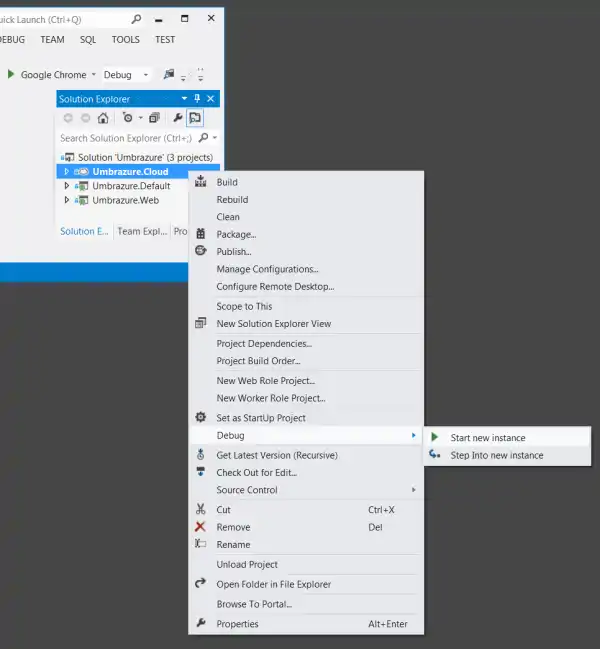
It will take a few moments to start up the emulators.

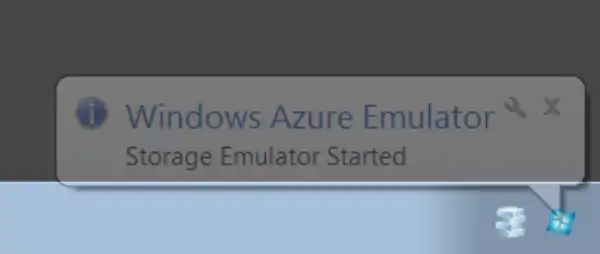
You will see some messages in your system tray as the emulators start. You can also use those icons to look at the emulators (e.g., to see any trace messages).
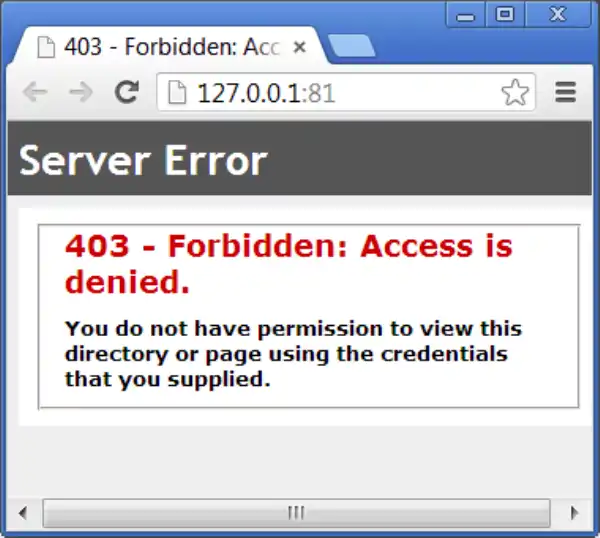
You are seeing this error message because you don't have a default route. Also, notice that port 81 is used. Azure sent you here automatically, but remember to keep the 81 anytime you modify the URL.
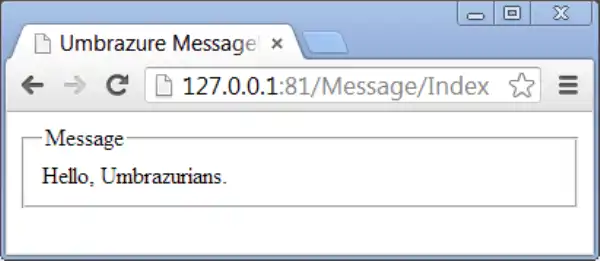
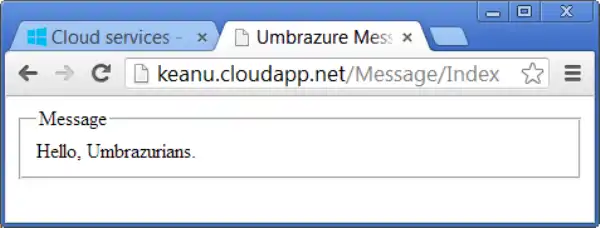
Visit the route you setup earlier. This will show you the Index view that gets returned from the Index action on the Message controller.
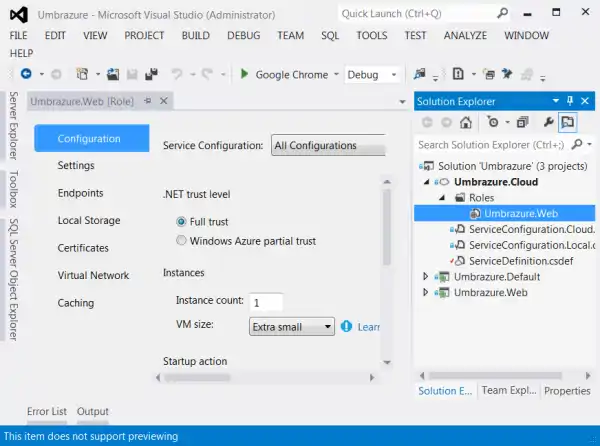
Double click your role configuration and set the VM size to extra small. This is the cheapest size. Cheap is good, yes?
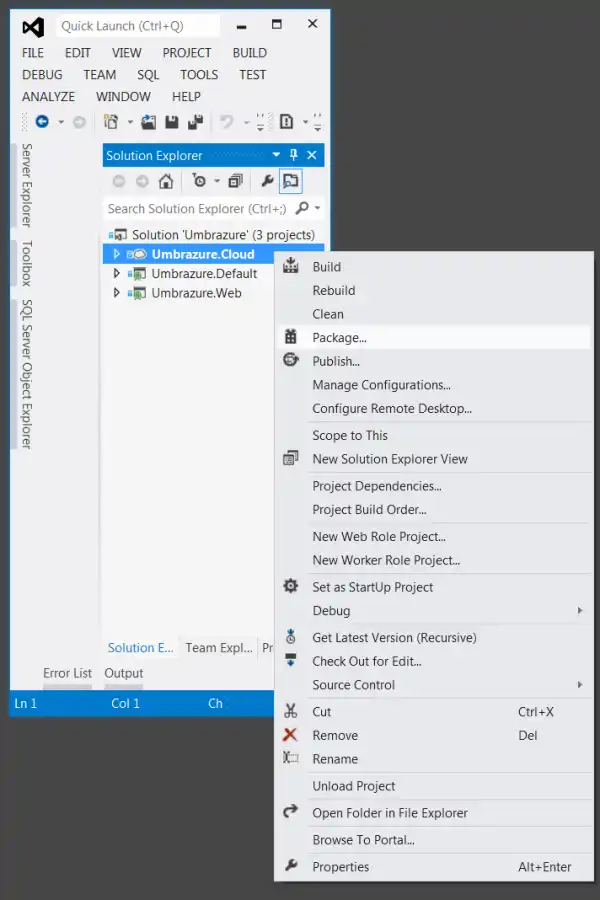
To deploy your project to Azure, right click the cloud project and select "Package".
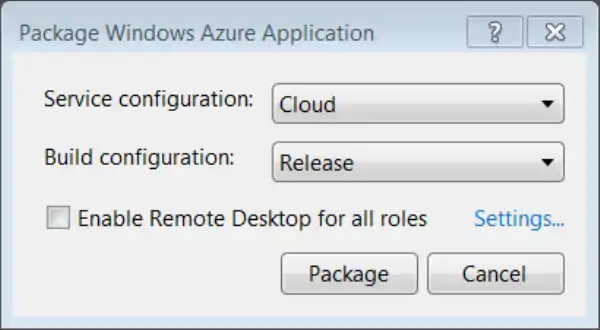
You will probably always select the cloud configuration and the release build configuration.
When Visual Studio is done packaging everything up, it will open the folder you need in Windows Explorer.

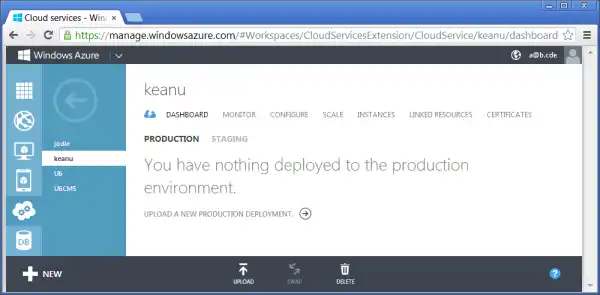
Visit the Azure portal, go to "Cloud Services", and find your "keanu" web role (or whatever you called yours). Click the "Upload" button.
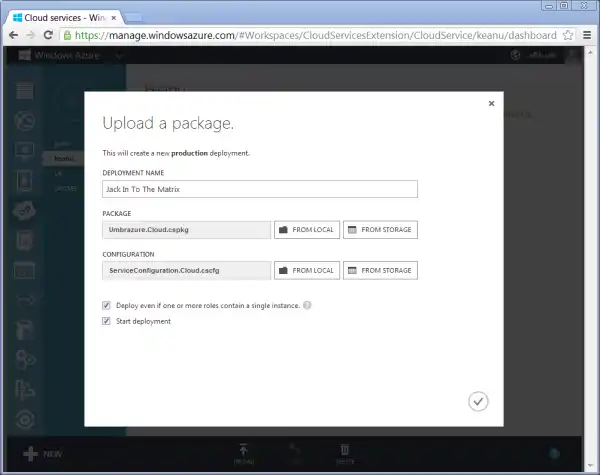
Fill in whatever name you want for the deployment, and select your package and configuration files from the folder that was opened in Windows Explorer for you by Visual Studio. Set the other options as shown and click the check mark button.
You can see the progress as your package uploads to the web role.
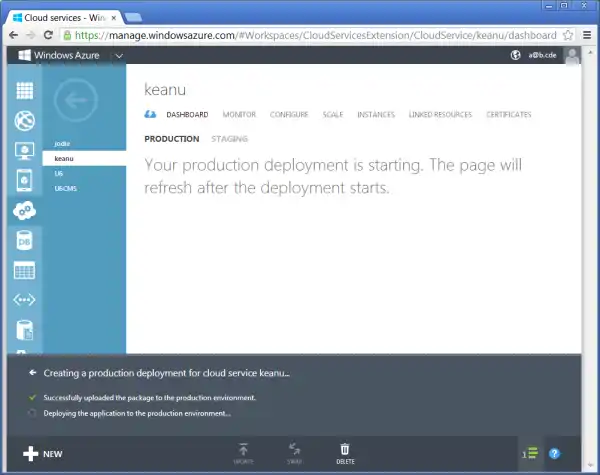
Once your package has been uploaded, it'll take about 10 minutes for the web role VM to "warm up". You can see the status here.
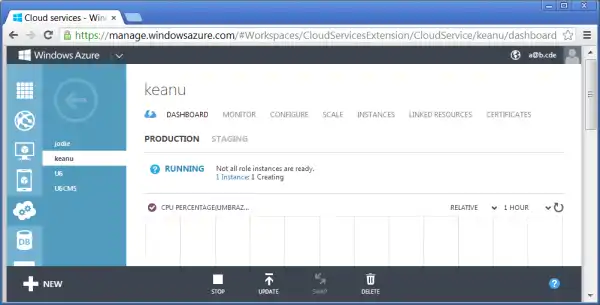
Looks like it finished, which means you can start using your web role.
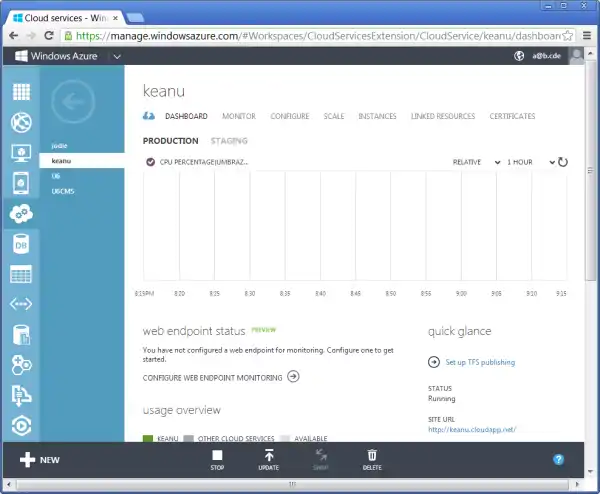
Just like when you ran it from Visual Studio, you will see an error if you try to go to the "home page".
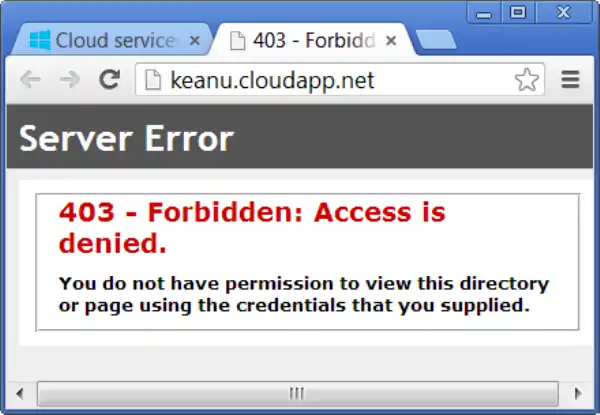
Instead, go to the path you setup with your route. Congratulations, you are an Azure web developer!
Domains
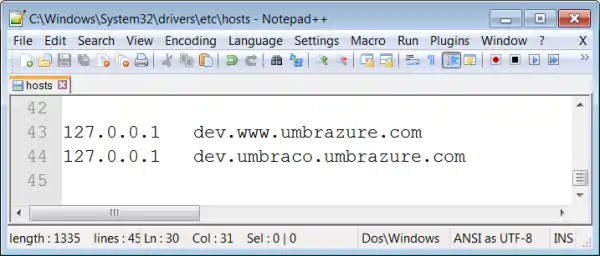
Rather than type in an IP address when you are debugging your cloud application in Visual Studio, you can see a domain. You do this by typing in an entry into your hosts file (path shown below). 127.0.0.1 is your local computer, and you can pick whatever domains you want.
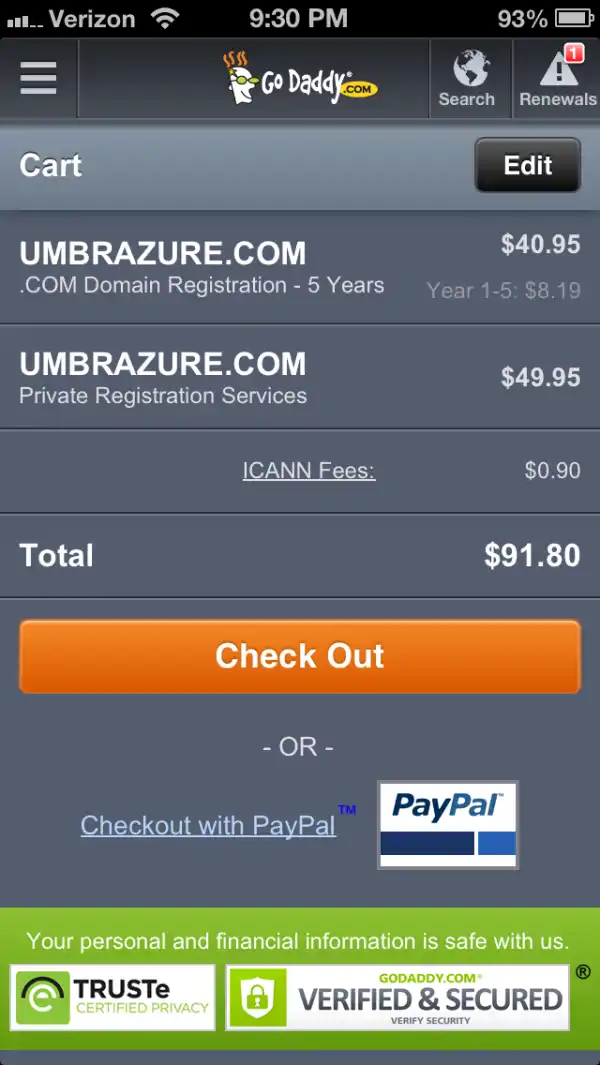
If you want others to see your site with a nice looking domain, the hosts file won't work. You'll have to register the domain with a registrar. Here, you can see I have registered umbrazure.com using the registrar GoDaddy. They are kind of garbage, but they're cheap if you buy lots fo domains like I do.
When people visit your newly registered domain, they won't see much, unless you add a CNAME record to point your site to Azure. Here, I am pointing www.umbrazure.com to jodie.cloudapp.net. Whenever somebody visits www.umbrazure.com, their request will be sent to jodie.cloudapp.net and they'll get a response as if they had visited that domain.
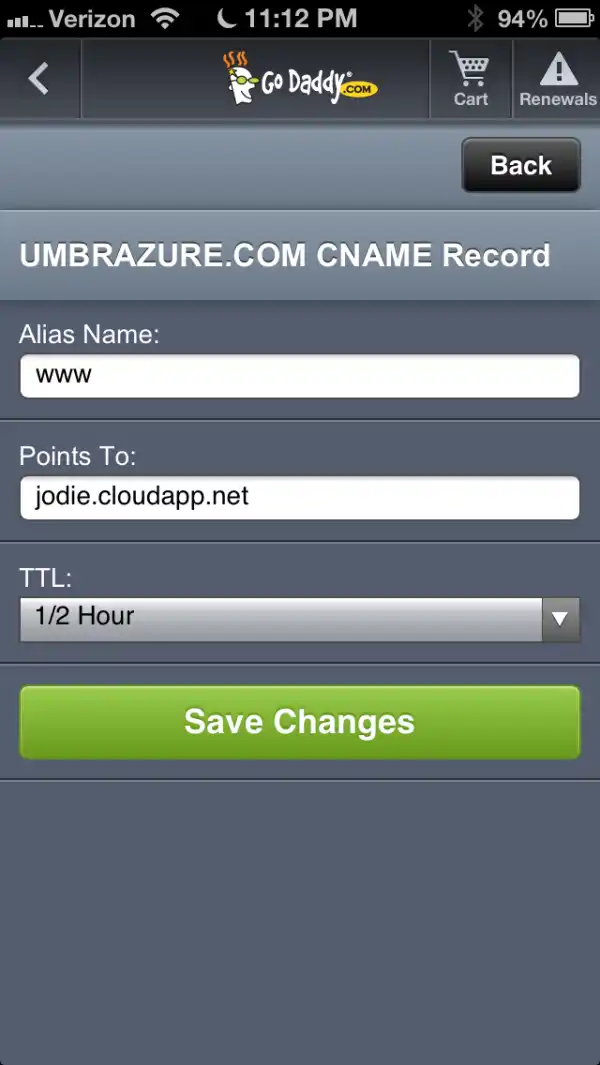
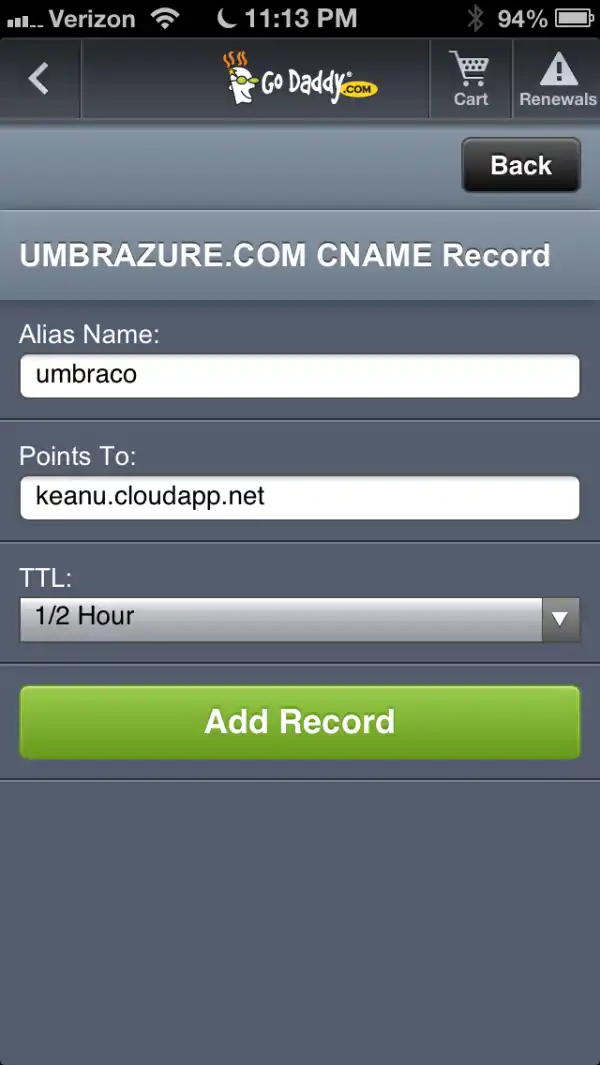
I created another CNAME record so that umbraco.umbrazure.com will point to my other web role, keanu.cloudapp.net. This is the subomdain I'll use to interact with Umbraco.
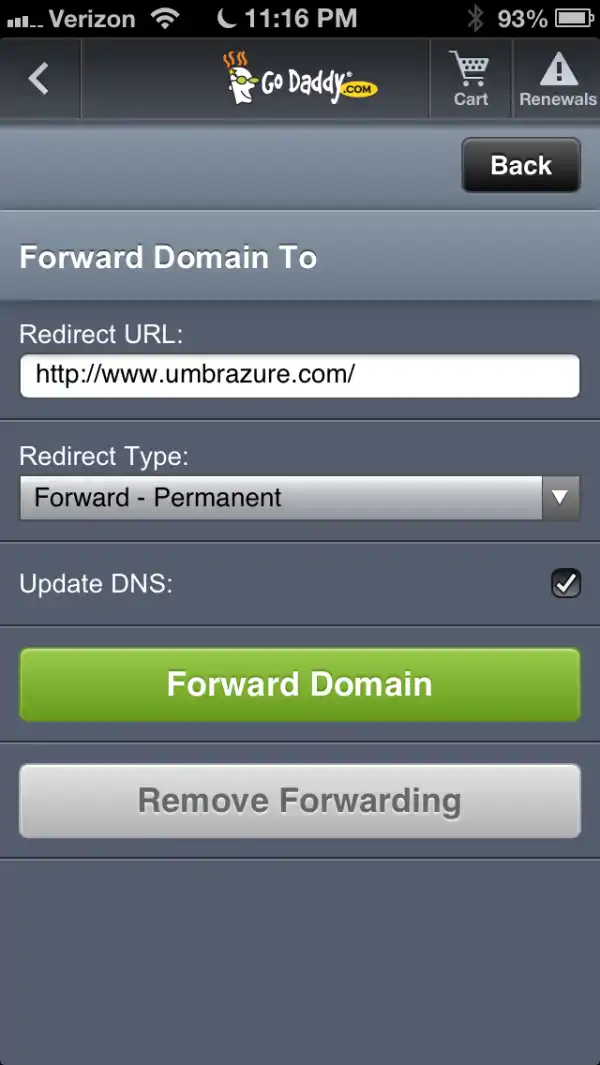
If somebody visits umbrazure.com without a subdomain, they won't see much. To fix that, you can create a domain forward so that they'll automatically be redirected to some subdomain. In this case, I am redirecting to www.umbrazure.com (the most common subdomain for websites).
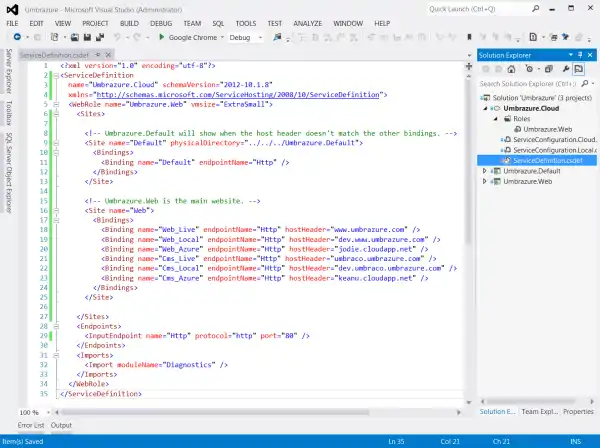
Each of your projects can bet setup to respond to requests for different domains. So, if a user types in "www.umbrazure.com", they'll see one website, and if they type in "umbraco.umbrazure.com", they may see another. You can also have multiple domains go to the same project, and so serve up the same website. Here, we are modifying the ServiceDefinition file so that all the known domains we are working with will be served up by the MVC 4 web role. Any other domain encountered will be served up by the "default" web application.
(Side note: The Code Project text editor won't HTML encode that XML snippet when I paste it, so just grab it from the download.)
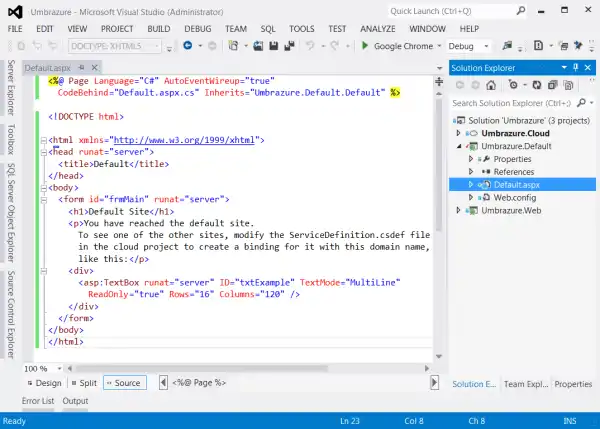
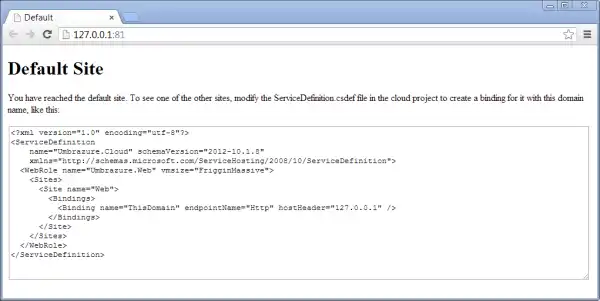
The default site is pretty boring as is, so we're going to add a web form page to it called "Default.aspx". Fill it in as shown below.
<%@ Page Language="C#" AutoEventWireup="true"
  CodeBehind="Default.aspx.cs" Inherits="Umbrazure.Default.Default" %>

<!DOCTYPE html>

<html xmlns="http://www.w3.org/1999/xhtml">
<head runat="server">
  <title>Default</title>
</head>
<body>
  <form id="frmMain" runat="server">
    <h1>Default Site</h1>
    <p>You have reached the default site.
      To see one of the other sites, modify the ServiceDefinition.csdef file
      in the cloud project to create a binding for it with this domain name,
      like this:</p>
    <div>
      <asp:TextBox runat="server" ID="txtExample" TextMode="MultiLine"
        ReadOnly="true" Rows="16" Columns="120" />
    </div>
  </form>
</body>
</html>
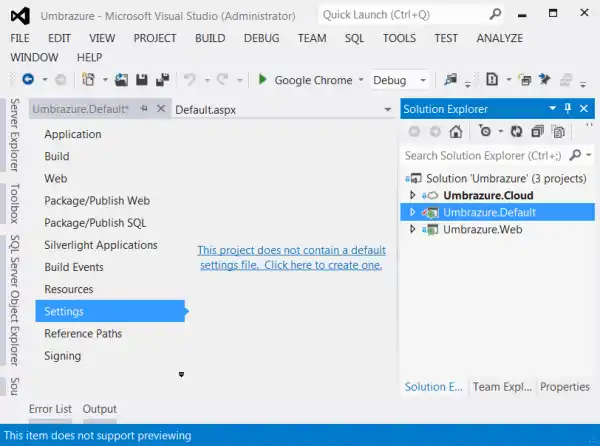
Go to the properties for your default project, click the "Settings" tab, and click the link to create a settings file.
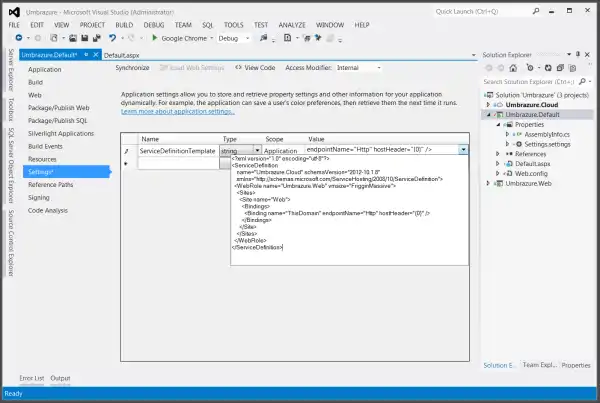
Add a string setting, ServiceDefinitionTemplate, with the value shown below.
(Site note: again, the Code Project article editor can't handle the XML snippet, so go to the download.)
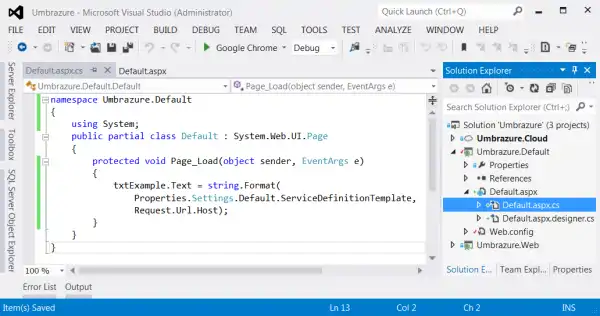
Modify your code behind for your Default page so that it matches that which is shown below.
namespace Umbrazure.Default
{
    using System;
    public partial class Default : System.Web.UI.Page
    {
        protected void Page_Load(object sender, EventArgs e)
        {
            txtExample.Text = string.Format(
                Properties.Settings.Default.ServiceDefinitionTemplate,
                Request.Url.Host);
        }
    }
}
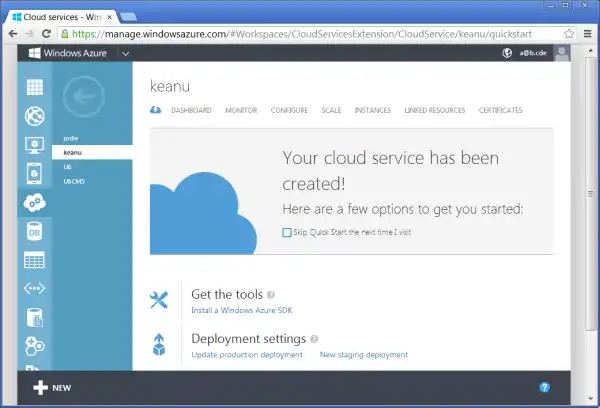
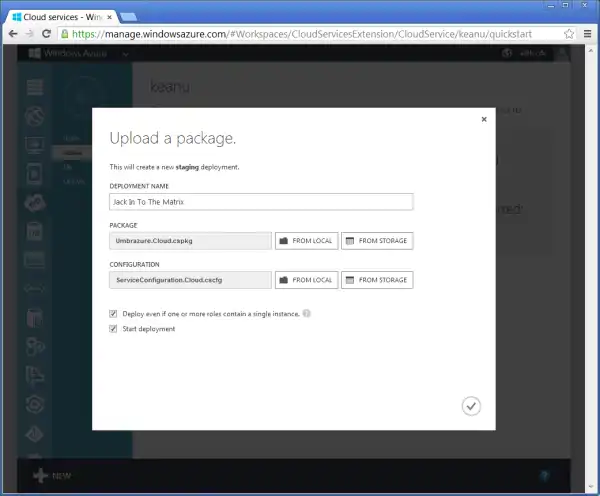
Go back to your keanu web role in Azure, but this time click "New staging deployment". Staging deployments have randomly assigned URL's. That way, you can test your code before you actually move it to production.
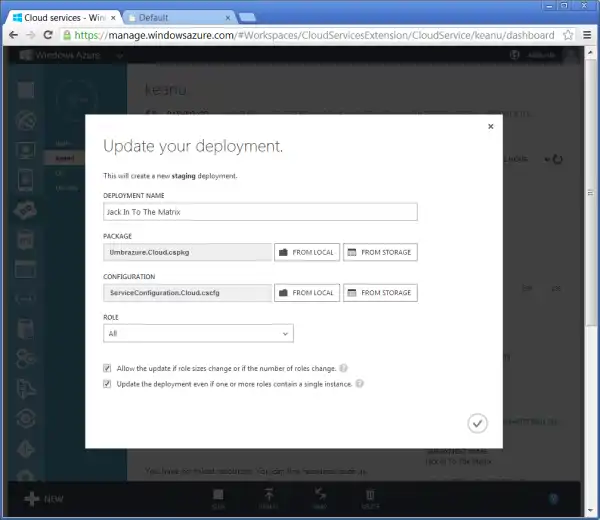
Package up your cloud project like you did before, and upload a staging deployment with the details shown below.
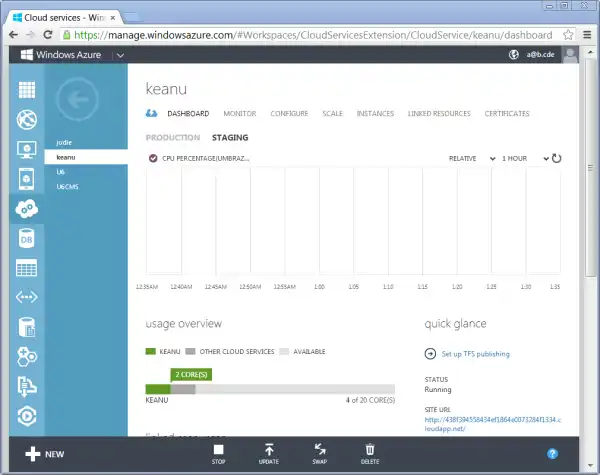
Once the project has uploaded, you will see the staging URL (bottom right of the image below). Click it.
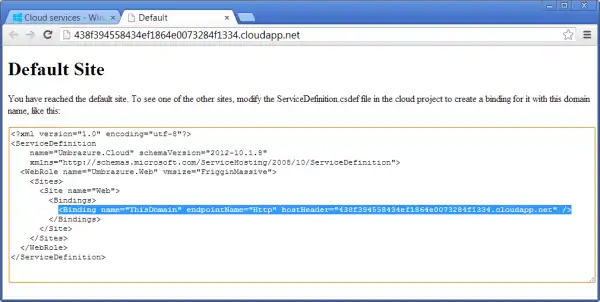
Your staging URL will open in a new tab. Since the URL was just generated, we are seeing our default site. However, we setup our default site previously so that it shows us the binding we need to add in order for the MVC 4 site to show up.
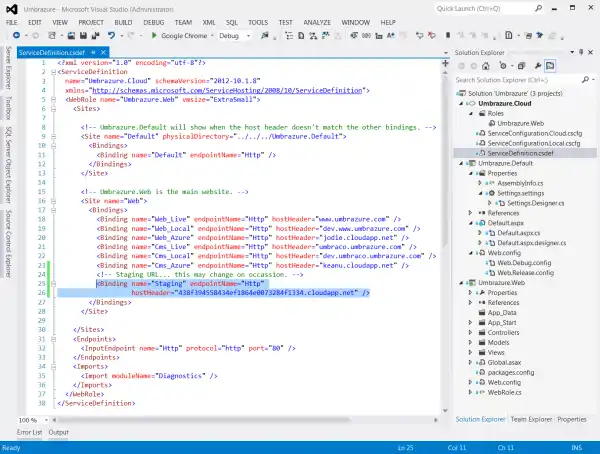
Grab that binding from above, and put it into your ServiceDefinition file as shown below. You'll probably want to modify the name (I called mine "Staging").
Package up your cloud project again (now that it includes the staging URL binding) and update your staging deployment.
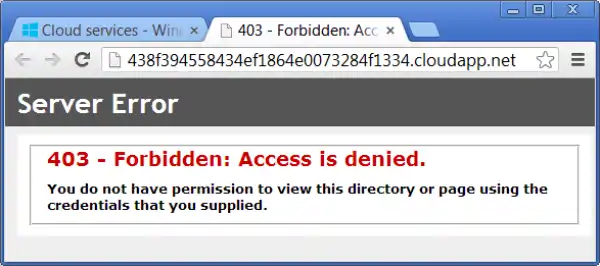
Hey, now the staging site is showing the same error as the MVC 4 site. What gives?
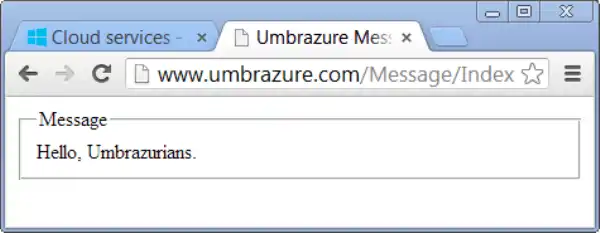
If we navigate to the route we setup, we can see our Index view. By creating a staging deployment, using the temporary URL to create a new binding, and updating the staging deployment, we were able to indicate that we want to see the MVC4 site on this staging deployment. Neat!

If you wait a few hours for the DNS to resolve your CNAME entry and you upload yor package to the jodie web role, you will be able to see your site on the real live domain (rather than the funky cloudapp.net domain). Keep in mind this domain can be whatever you want to register (so long as it's available). You can also point multiple sites to the same web role (I am just using different subdomains because it's cheaper... CNAME records don't cost anything).
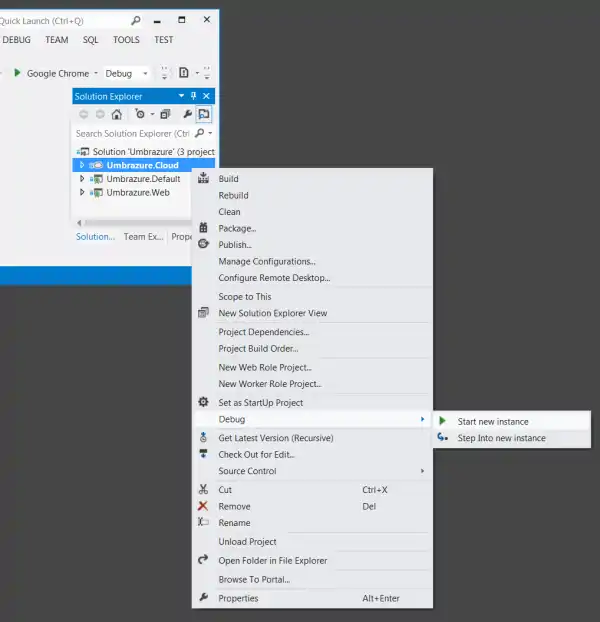
Next, start debugging your cloud project.
You'll see the default project, because you are visiting the site by its IP address.
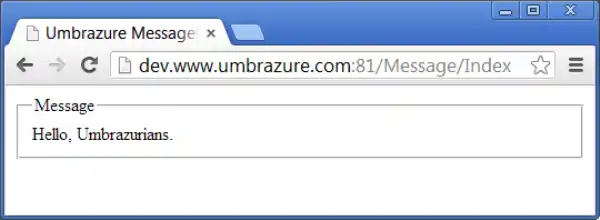
However, since you added that hosts entry earlier, you can also visit the site you are debugging by a development domain. Look, it works! Since you setup a binding for this development domain, the emulator is serving up traffic from your MVC 4 project.
Umbraco Integration
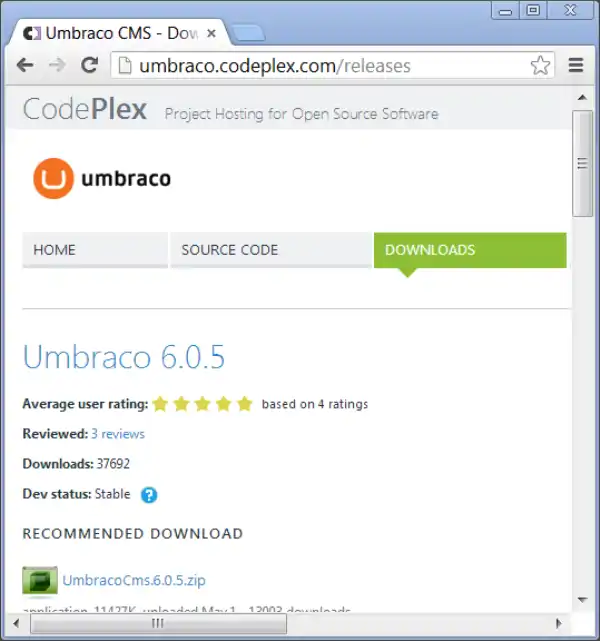
Now that you are comfortable working with Azure in general, it's on to the tricky bit. Umbraco integration. You can start by downloading Umbraco from umbraco.codeplex.com/releases. You want that ZIP file under "recommended download". Well, unless...
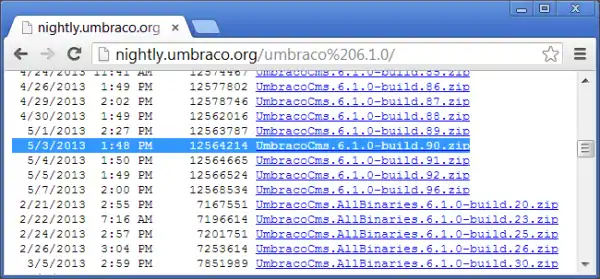
I like to live life on the bleeding edge, so I chose to download a nightly build of Umbraco. You can find those at nightly.umbraco.org. I downloaded build 90 of version 6.1.0. If you want to follow along exactly with this article, I recommend you download that one. However, in the future, you may want to download the latest and greatest. If you do that, though, you may encounter some bugs, and I may not be able to help you out much with figuring them out.
Once the ZIP file downloads, click the link to open the folder it downloaded to.
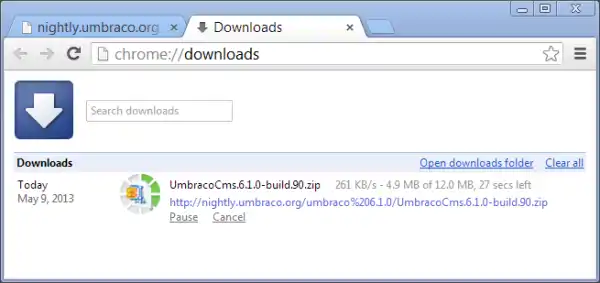
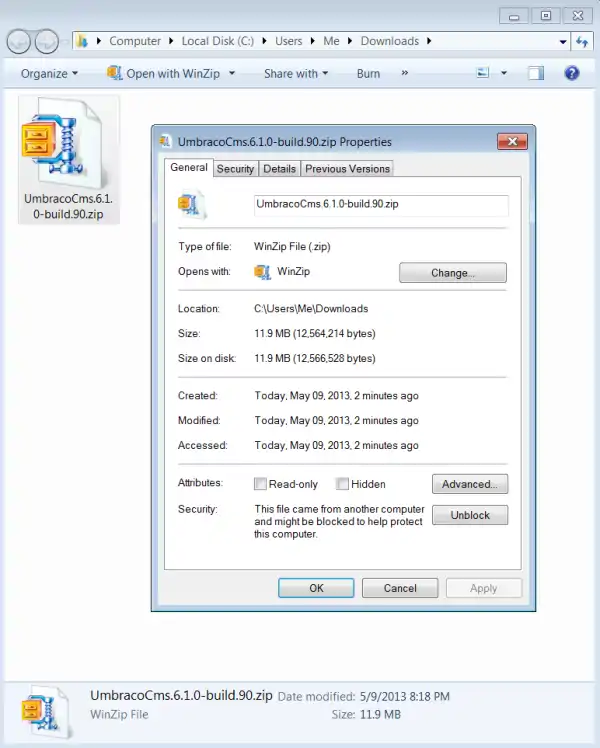
It may not seem like it, but this step can be really important. Right click the ZIP file to access its properties. Make sure to unblock the ZIP file before you unzip it, or you may run into funky permission issues.
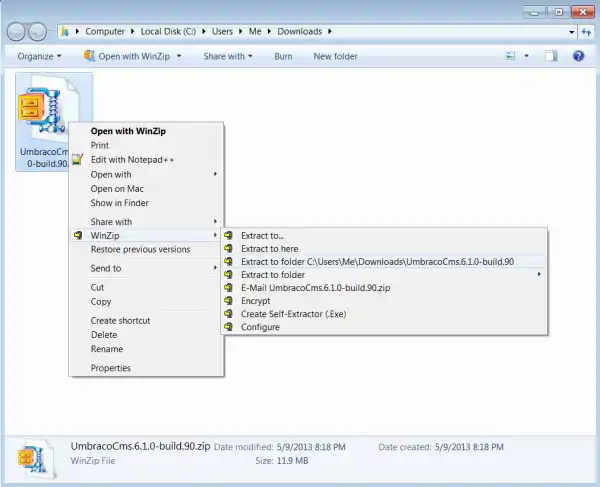
Extract the ZIP file to a folder.
These are the files in the folder you extracted to. This is Umbraco.
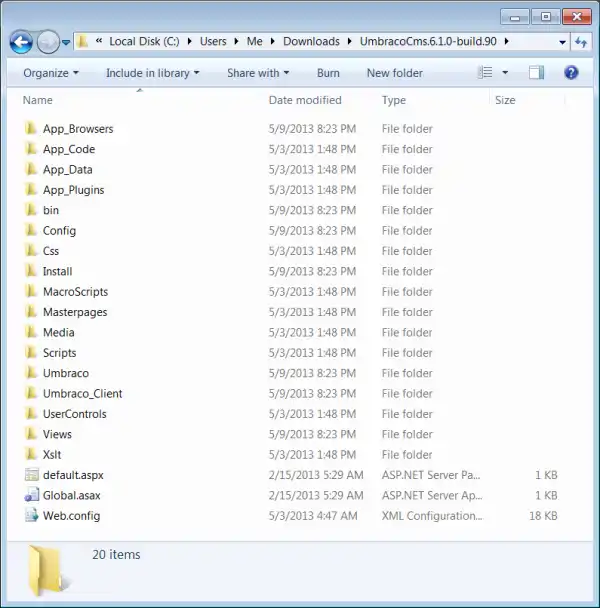
You are going to integrate Umbraco into your MVC 4 project. Start by copying all the new files and folders into your project folder (by "new", I mean the ones that don't already exist in the project folder). I have highlighted them in the below picture.
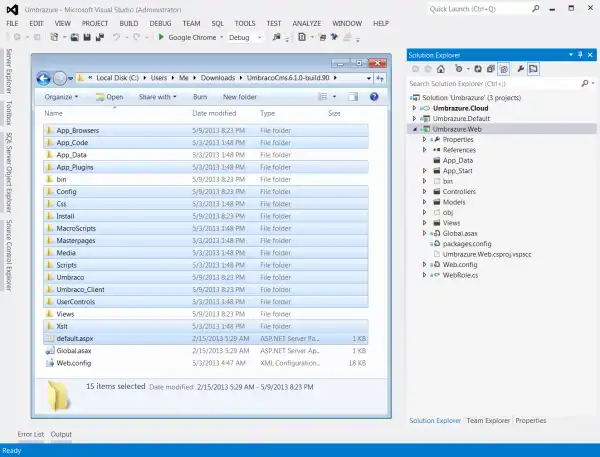
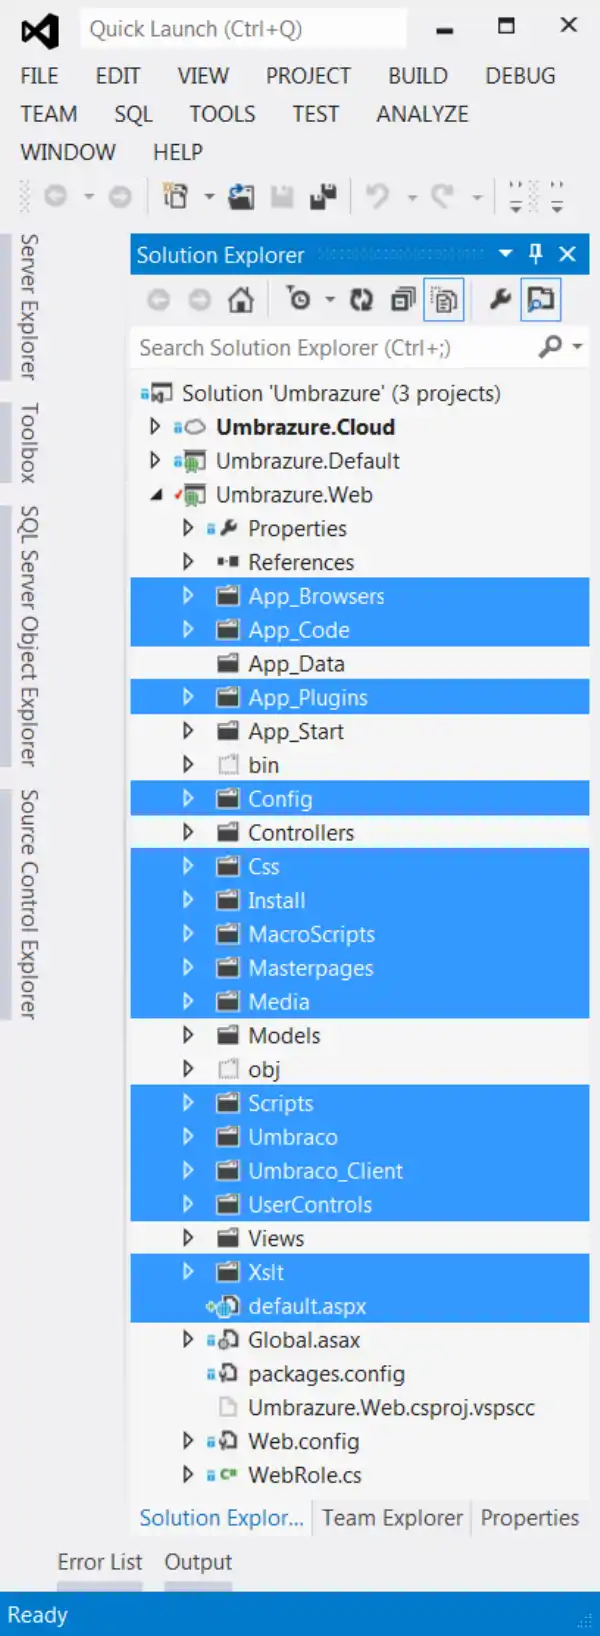
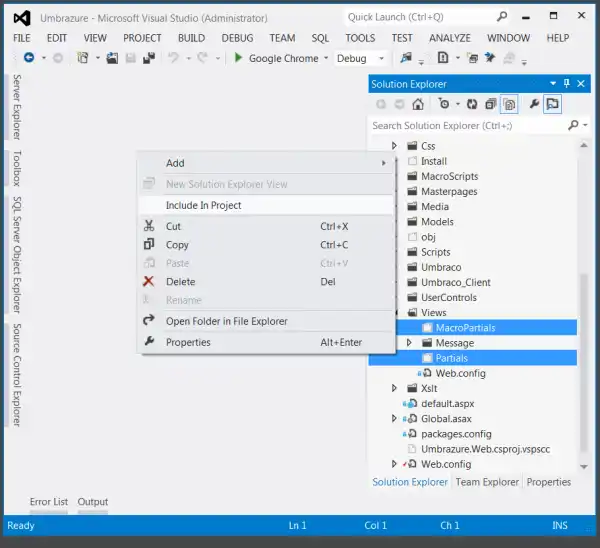
Next, "include" the files and folders in your project by right clicking them and selecting "Include" in Visual Studio. If you don't see them at first, click the "Refresh" button (it's that one with two arrows chasing each other in a circle).
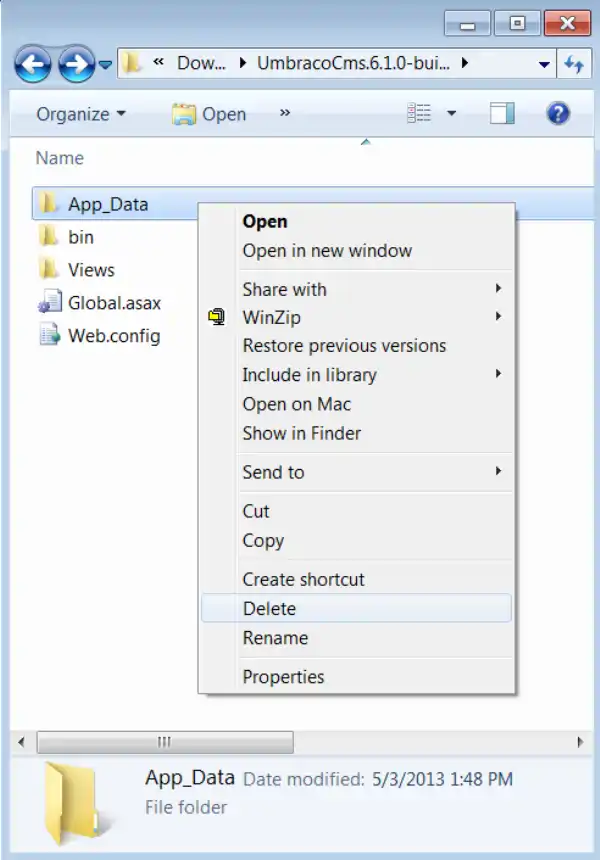
Umbraco's App_Data folder is empty, so you can just delete it (leave the one in the MVC 4 project intact, however).
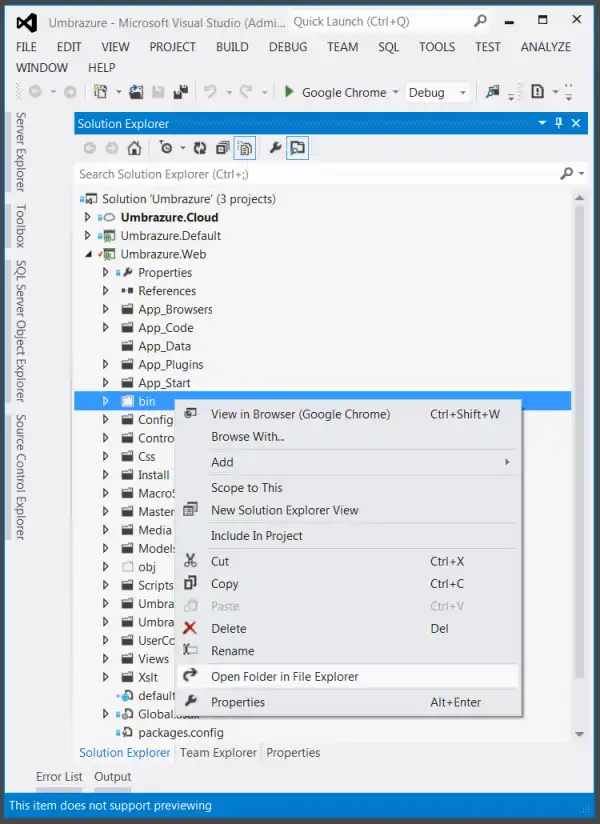
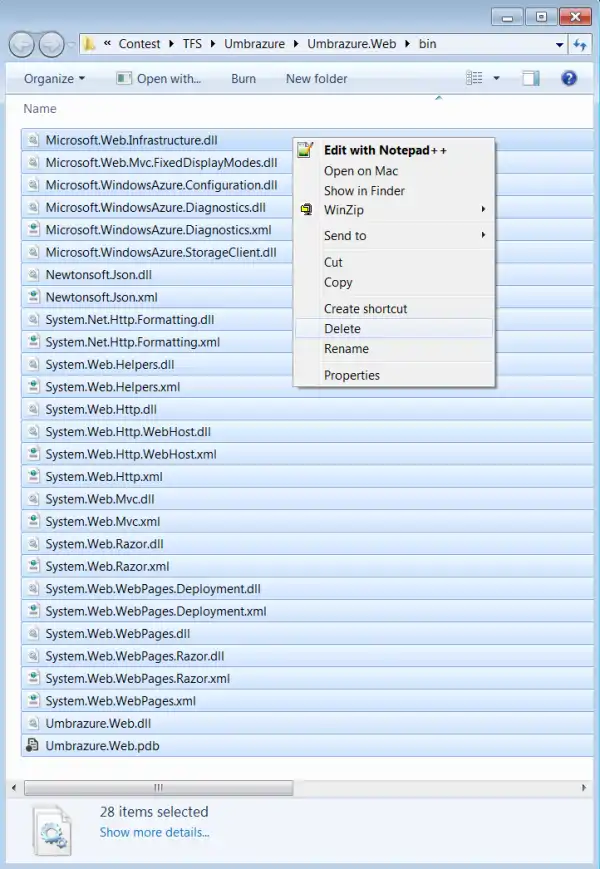
Open the destination bin folder in Windows Explorer.
Delete all the files in there. This will make the next step easier.
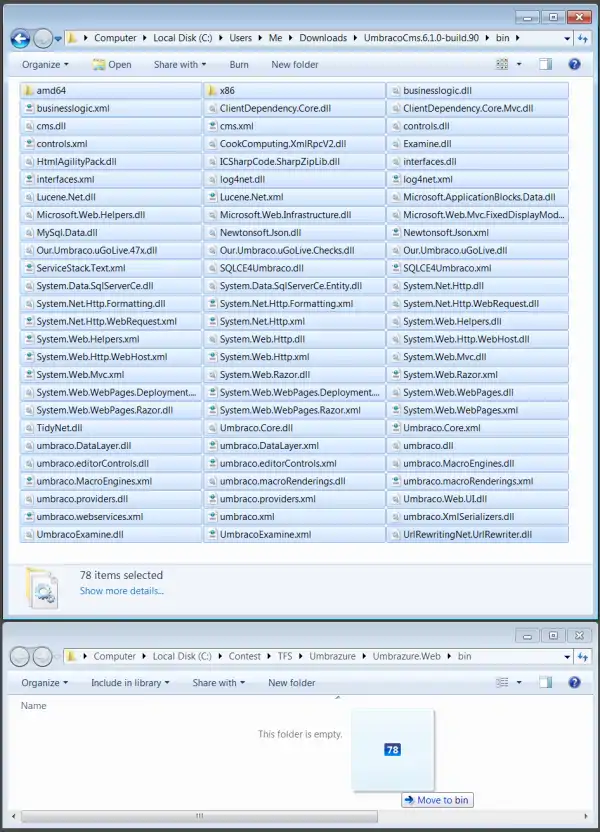
Move all the files in the Umbraco bin folder into your MVC 4 project bin folder.
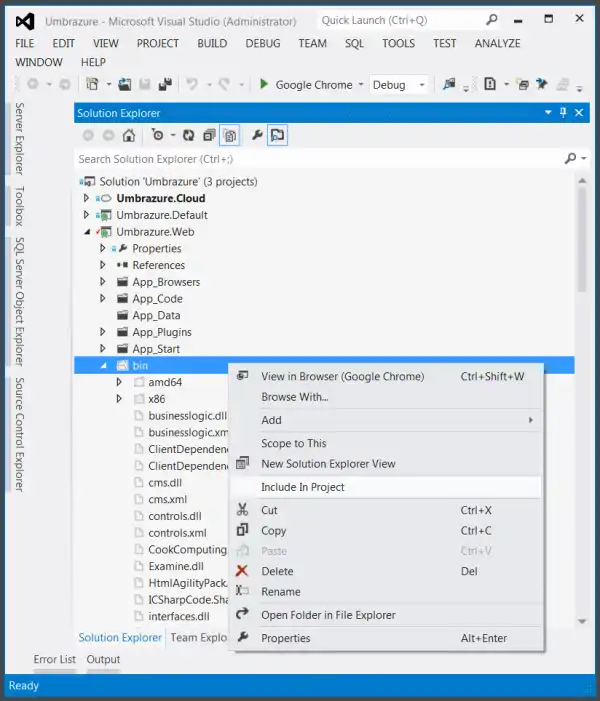
Refresh in Visual Studio and then include everything in the bin file into the project.
You could spend a bunch of time trying to merge up the web.config files, but it seems to work if you just overwrite the MVC 4 web.config with the Umbraco version.
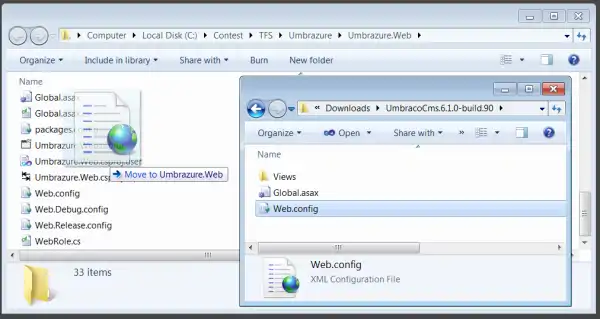
The Views folder has its own web.config. Again, overwrite the MVC 4 project's version with Umbraco's web.config in the Views folder. Ignore the web.config.transform file... it's just a leftover from the Umbraco build process that they haven't cleaned up.
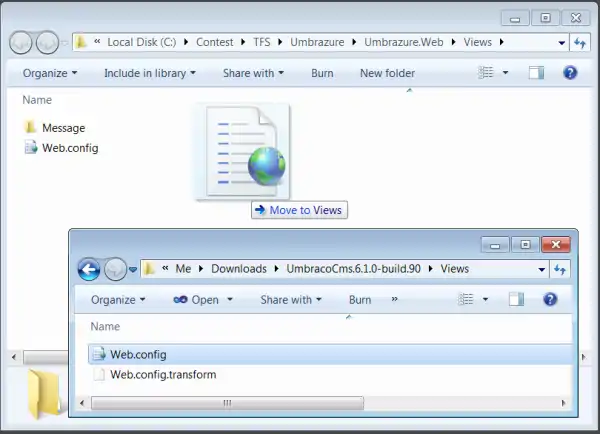
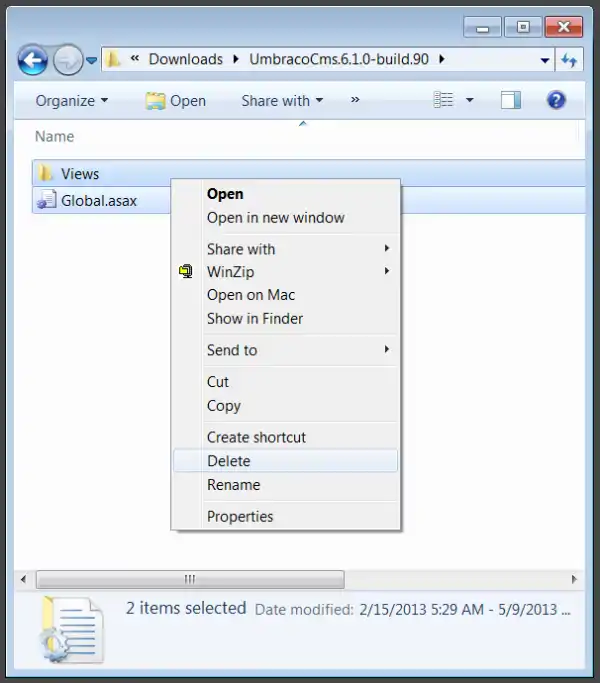
You can ignore the rest of the Umbraco files/folders... you already have what you need in the MVC 4 project.
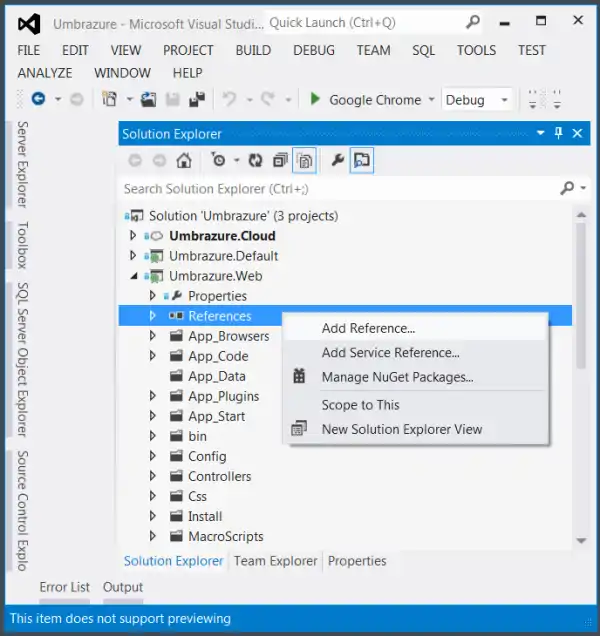
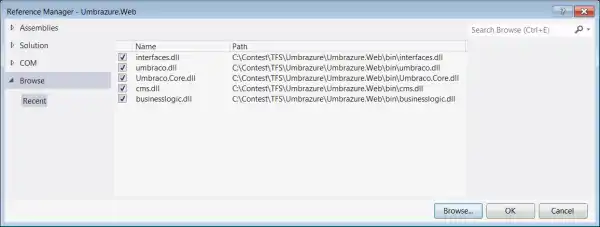
To work with the Umbraco API, we'll need to add some references.
You are going to add a reference for each of these 5 files in your bin folder. They are all Umbraco DLL's.
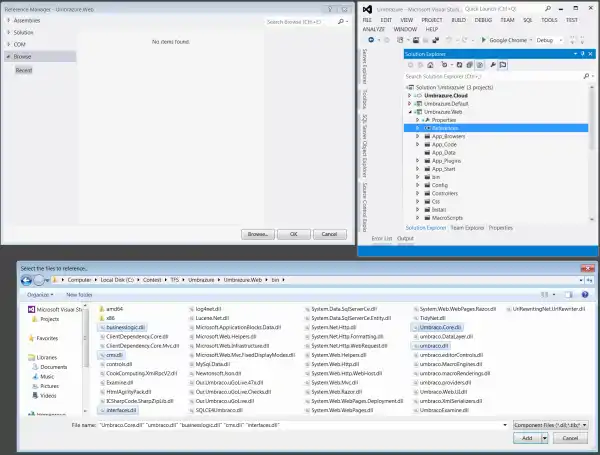
These are the 5 references you should add.
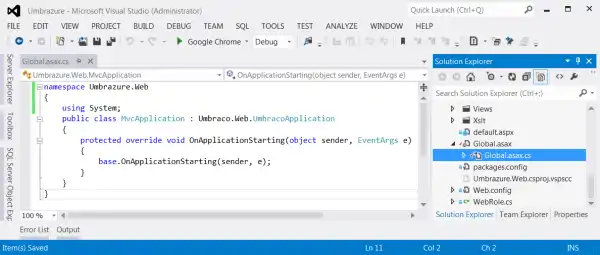
To make your Global.asax.cs file Umbraco-friendly, modify it as shown below. We will be extending this later.
namespace Umbrazure.Web
{
    using System;
    public class MvcApplication : Umbraco.Web.UmbracoApplication
    {
        protected override void OnApplicationStarting(object sender, EventArgs e)
        {
            base.OnApplicationStarting(sender, e);
        }
    }
}
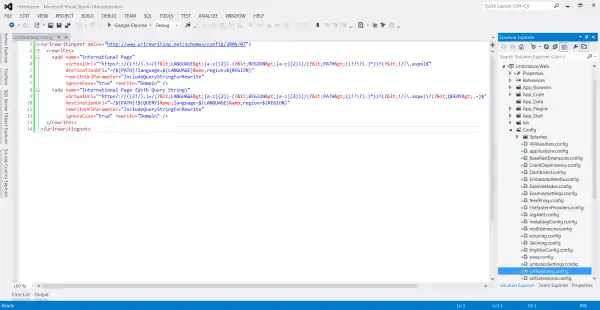
To have nice international URL's, modify your UrlRewriting.config file as shown below. This will make it so you can specify the language and region at the beginning of the URL rather than as a query string.
(Sorry, can't paste again.)
For ASP.NET Web Forms postbacks to work properly, you'll need to modify your Form.browser file as shown below.
(I'm not even going to mention the Code Project editor issues from now on; they're too frequent.)
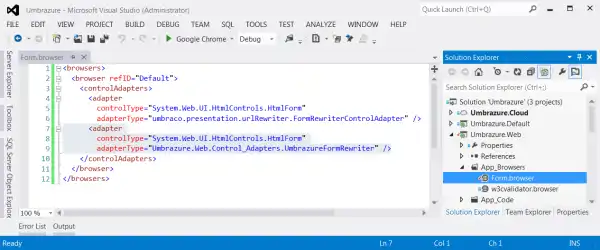
The above file shows a class that doesn't exist yet, so we're going to create it. Start by creating a "Control_Adapters" folder.
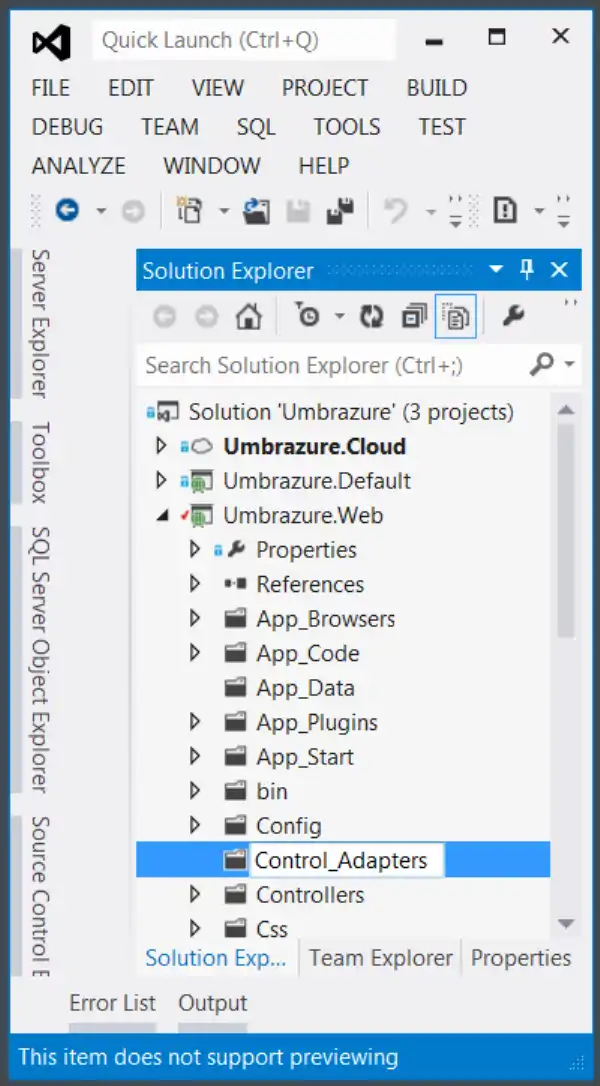
Inside that folder, create a class called UmbrazureFormRewriter.
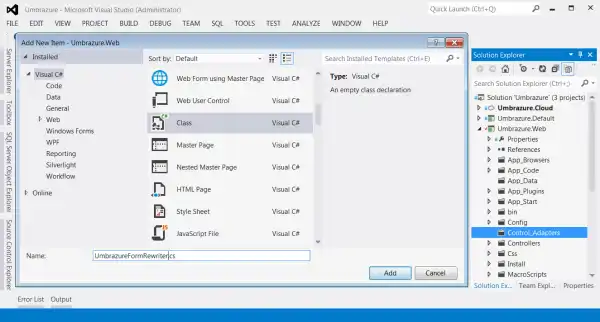
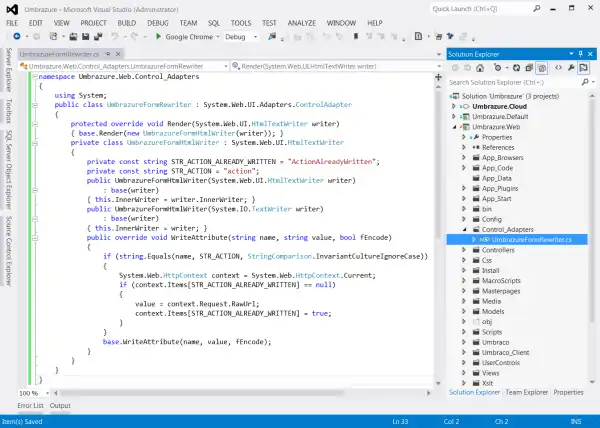
Fill in the class as shown below. This makes it so that any form tags will have their action attribute set to the expected URL that the user sees rather than the rewritten URL that the server sees after URL rewrite rules are applied.
namespace Umbrazure.Web.Control_Adapters
{
    using System;
    public class UmbrazureFormRewriter : System.Web.UI.Adapters.ControlAdapter
    {
        protected override void Render(System.Web.UI.HtmlTextWriter writer)
        { base.Render(new UmbrazureFormHtmlWriter(writer)); }
        private class UmbrazureFormHtmlWriter : System.Web.UI.HtmlTextWriter
        {
            private const string STR_ACTION_ALREADY_WRITTEN = "ActionAlreadyWritten";
            private const string STR_ACTION = "action";
            public UmbrazureFormHtmlWriter(System.Web.UI.HtmlTextWriter writer)
                : base(writer)
            { this.InnerWriter = writer.InnerWriter; }
            public UmbrazureFormHtmlWriter(System.IO.TextWriter writer)
                : base(writer)
            { this.InnerWriter = writer; }
            public override void WriteAttribute(string name, string value, bool fEncode)
            {
                if (string.Equals(name, STR_ACTION, StringComparison.InvariantCultureIgnoreCase))
                {
                    System.Web.HttpContext context = System.Web.HttpContext.Current;
                    if (context.Items[STR_ACTION_ALREADY_WRITTEN] == null)
                    {
                        value = context.Request.RawUrl;
                        context.Items[STR_ACTION_ALREADY_WRITTEN] = true;
                    }
                }
                base.WriteAttribute(name, value, fEncode);
            }
        }
    }
}
We are finally ready to see the fruits of our labor. Build the solution. Cloud projects are funny... you should always build the solution before you run a cloud project. I'm not sure if it's still this way, but it used to be that if you didn't do this you might get your cloud project running an old version of your other projects.
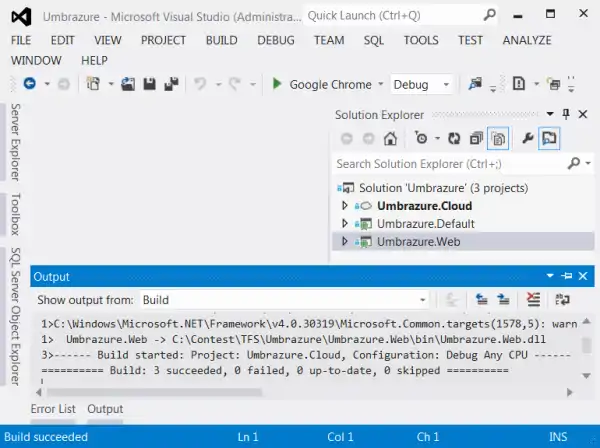
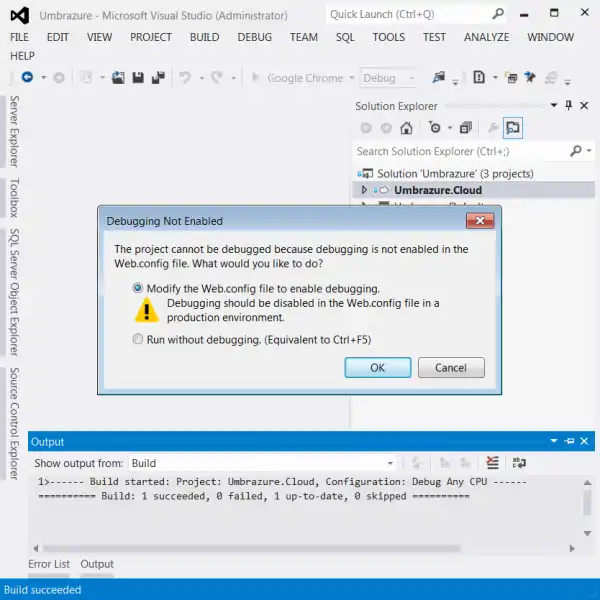
Go ahead an enable debugging (the Umbraco web.config had it disabled).
Umbraco Installation
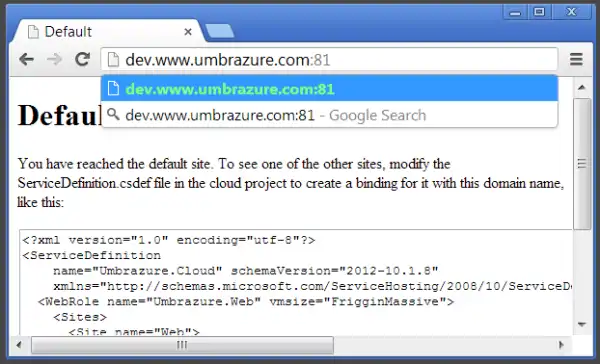
When the web page loads with the IP address, modify it to instead be your dev domain.
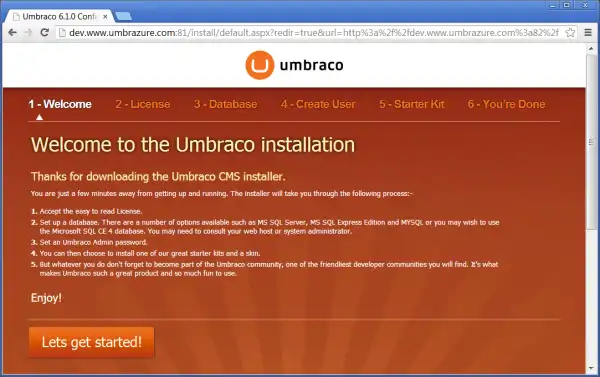
Progress! This is the Umbraco installation page. Click the button to proceed.
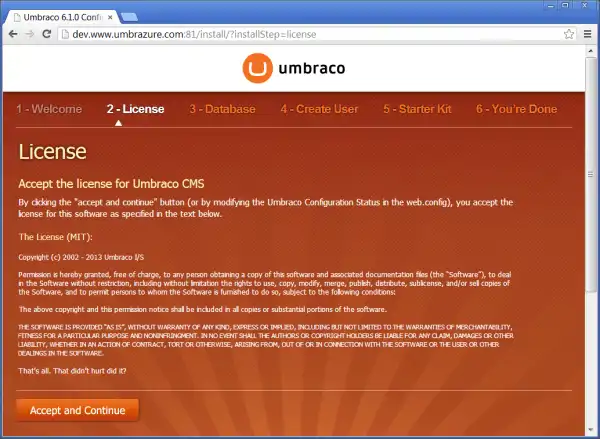
I'm sure you'll read every word of this page. Once you are done, proceed to the next page.
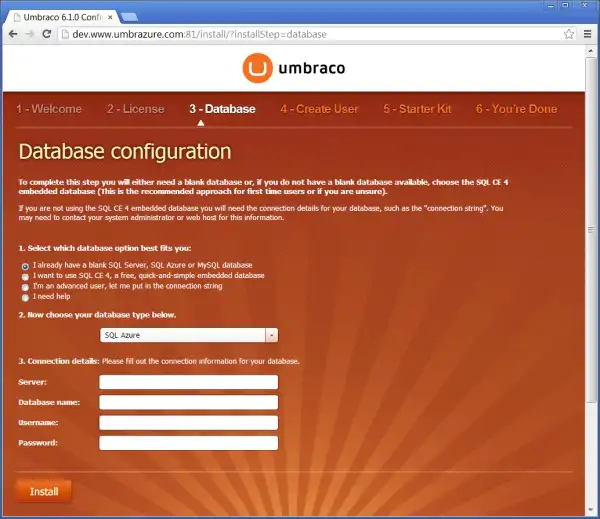
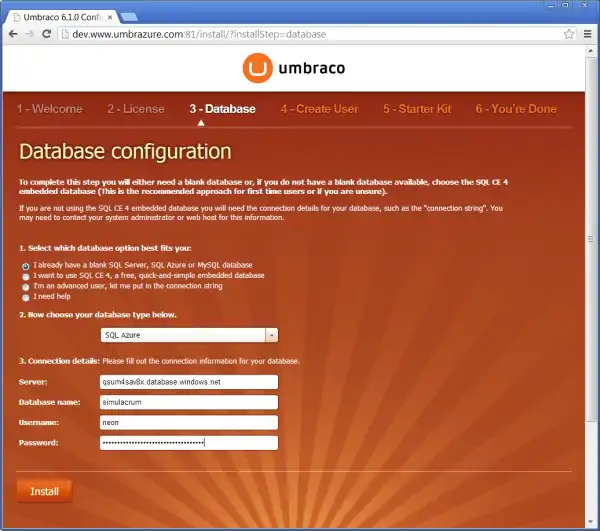
The most annoying install step; filling out the database information. Azure makes this easy, however...
In the management page for your Umbraco page in the Azure portal, you can click the link at the bottom to view connection strings.
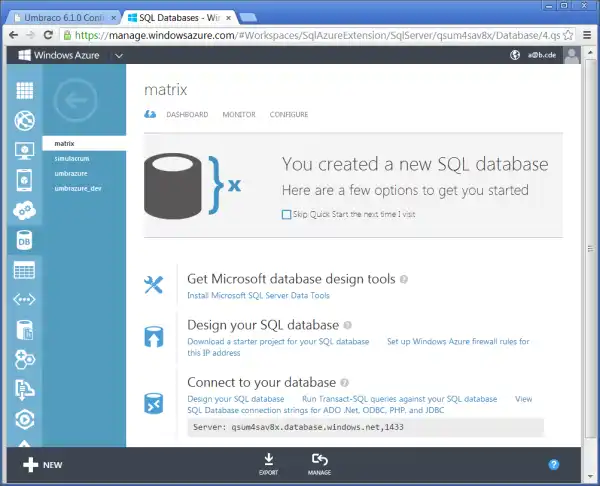
You can see almost all the information you need to fill out the form in the Umbraco installer.
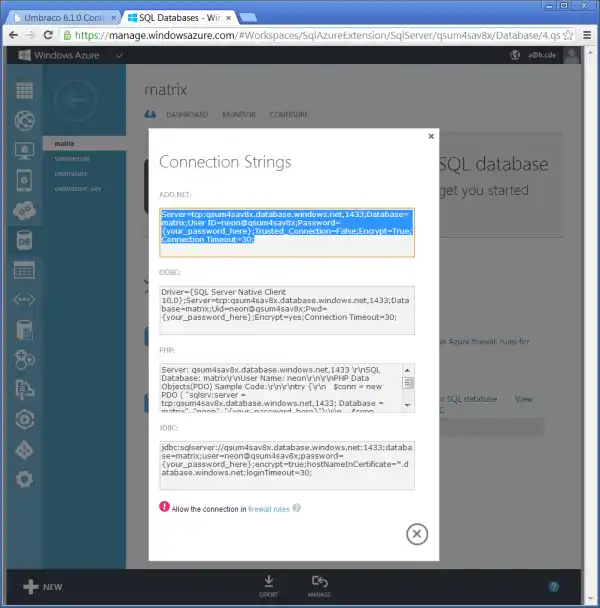
Go ahead and fill in the details from the connection string. Hopefully you remembered that password you created when you created the database.
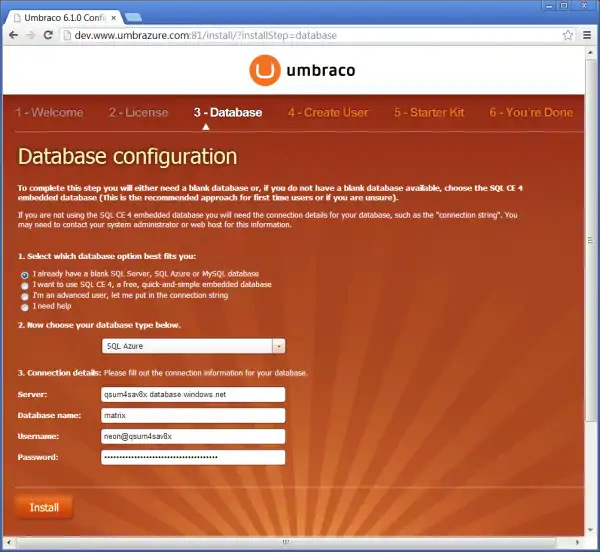
This install step could take a minute or two.
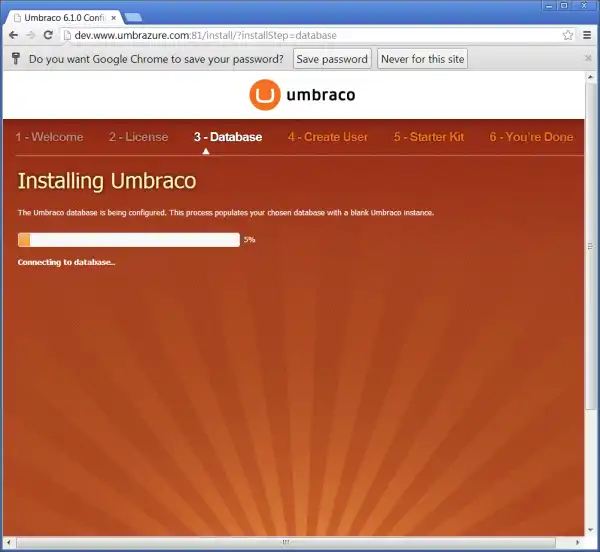
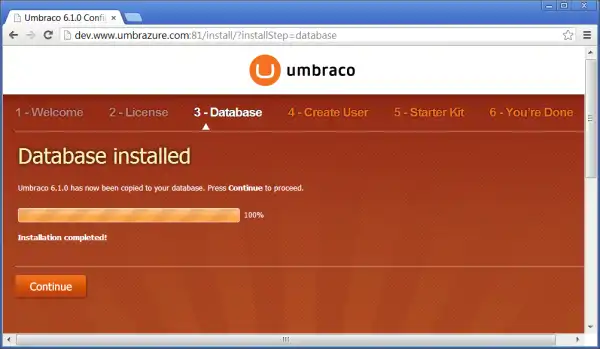
A rare site indeed... success on the first try!
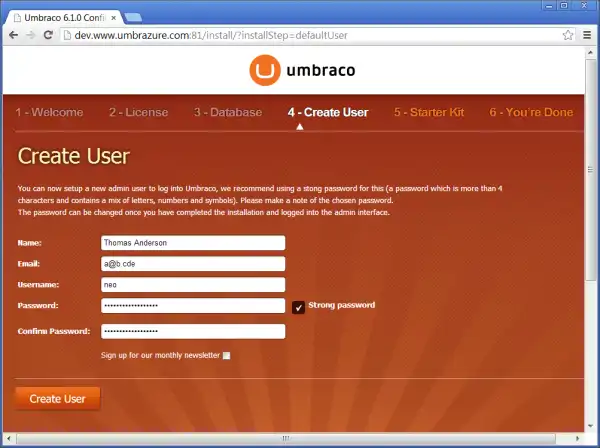
Umbraco wants you to create a user that you'll use to log into the Umbraco CMS page. Enter whatever credentials you would like and create your user.
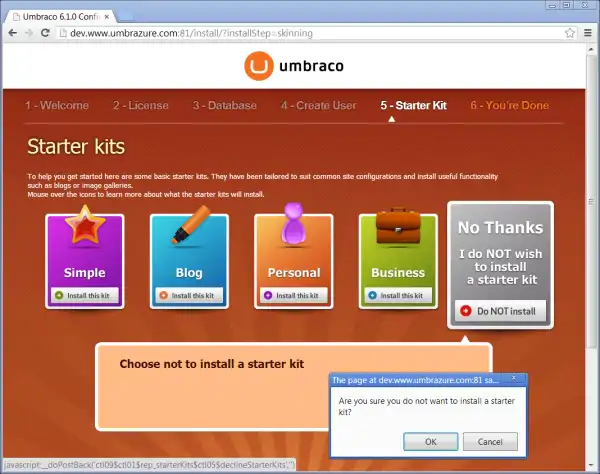
You can have Umbraco create a site for you, but we aren't going to take that route, as we want everything to be custom. Start from scratch by not installing a starter kit.
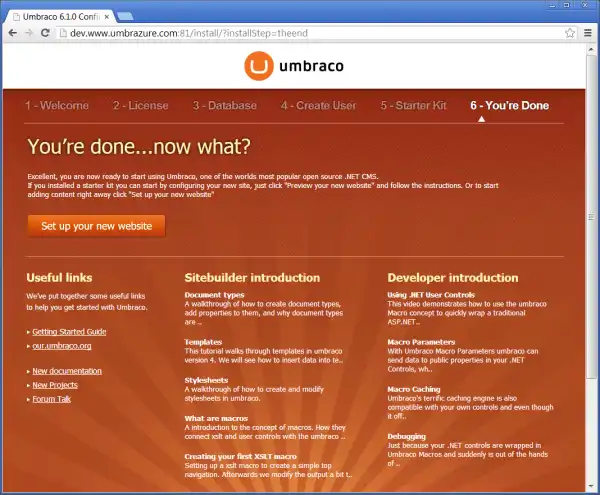
And just like that, you've setup Umbraco. Click the button to see the Umbraco UI.
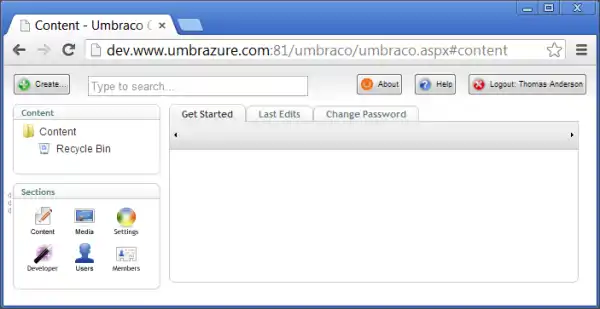
This is what Umbraco looks like. This is called the "Content section". You visit different sections by clicking the icons at the bottom left of the page.
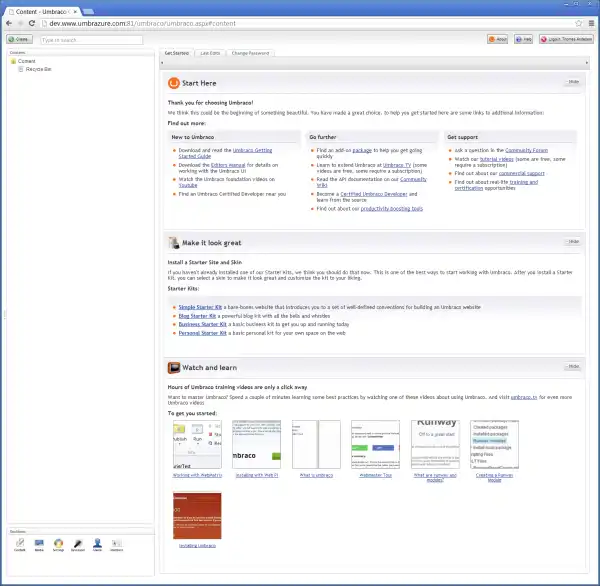
You can also click the "Hide" buttons to hide those funky widgets.
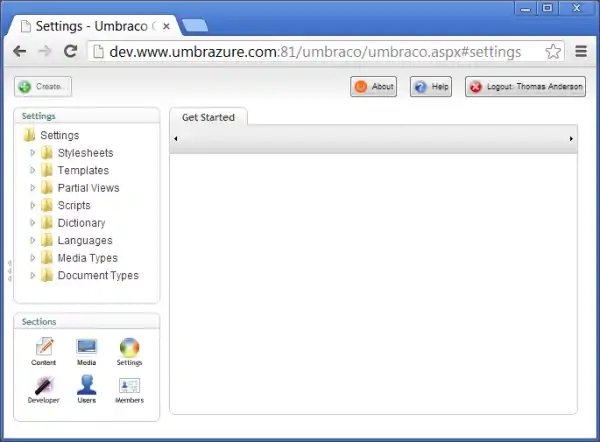
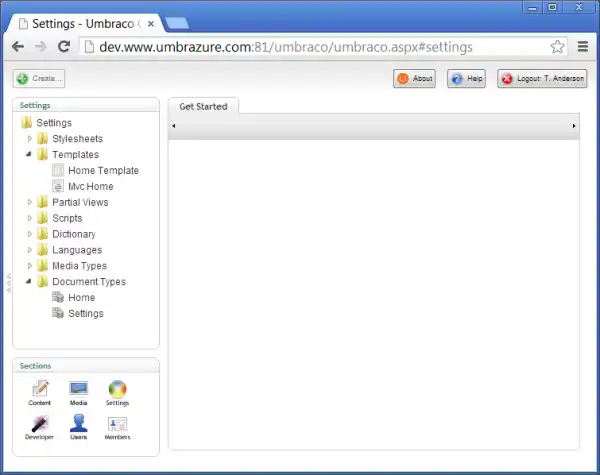
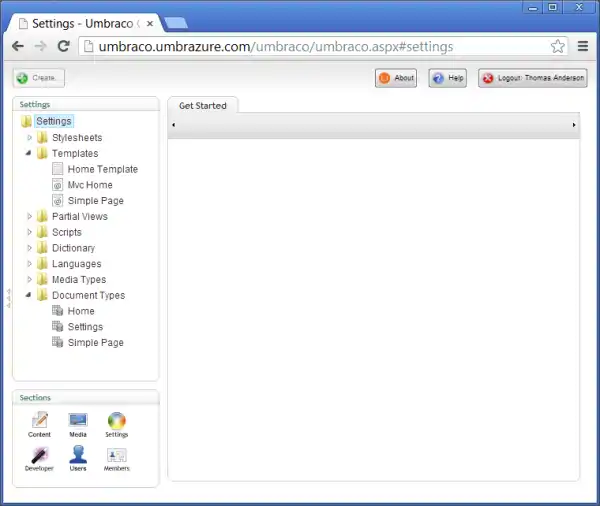
This is the "Settings" section. This is where developers spend a lot of their time.
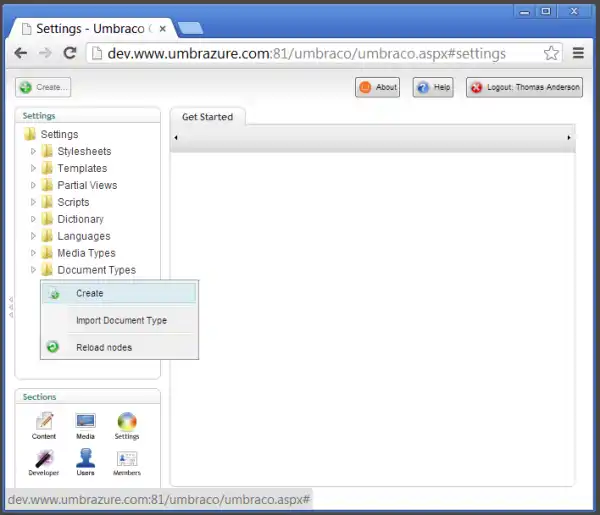
You're going to be creating what Umbraco calls a "Document Type" (or "DocType" for short). You can think of this as a class. It defines the structure of data. The data is what you enter in the "Content" section, and the "Document Type" is what indicates the type of things you can enter as content.
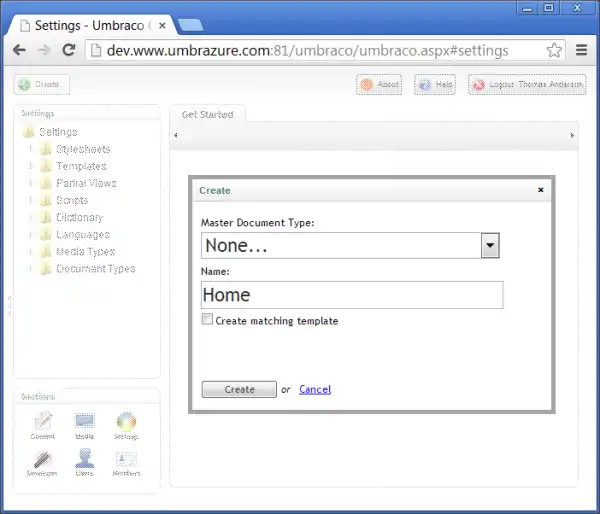
Call this doctype "Home". Make sure you uncheck the box to create a matching template.
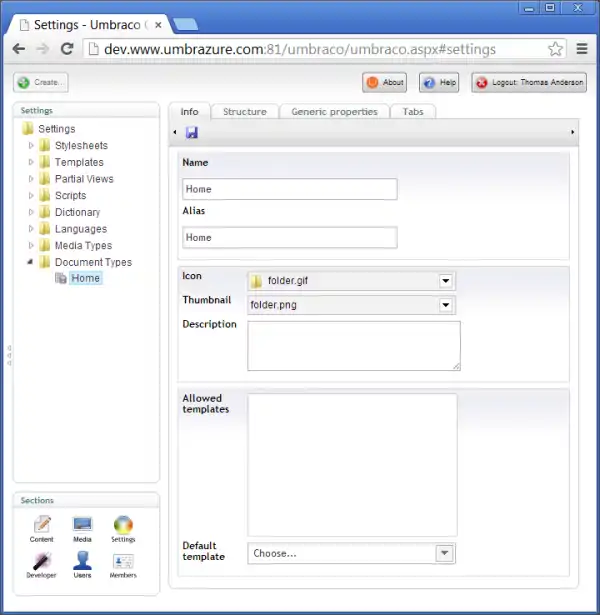
Here is your "Home" doctype.
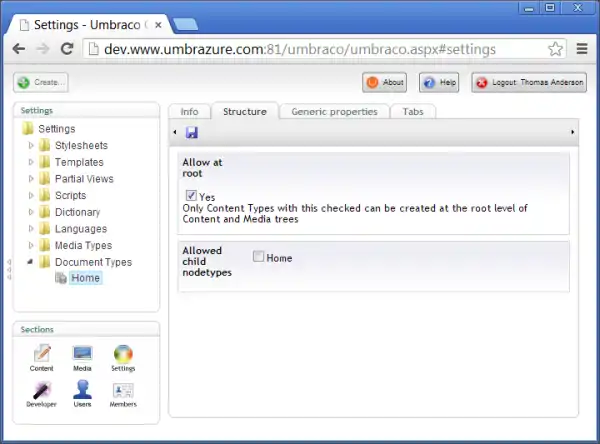
Go to the "Structure" tab. Check the box to allow at root, then click the save icon at the top of the page (under the tabs). By doing this, you allow any content node created with the "Home" doctype to be created at the highest level.
Next, create a template. A template is what Umbraco uses to refer to two different ASP.NET concepts: masterpages and views. A new feature in Umbraco is that a template can be either of those, but by default it will create a masterpage.
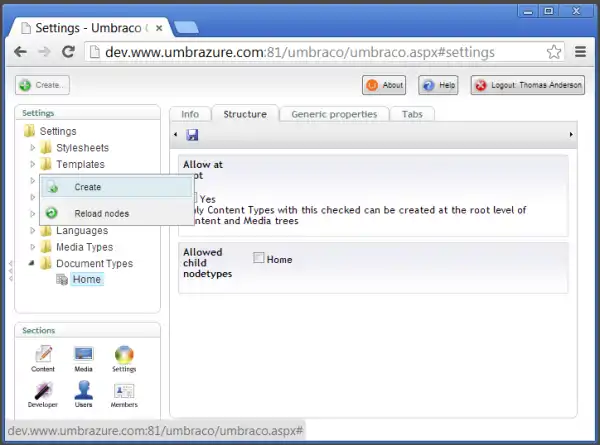
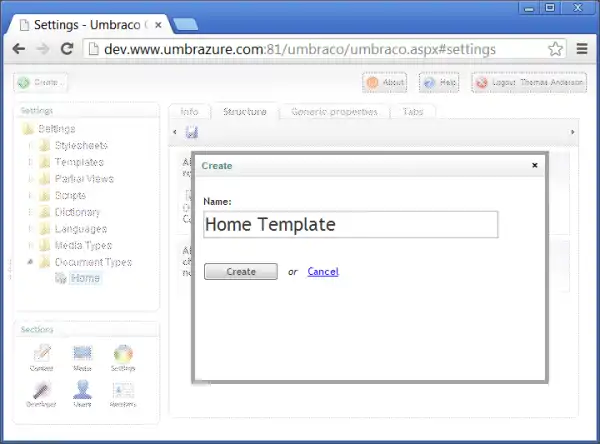
Call your template "Home Template".
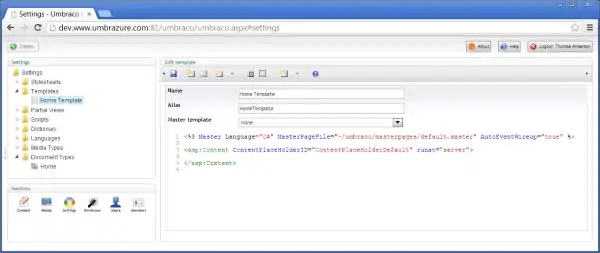
This is the template (aka masterpage) you get by default. It's a little empty, if you ask me.
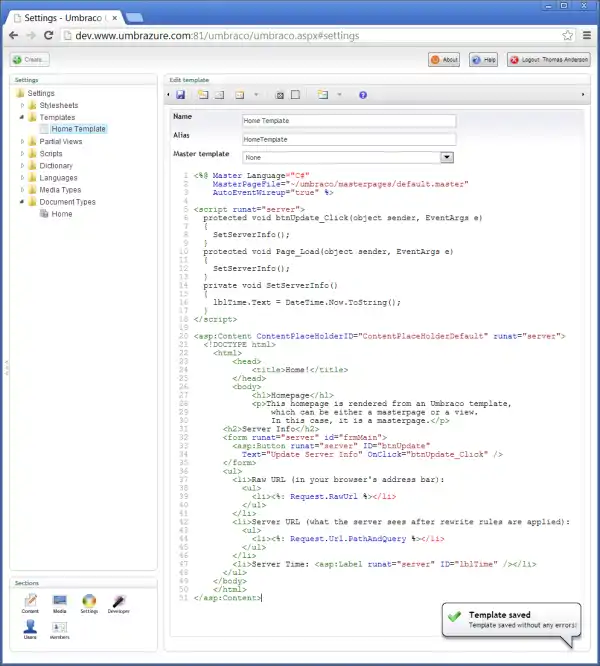
Fill in your template with the markup shown below. This is a page that gives the user some info about the server.
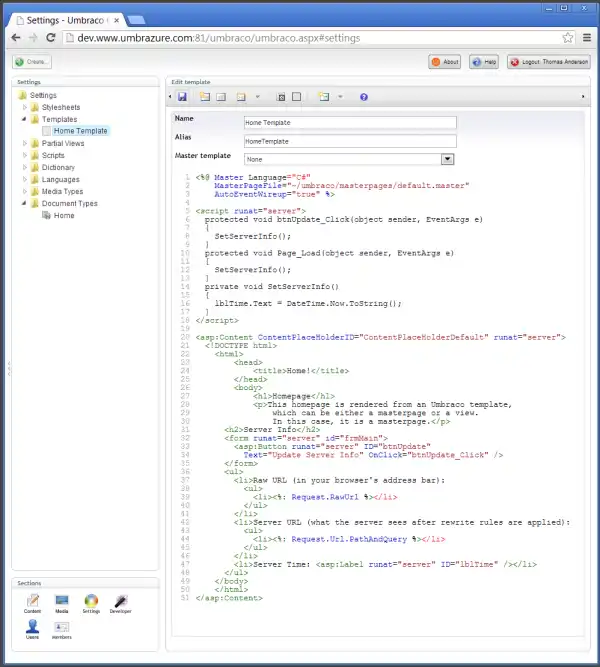
Once you are done, click the "Save" icon. Whenever you save, Umbraco shows a little balloon notification when the operation is complete.
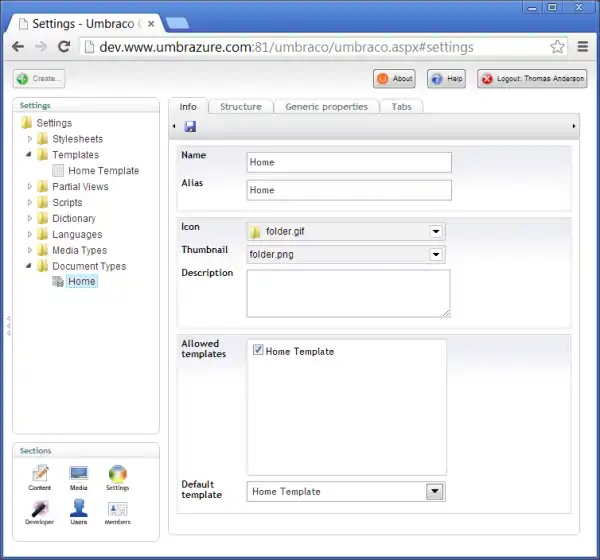
Go back to your "Home" doctype and select "Home Template" to be an allowed template. This means that when you create a content node from this doctype, you can choose to present it using the "Home Template" masterpage.
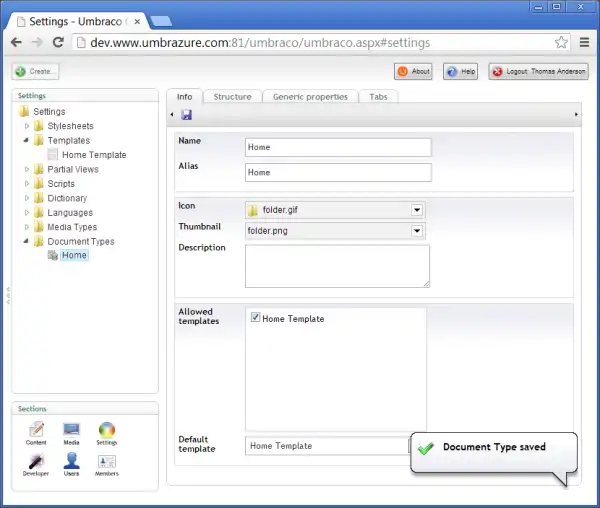
Remember to save; you won't be warned if you navigate away, and your changes will be lost.
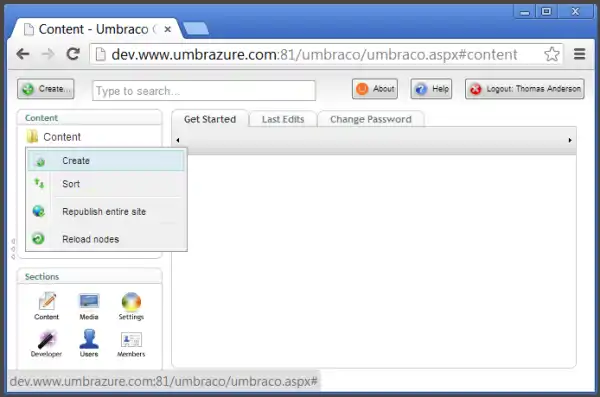
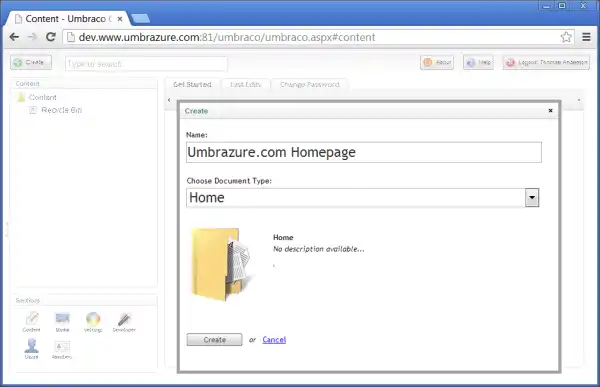
Now that you have created your doctype and template, you can finally create some content, which is the heart of any CMS.
Name your content node whatever you want. This will serve as your homepage.
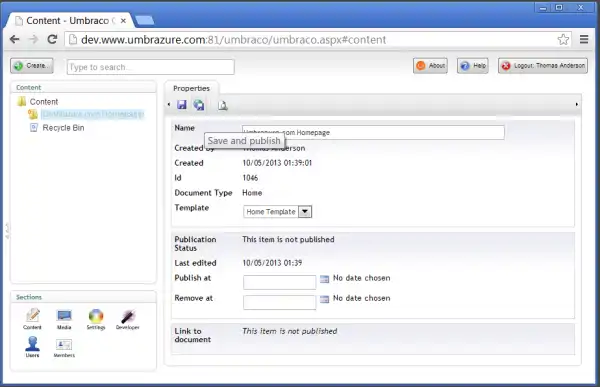
Content can either be "saved" or "published". If you save it, that content will be stored to the Umbraco database, but it will not appear on the site. If you publish it, the content will be made visible on the site. Go ahead and publish.
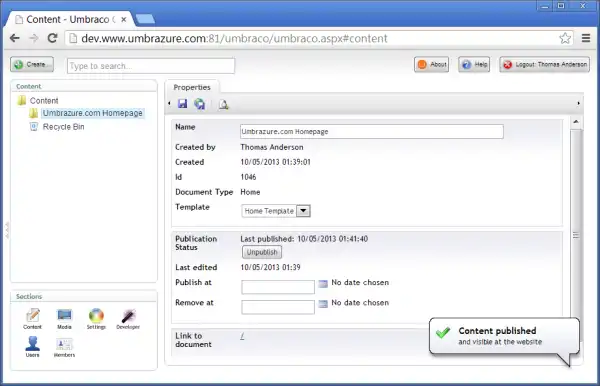
Your notification letting you know the content is published. Notice the node changed color too.
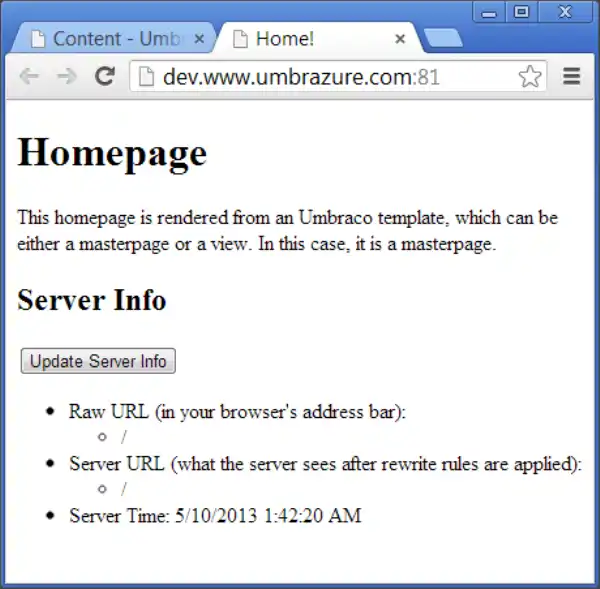
If you click the "link to document" shown above, you'll see the homepage open in a new tab. What's neat is that this is an ASP.NET web forms masterpage running out of an MVC 4 project. Umbraco can mix and match MVC and Web Forms.
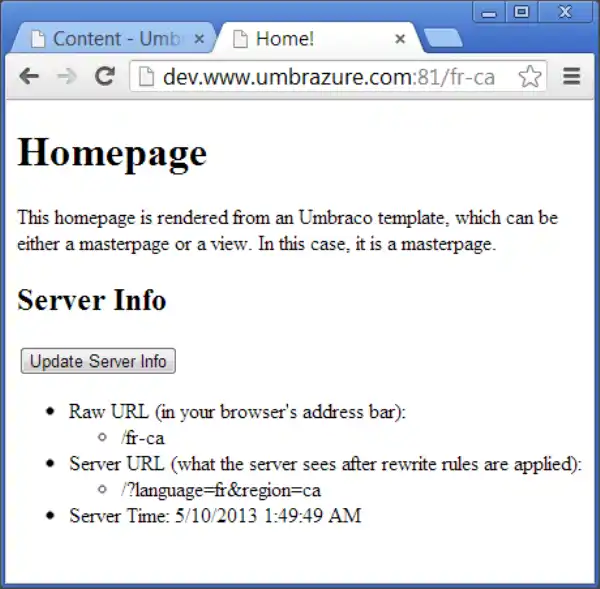
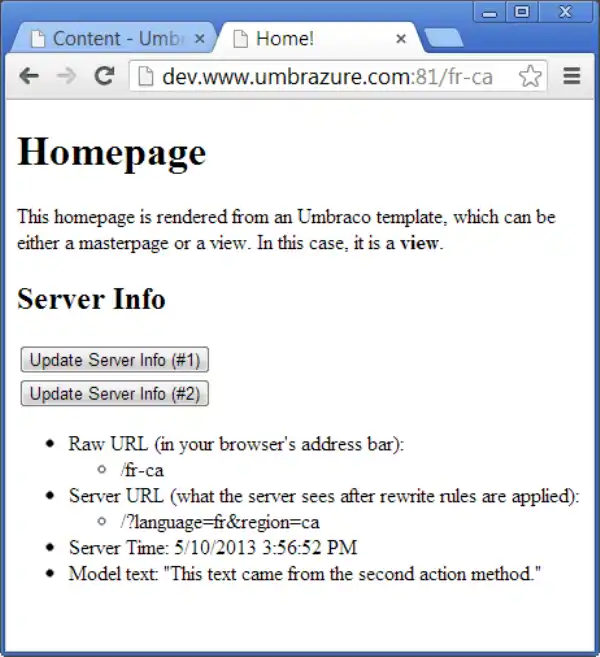
We didn't put in the URL rewrite rule for nothing. We can visit the French Canadian version of the site if we want. Notice that the server sees the language and region as query string values even though we typed them in as if they were part of the path.
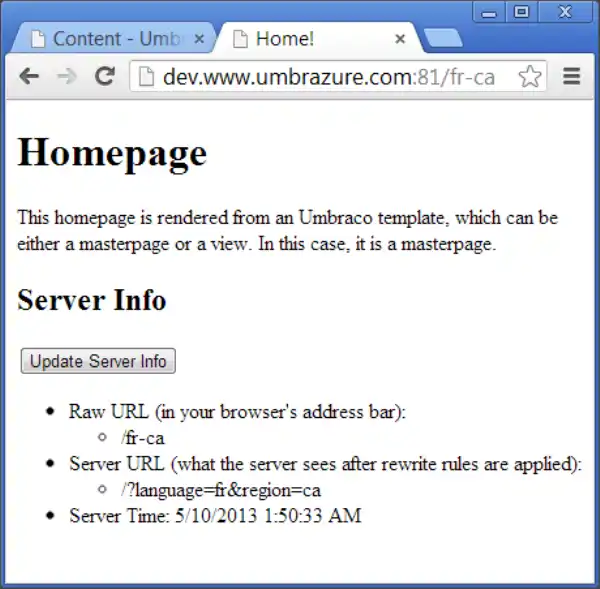
If you click one of the buttons, the time will update. Also, the URL does not change... that is thanks to the Form.browser file we setup earlier. If we hadn't done that, we'd be seeing the query string version of the URL in the address bar right now.
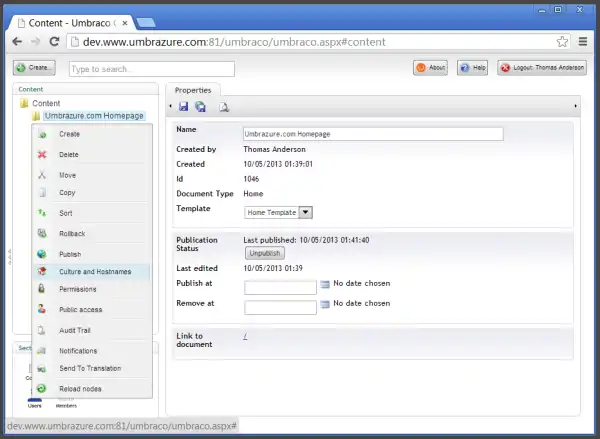
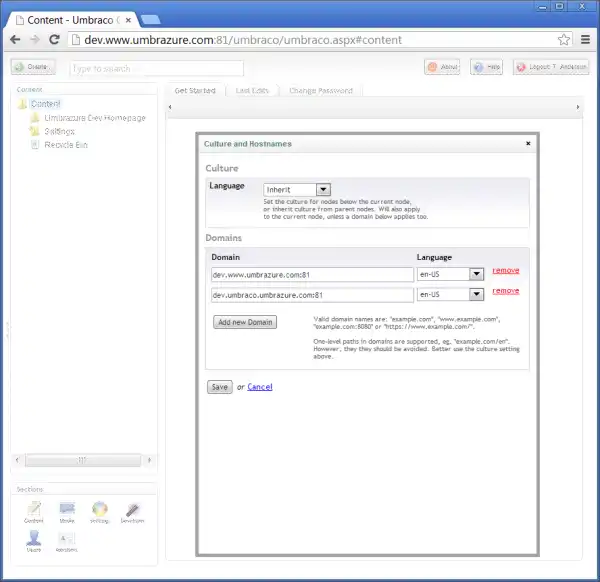
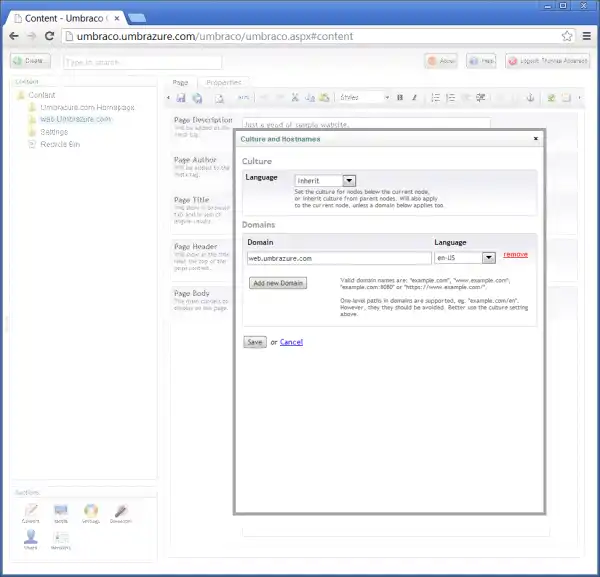
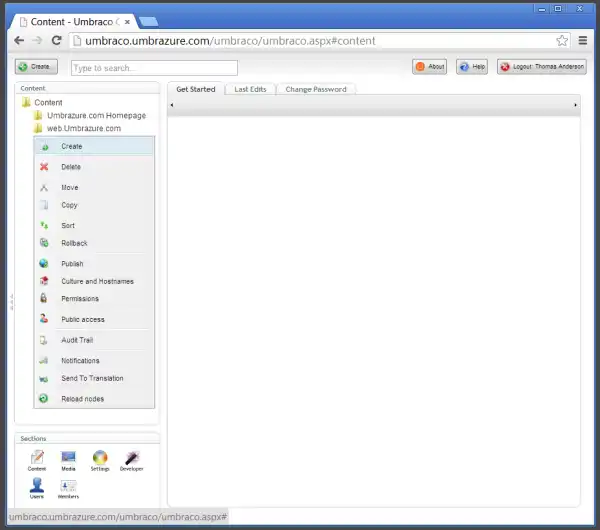
Back in the Umbraco UI, right click your homepage node and select "Culture and Hostnames".
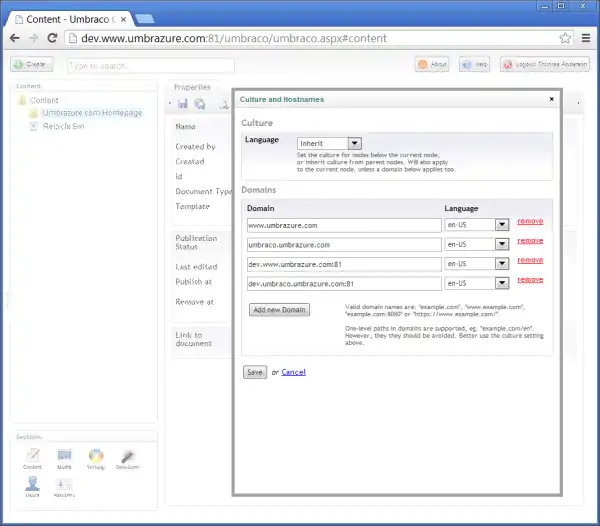
Here, we'll setup all the domains we expect this homepage to serve content for. If you wanted a different set of content to appear for a different domain, you'd create another content node and set it to use that domain. This is the Umbraco approach to managing multiple domains. What's nice about this is that it all works from the same application pool, so there isn't any extra memory overhead to manage multiple sites in Umbraco.
After we set all the domains, if we click the homepage node to refresh it, we see a list of links... there is one per domain.
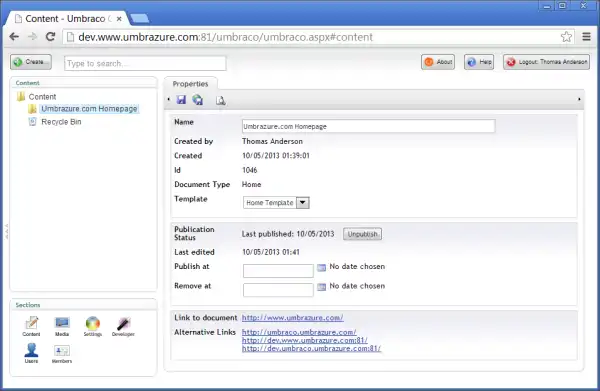
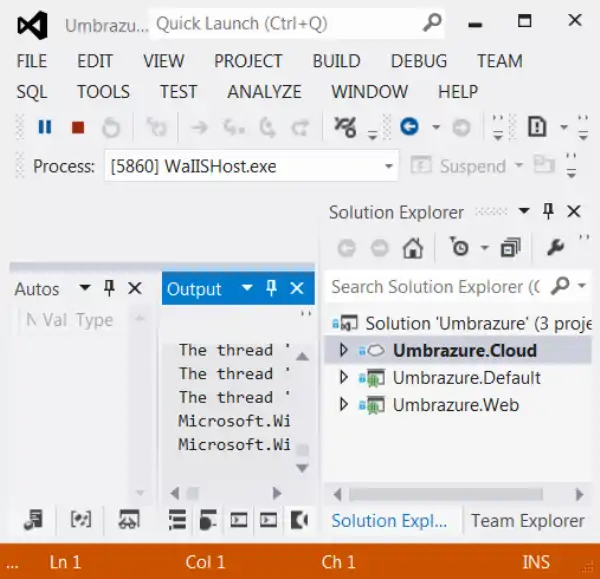
Now that we've seen what Umbraco is capable of, let's stop debugging (click the red square in Visual Studio).
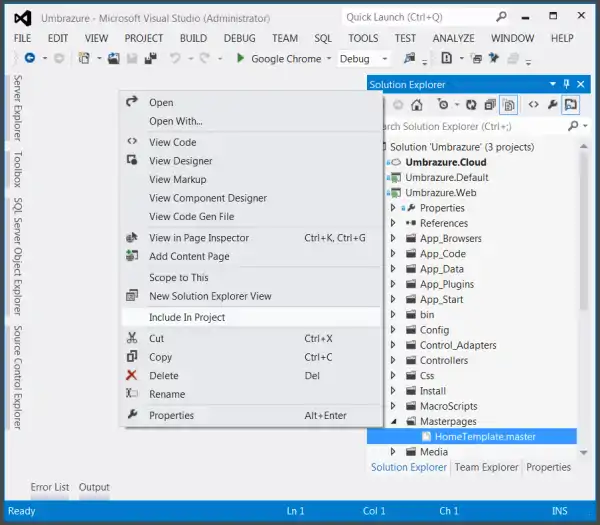
Since you created a template (aka masterpage) in Umbraco, you'll need to make sure to include it in the project in Visual Studio. Otherwise, it won't be included in any packages you send to Azure.
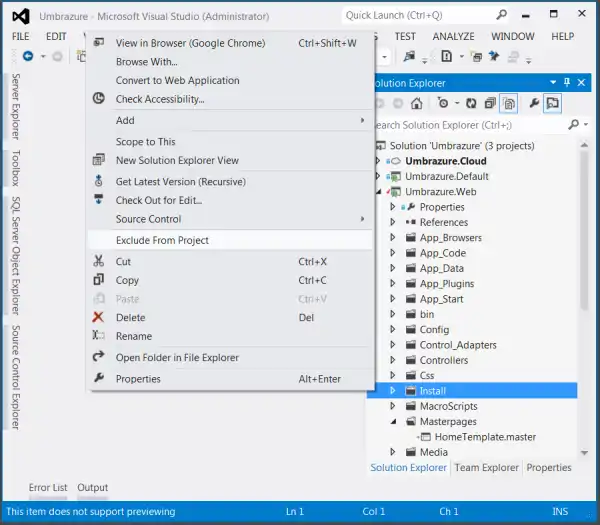
If you don't want the install folder to run when it's on Azure, you can exclude it from the project. It shouldn't run more than once, but there was an Umbraco bug a while back where if the connection to SQL was lost, Umbraco would show the installation again. Better safe than sorry I say; exclude it to be on the safe side.
Looks like Umbraco created a couple more folders for us... include those in the project as well, in case Umbraco needs them for something.
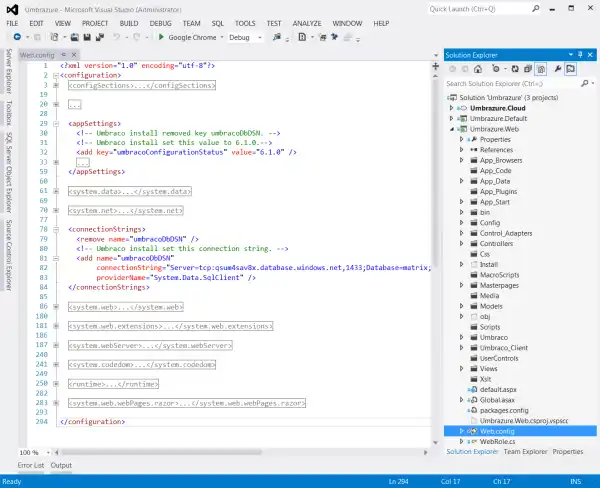
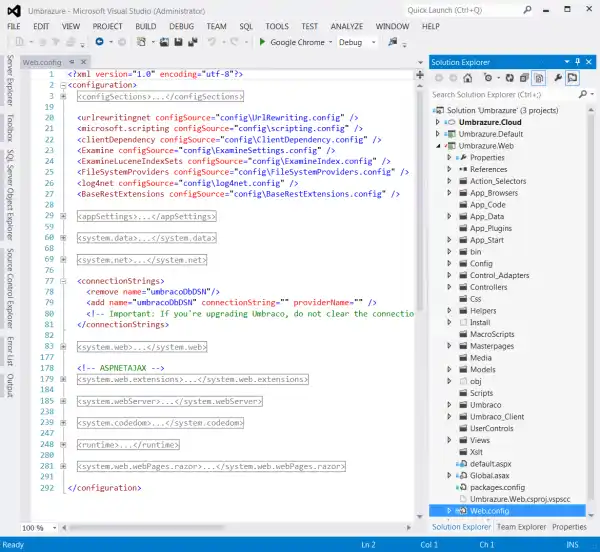
Just so you are aware, Umbraco modified your web.config during the install process. It removed an app setting, it set the value of another, and it setup a connection string to the database. If you are using source control, it's good to know that this file changed so you can check it in.
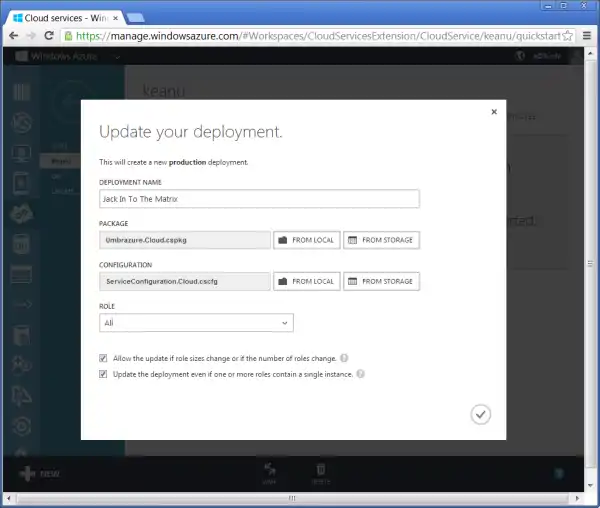
Now that we've run the installer locally, package up the cloud project and update your keanu deployment on Azure.
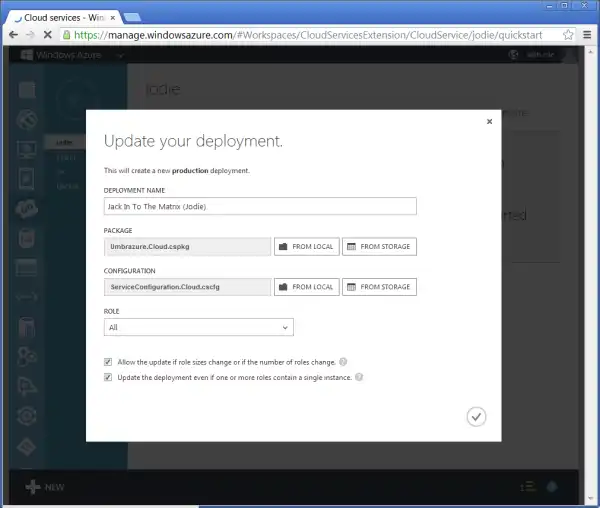
Also update your jodie deployment with the same package.
After 10 minutes or so, visit your real live homepage and you'll see what you just saw when you were running in Visual Studio. Looks like everything went smoothly.
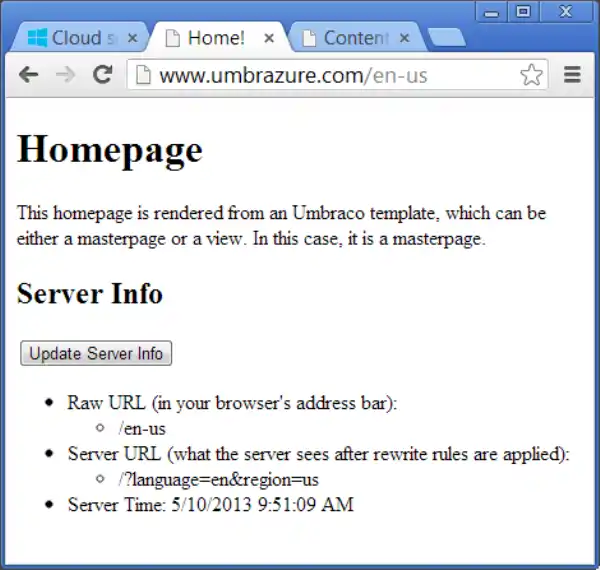
When working with Umbraco, remember to use the Umbraco subdomain. This doesn't seem important now, but it will be important later when you create more web role instances.
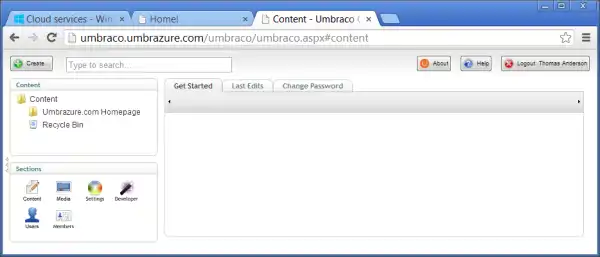
In order to create an MVC view as a template, modify this setting in the umbracoSettings.config file.
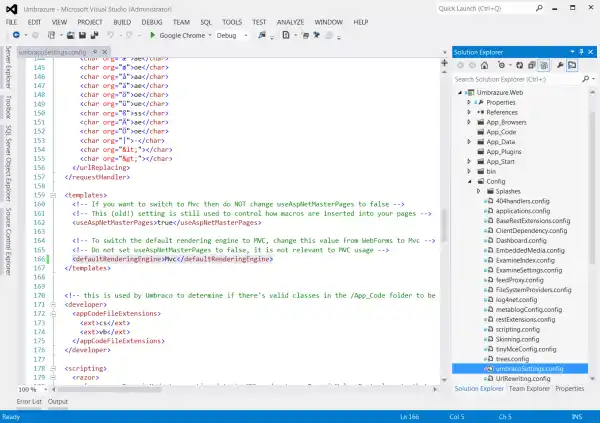
Next, debug the cloud project like usual. Then, go into Umbraco and create a new template.
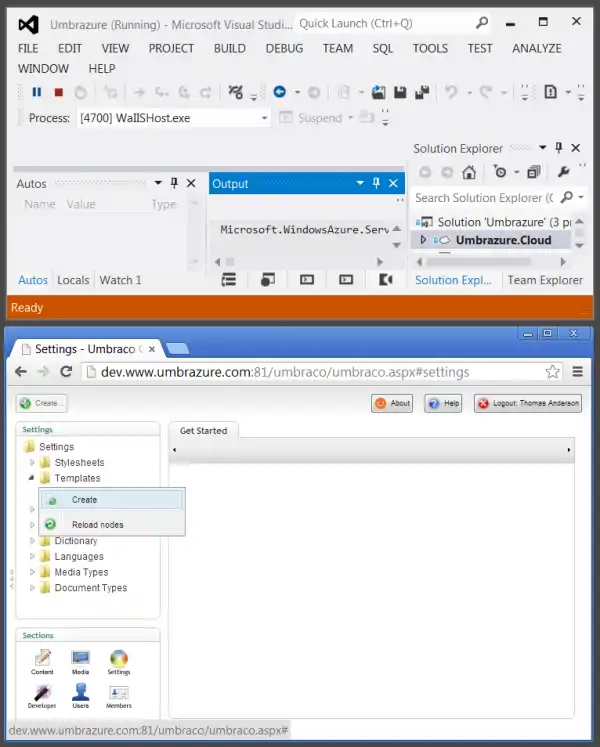
You will call this template "Mvc Home".
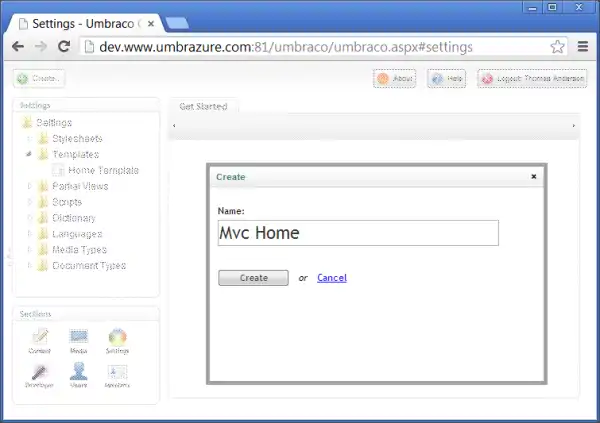
The name of masterpage templates is mostly unimportant, but the name of MVC view templates is very important. The reason is that the alias (shown in the below picture, below the name) is derived from the name. It is basically the name without spaces. When you create an MVC controller, Umbraco's routing is setup so that the name of the template determines which action method to call. The controller is determined from the alias for the doctype. So, if we have a "Home" doctype and an "MvcHome" template, the routing for that content node will go to the "MvcHome" action method on the "Home" controller.
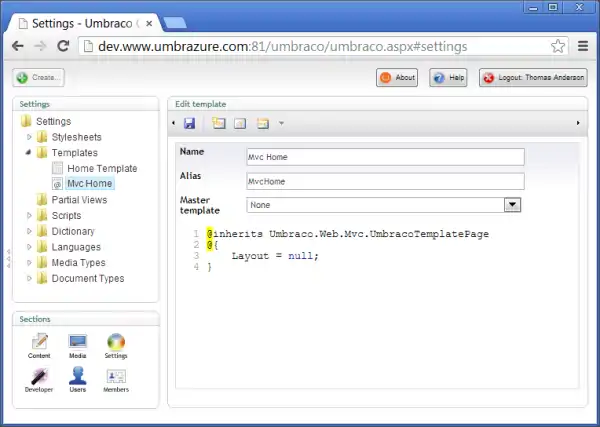
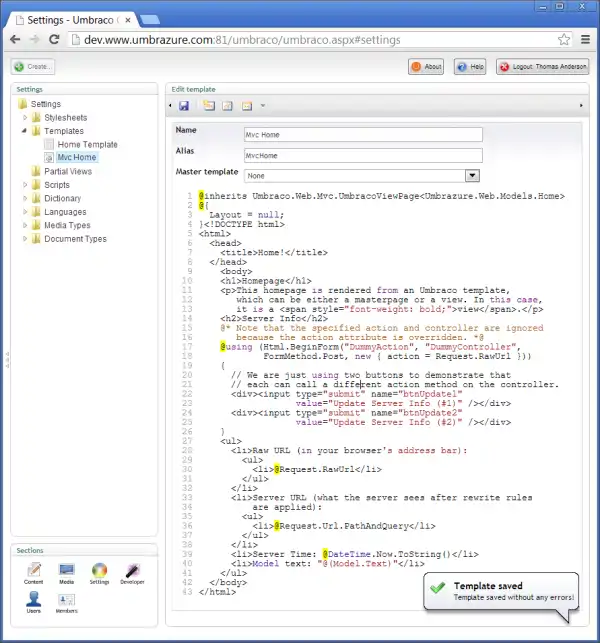
Fill in the template as shown below. Notice that we have two buttons in our view. We'll have to do some further coding for that to work as expected. Also, notice that we are specifying dummy values for the action and controller in the BeginForm call. This is because those are just used to construct the action attribute's value. However, we are manually specifying that so that it gets set to the request's raw URL (the URL the user types in). This is the MVC way to allow for URL rewrites to work with postbacks (if you remember, the web forms way was to modify the Form.browser file).
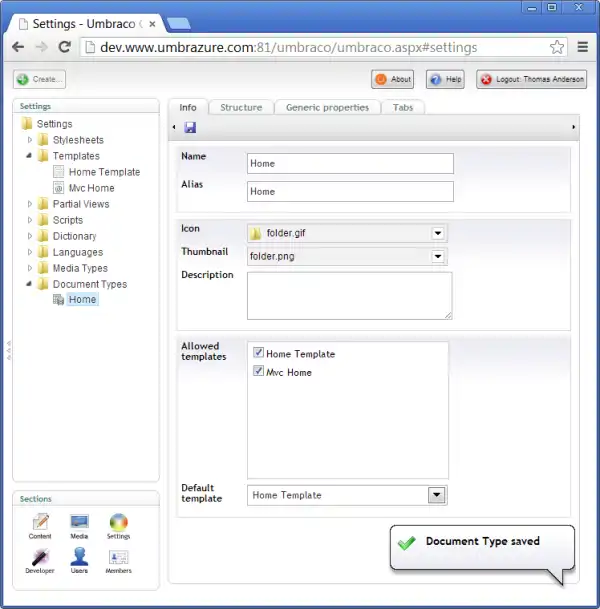
You can't use your new template with the "Home" doctype without allowing it, so do that now.
Stop debugging and go back into Visual Studio. Include the view in the project so it is part of the next package for Azure.
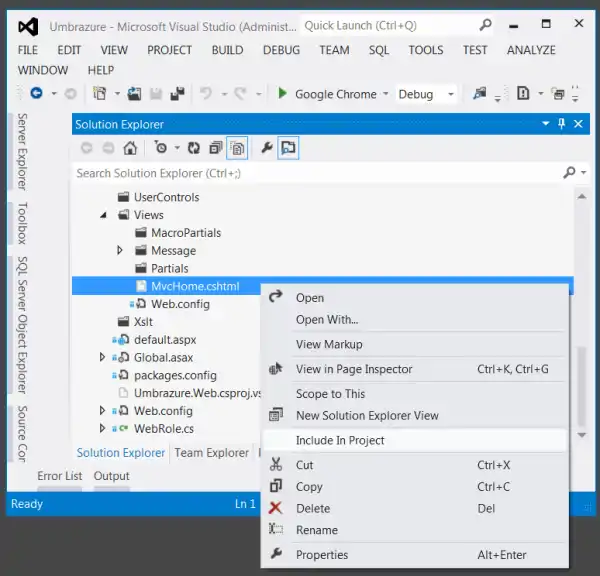
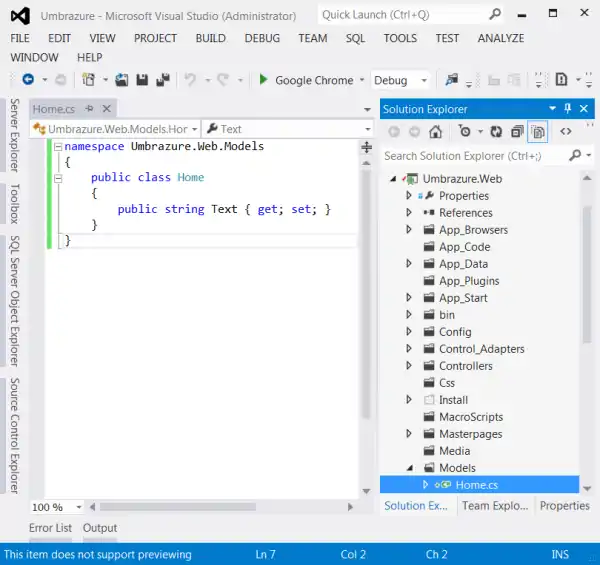
Create a model to use with the "Home" controller (which you'll be adding soon).
namespace Umbrazure.Web.Models
{
    public class Home
    {
        public string Text { get; set; }
    }
}
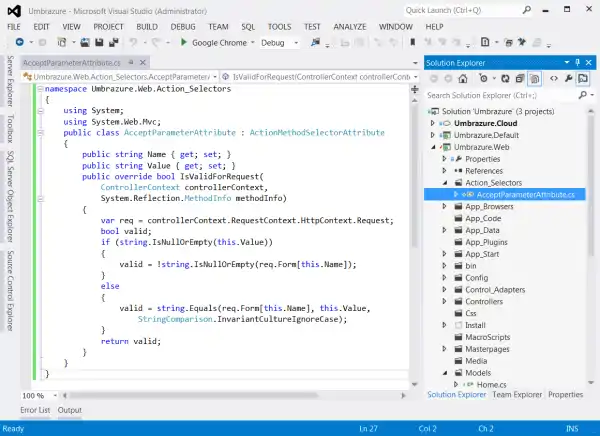
To allow for multiple buttons in the same form tag on an MVC view to initiate different action methods, you have to create an action selector, as shown below.
namespace Umbrazure.Web.Action_Selectors
{
    using System;
    using System.Web.Mvc;
    public class AcceptParameterAttribute : ActionMethodSelectorAttribute
    {
        public string Name { get; set; }
        public string Value { get; set; }
        public override bool IsValidForRequest(
            ControllerContext controllerContext,
            System.Reflection.MethodInfo methodInfo)
        {
            var req = controllerContext.RequestContext.HttpContext.Request;
            bool valid;
            if (string.IsNullOrEmpty(this.Value))
            {
                valid = !string.IsNullOrEmpty(req.Form[this.Name]);
            }
            else
            {
                valid = string.Equals(req.Form[this.Name], this.Value,
                    StringComparison.InvariantCultureIgnoreCase);
            }
            return valid;
        }
    }
}
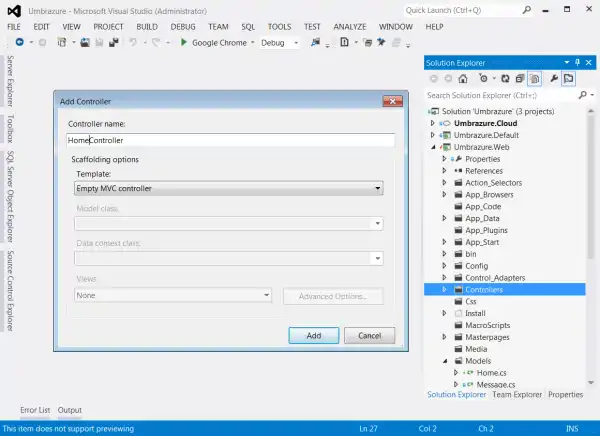
Finally, create your home controller.
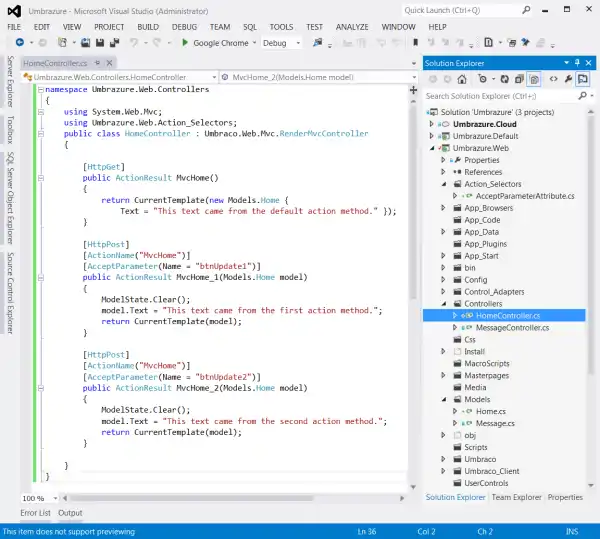
Fill in the home controller as shown below. Notice we are making use of the action selector we just created. The first and second button will each call their own action method, and so they can respond with different output.
namespace Umbrazure.Web.Controllers
{
    using System.Web.Mvc;
    using Umbrazure.Web.Action_Selectors;
    public class HomeController : Umbraco.Web.Mvc.RenderMvcController
    {

        [HttpGet]
        public ActionResult MvcHome()
        {
            return CurrentTemplate(new Models.Home {
                Text = "This text came from the default action method." });
        }

        [HttpPost]
        [ActionName("MvcHome")]
        [AcceptParameter(Name = "btnUpdate1")]
        public ActionResult MvcHome_1(Models.Home model)
        {
            ModelState.Clear();
            model.Text = "This text came from the first action method.";
            return CurrentTemplate(model);
        }

        [HttpPost]
        [ActionName("MvcHome")]
        [AcceptParameter(Name = "btnUpdate2")]
        public ActionResult MvcHome_2(Models.Home model)
        {
            ModelState.Clear();
            model.Text = "This text came from the second action method.";
            return CurrentTemplate(model);
        }

    }
}
Start debugging from Visual Studio again, and visit Umbraco. Set the "Template" drop down to "Mvc Home" and publish.
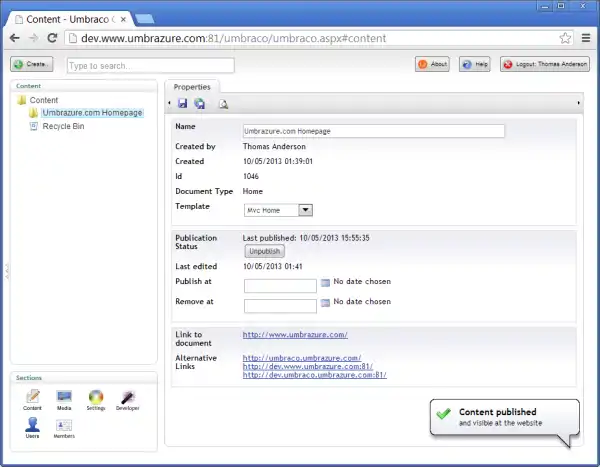
As you can see, you are now using the MVC view instead of the web forms masterpage to build the homepage. It's that easy to switch between web forms and MVC... you just toggle with a drop down and click publish.
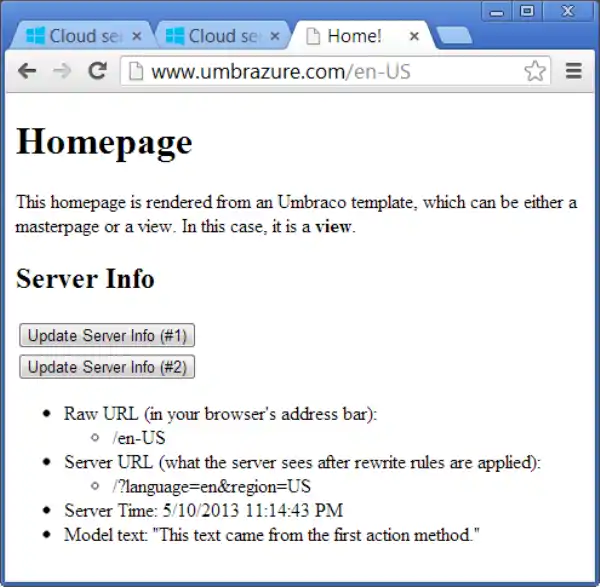
Stop debugging, package your cloud project, and upload it to Azure. You can now see your Umbraco MVC page working live on Azure with a real domain. Not too shabby!
Scale With Multiple Web Role Instances
Time to create a new doctype. Since doctypes live in the database only, you can create them from your live production environment.
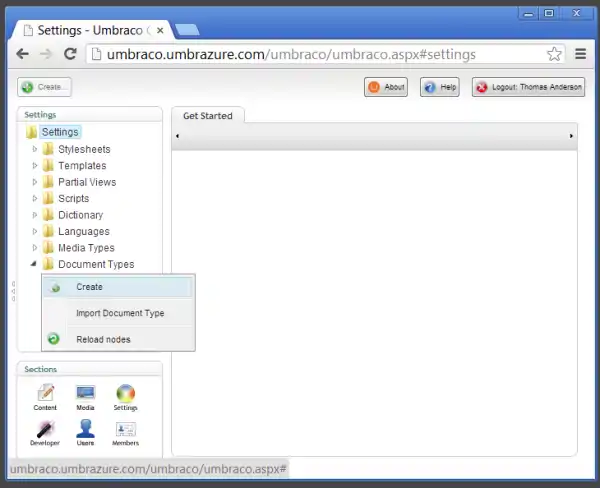
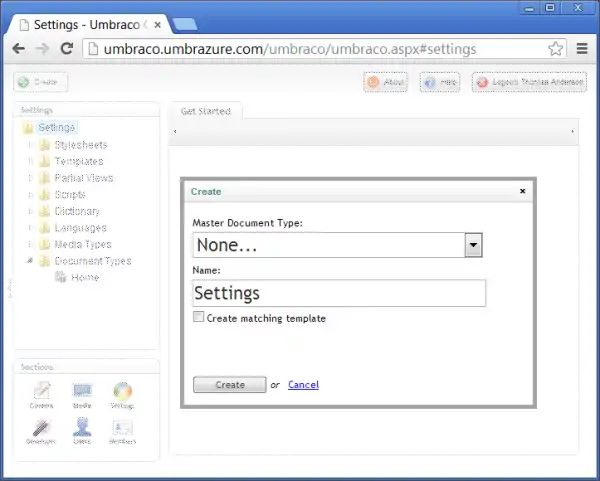
Call this one "Settings".
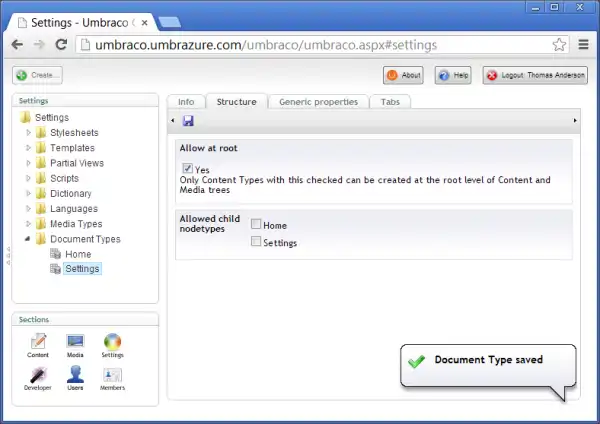
Allow it as a root node.
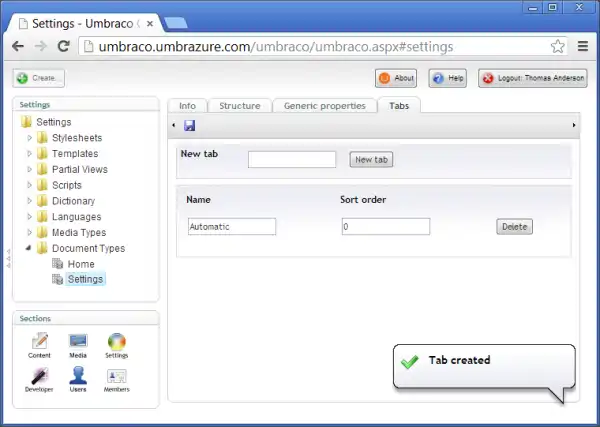
Go to the "Tabs" tab, and create a new tab called "Automatic". The automatic tab is where we'll store settings that the code automatically generates values for.
Go to the "Generic Properties" tab and create a new property called "Refresh Token" as shown below.
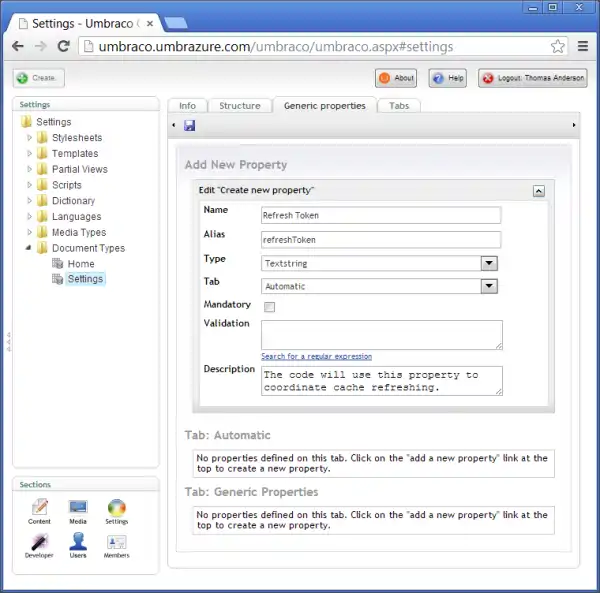
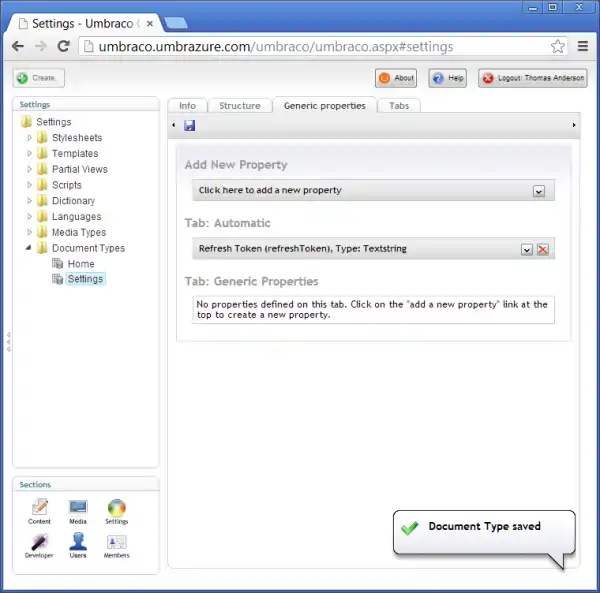
Remember to save.
Now, create a "Settings" node using your Settings doctype.
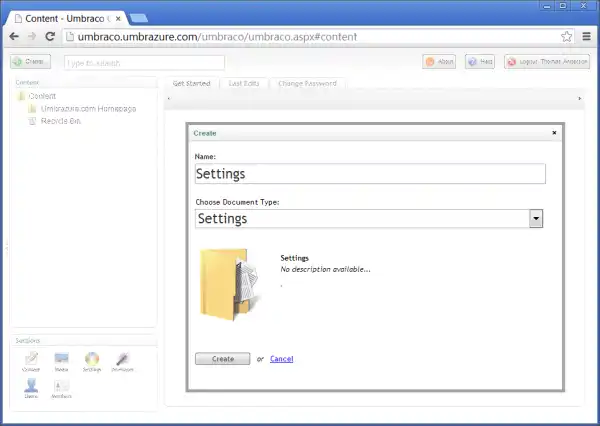
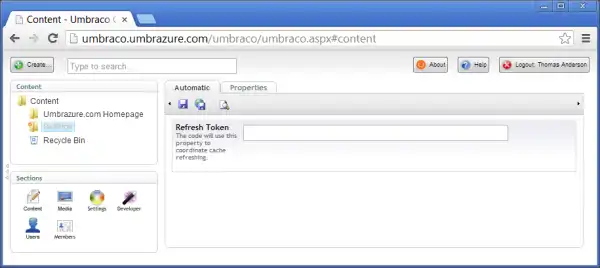
Here it is. Go ahead and publish this node now, or you may run into problems later (I made the mistake of not publishing right away and ran into a few of those problems myself).
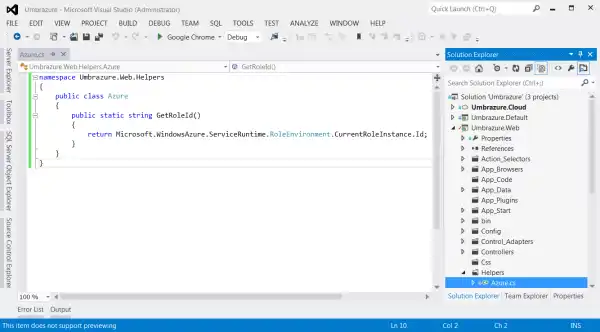
Back in Visual Studio land, add a new folder called "Helpers", and under that create a class called "Azure". Fill it in as shown below.
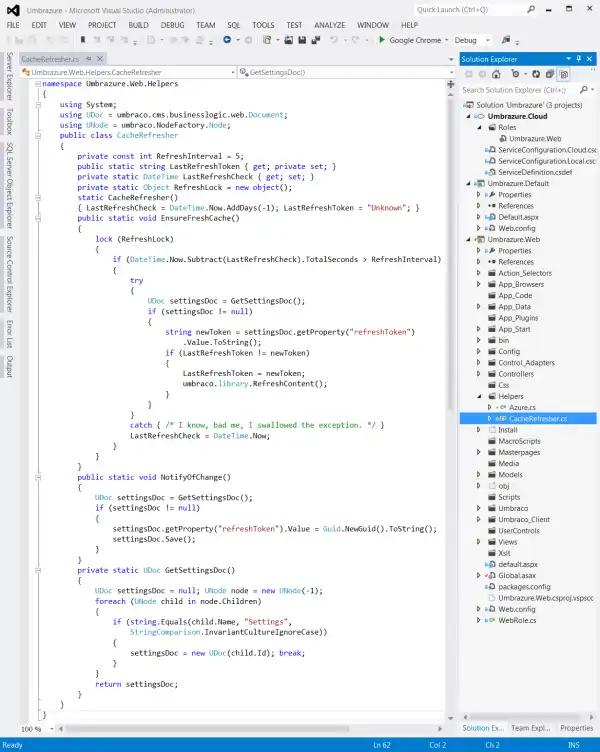
Also create a second helper class called CacheRefresher as shown below. I know, that's pretty much the worst formatting possible for code, but that's what it took to get the code to fit into a single screenshot.
namespace Umbrazure.Web.Helpers
{
using System;
using UDoc = umbraco.cms.businesslogic.web.Document;
using UNode = umbraco.NodeFactory.Node;
public class CacheRefresher
{
private const int RefreshInterval = 5;
public static string LastRefreshToken { get; private set; }
private static DateTime LastRefreshCheck { get; set; }
private static Object RefreshLock = new object();
static CacheRefresher()
{ LastRefreshCheck = DateTime.Now.AddDays(-1); LastRefreshToken = "Unknown"; }
public static void EnsureFreshCache()
{
lock (RefreshLock)
{
if (DateTime.Now.Subtract(LastRefreshCheck).TotalSeconds > RefreshInterval)
{
try
{
UDoc settingsDoc = GetSettingsDoc();
if (settingsDoc != null)
{
string newToken = settingsDoc.getProperty("refreshToken")
.Value.ToString();
if (LastRefreshToken != newToken)
{
LastRefreshToken = newToken;
umbraco.library.RefreshContent();
}
}
}
catch { }
LastRefreshCheck = DateTime.Now;
}
}
}
public static void NotifyOfChange()
{
UDoc settingsDoc = GetSettingsDoc();
if (settingsDoc != null)
{
settingsDoc.getProperty("refreshToken").Value = Guid.NewGuid().ToString();
settingsDoc.Save();
}
}
private static UDoc GetSettingsDoc()
{
UDoc settingsDoc = null; UNode node = new UNode(-1);
foreach (UNode child in node.Children)
{
if (string.Equals(child.Name, "Settings",
StringComparison.InvariantCultureIgnoreCase))
{
settingsDoc = new UDoc(child.Id); break;
}
}
return settingsDoc;
}
}
}
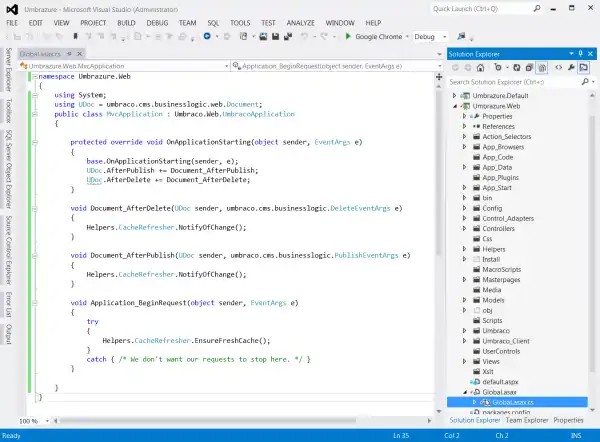
Back in your Global, modify it to match the code shown below. This will listen to Umbraco content publish events. Anytime a node is published or deleted, the cache refresher will be made aware so that the other web role instances will know that they need to update their local cache from the changes in the database.
namespace Umbrazure.Web
{
using System;
using UDoc = umbraco.cms.businesslogic.web.Document;
public class MvcApplication : Umbraco.Web.UmbracoApplication
{
protected override void OnApplicationStarting(object sender, EventArgs e)
{
base.OnApplicationStarting(sender, e);
UDoc.AfterPublish += Document_AfterPublish;
UDoc.AfterDelete += Document_AfterDelete;
}
void Document_AfterDelete(UDoc sender, umbraco.cms.businesslogic.DeleteEventArgs e)
{
Helpers.CacheRefresher.NotifyOfChange();
}
void Document_AfterPublish(UDoc sender, umbraco.cms.businesslogic.PublishEventArgs e)
{
Helpers.CacheRefresher.NotifyOfChange();
}
void Application_BeginRequest(object sender, EventArgs e)
{
try
{
Helpers.CacheRefresher.EnsureFreshCache();
}
catch { }
}
}
}
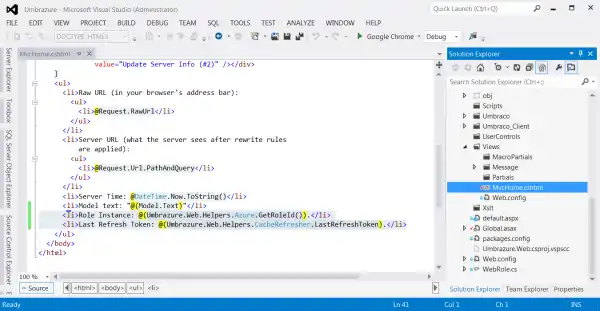
Add the highlighted lines in the below screenshot to your MvcHome view. They'll let you know which web role instance you are on as well as some cache info.
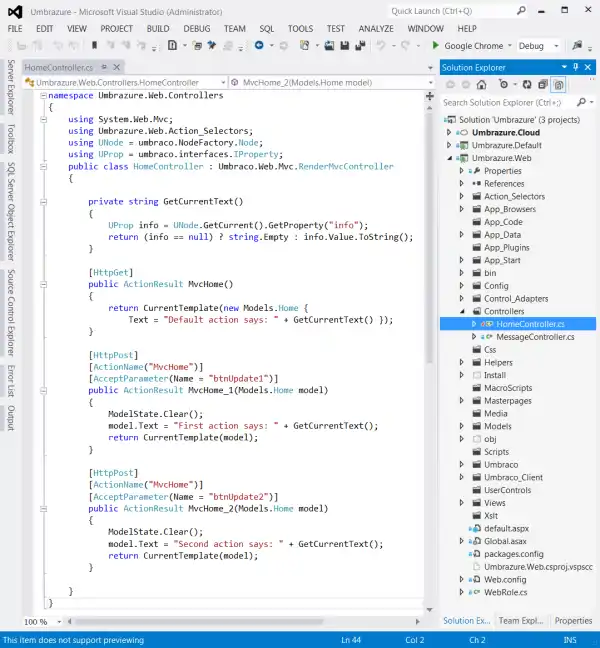
So we can be sure the cache is updating on each web role instance, we are going to show some data to the site visitor that comes from Umbraco. Modify the HomeController as shown below.
namespace Umbrazure.Web.Controllers
{
    using System.Web.Mvc;
    using Umbrazure.Web.Action_Selectors;
    using UNode = umbraco.NodeFactory.Node;
    using UProp = umbraco.interfaces.IProperty;
    public class HomeController : Umbraco.Web.Mvc.RenderMvcController
    {

        private string GetCurrentText()
        {
            UProp info = UNode.GetCurrent().GetProperty("info");
            return (info == null) ? string.Empty : info.Value.ToString();
        }

        [HttpGet]
        public ActionResult MvcHome()
        {
            return CurrentTemplate(new Models.Home {
                Text = "Default action says: " + GetCurrentText() });
        }

        [HttpPost]
        [ActionName("MvcHome")]
        [AcceptParameter(Name = "btnUpdate1")]
        public ActionResult MvcHome_1(Models.Home model)
        {
            ModelState.Clear();
            model.Text = "First action says: " + GetCurrentText();
            return CurrentTemplate(model);
        }

        [HttpPost]
        [ActionName("MvcHome")]
        [AcceptParameter(Name = "btnUpdate2")]
        public ActionResult MvcHome_2(Models.Home model)
        {
            ModelState.Clear();
            model.Text = "Second action says: " + GetCurrentText();
            return CurrentTemplate(model);
        }

    }
}
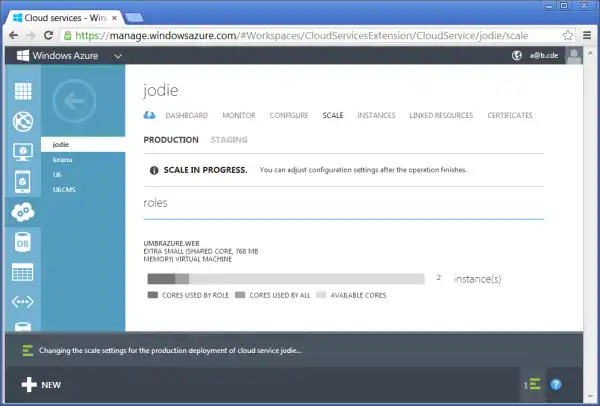
Package up your cloud project and deploy it to both keanu and jodie on Azure. Then, scale jodie to two instances instead of just one. This will take some time (10 minutes or so).
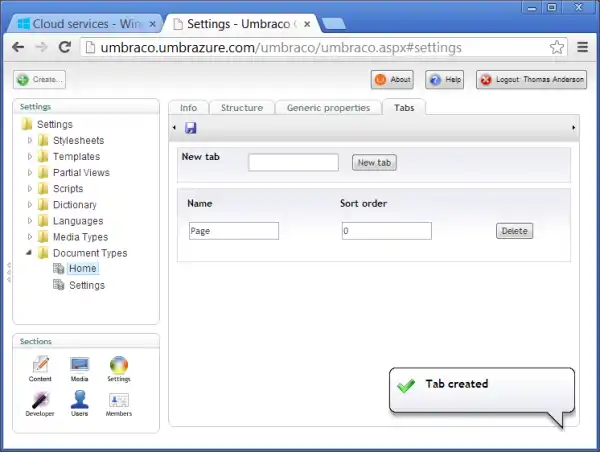
Back in Umbraco, add a new tab to your Home doctype.
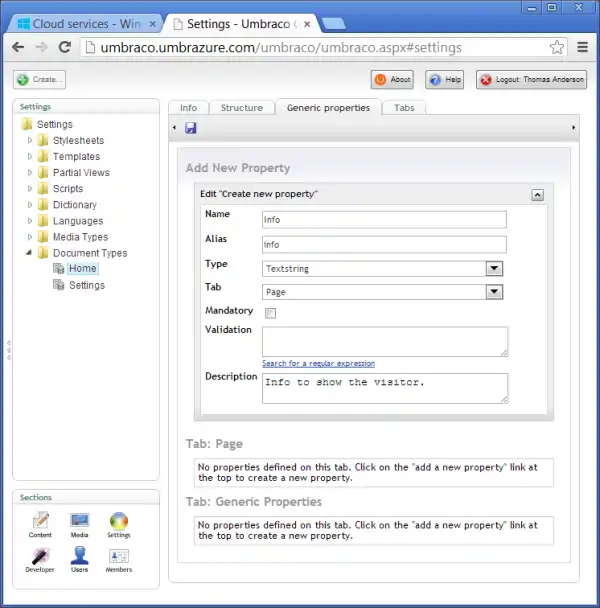
Then add an "Info" property to the "Page" tab.
Remember to save.
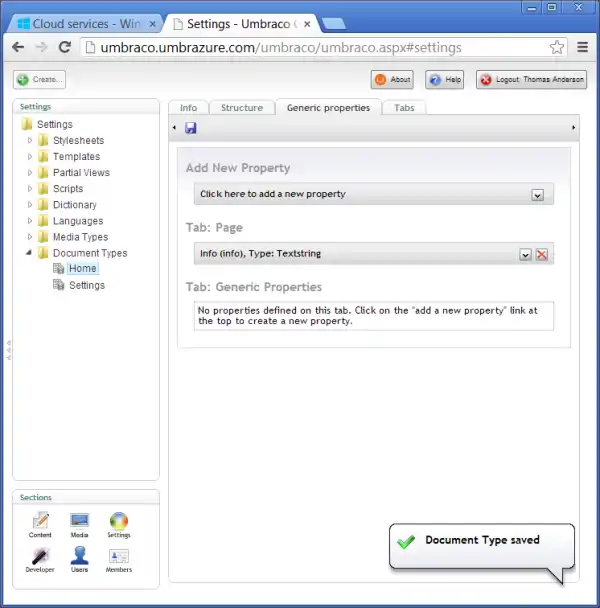
If you didn't already save the Settings node, do so now.
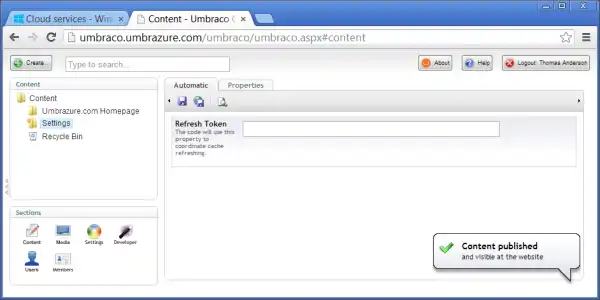
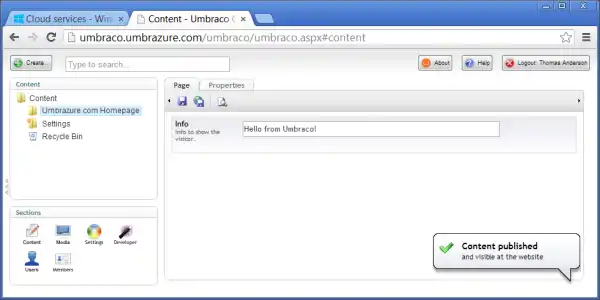
Type the most interesting sentence you can think of into the "Info" textbox on the homepage node. I am pretty boring, so I chose a greeting. Publish.
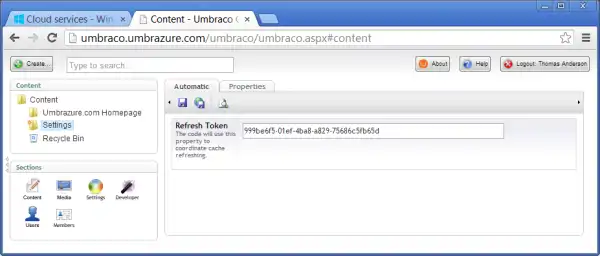
When you published, a new "refresh token" should have been generated and stored to the Umbraco database. You can confirm this by clicking the "Settings" node and looking at the value for the refresh token. It should be a GUID. If a web role instance notices that its GUID doesn't match the GUID from the Umbraco database, it will refresh it's cache (and its GUID).
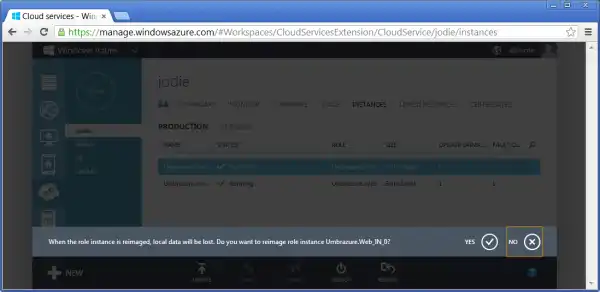
Remember how I was telling you I hadn't published the "Settings" node right away and it caused me some problems? If you did the same, you can fix those problems by reimaging each web role instance.
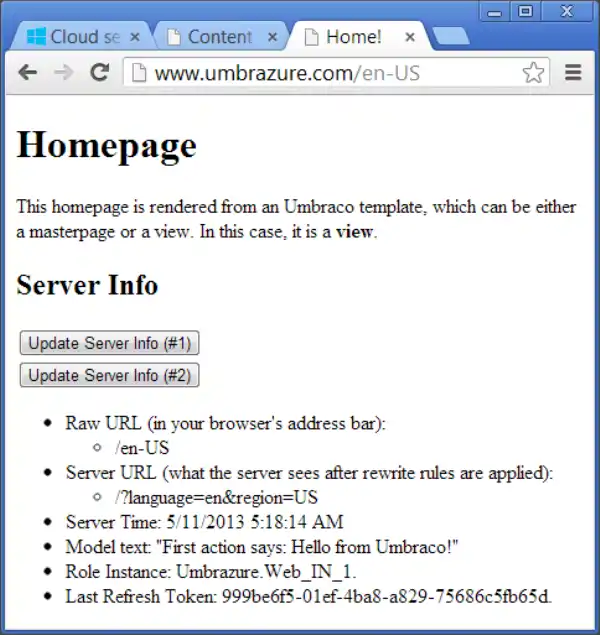
When I opened the homepage in Chrome, I got the second web role instance (they use zero-based indexing), as you can see.
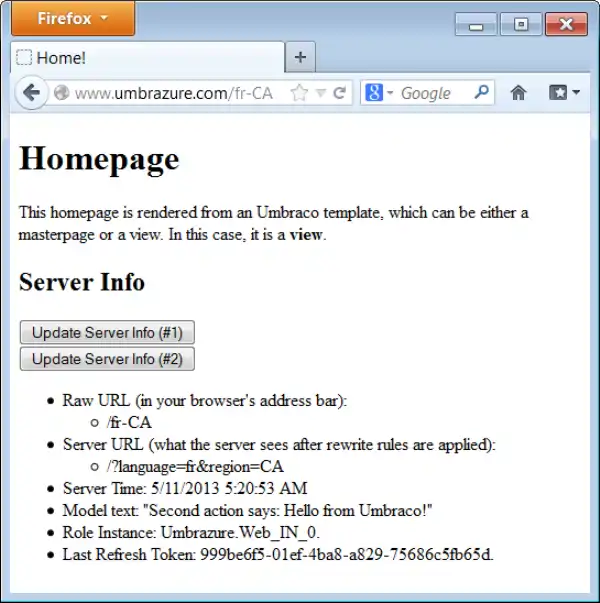
Then when I opened the homepage in Firefox, I was on the first web role instance. Looks like load balancing is working!
Multiple Environment Configuration
In order to create a development database, we will have to run the Umbraco installer again. However, before we do that, we'll have to clean up a few things so the installer doesn't get confused. We'll start by excluding the templates from the project and renaming them temporarily.
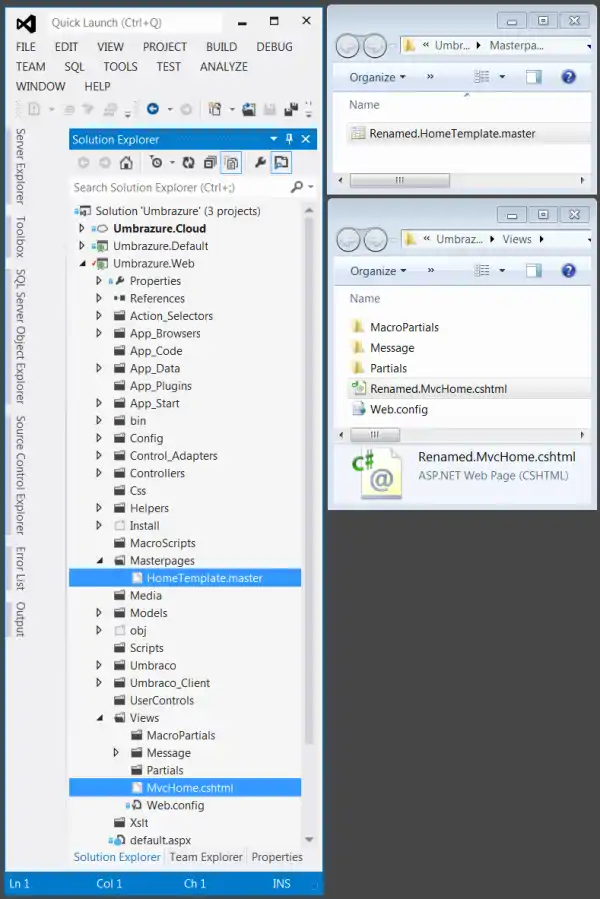
Undo the web.config changes done by the installer the last time it ran. This is easy if you are using source control. Otherwise, save your current one off somewhere and overwrite this one with the web.config from the Umbraco ZIP download.
Start debugging in Visual Studio and run through the whole installer process. This time, however, use the simulacrum database rather than the matrix database.
Recreate all the templates and the doctypes. Don't worry about filling in the contents of the views. However, do get the doctypes to match what you see on production. Note that you'll have to toggle the umbracoSettings.config file and restart debugging to switch between creating masterpages and views (I know, that's annoying... I'm hoping they just add that option to the right click context menu at some point).
Also recreate the content nodes. Note that the order is important. Don't make the Settings node first, or you will have hours of fun trying to fix it.
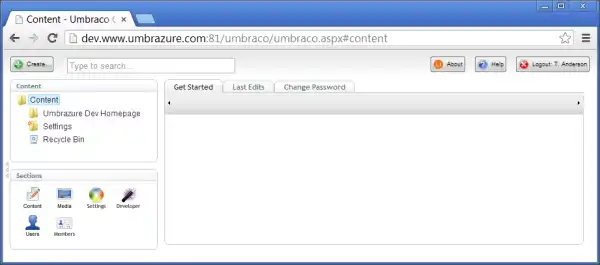
Something easy to forget is setting the domains for the homepage node. Since you'll only ever run the dev site from Visual Studio, you only need to add the dev domains. Heck, you could go with just one of them if you really wanted.
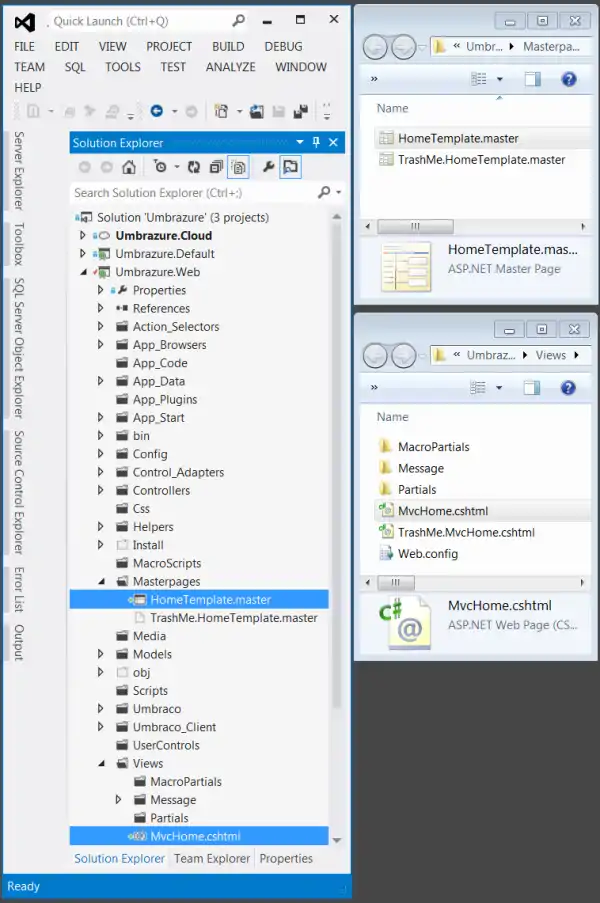
Stop Visual Studio debugging and delete the templates you just created, replacing them with the ones you temporarily renamed earlier. Then, reinclude them into the project. You should always create templates in Umbraco, as it stores information about them in its database. However, you need to then deploy the templates as part of a package, since the templates may not exist on the file system of each web role instance until you do so.
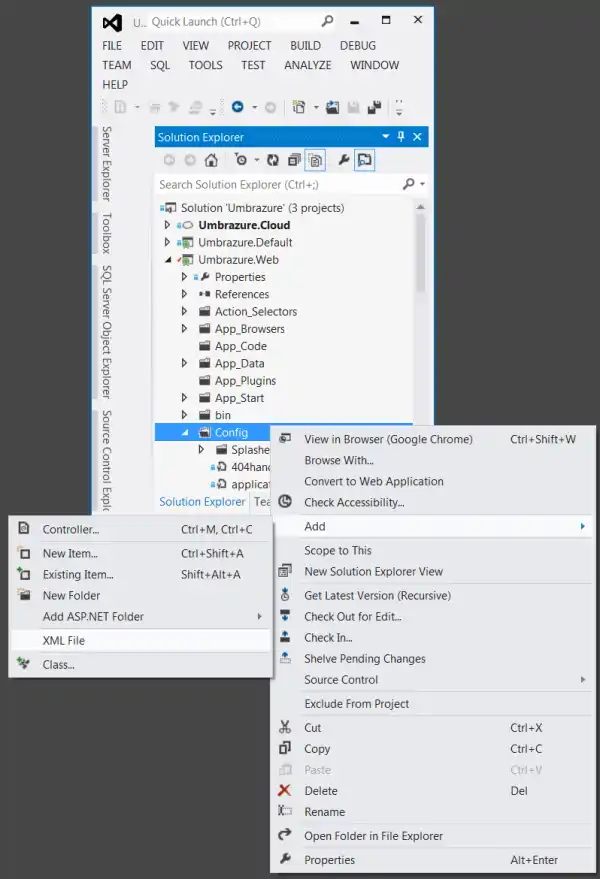
Next, you will be adding three XML files (though they will have a ".config" extension).
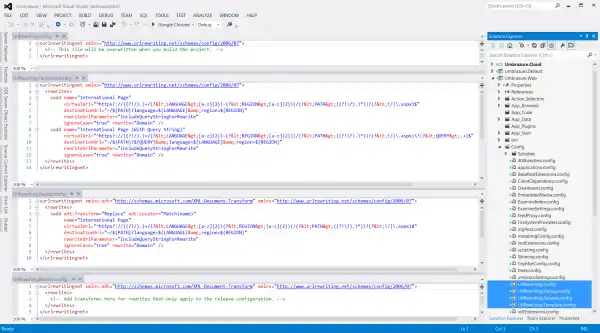
The files are UrlRewriting.Template.config, UrlRewriting.Debug.config, and UrlRewriting.Release.config. Fill them in as shown below, and modify the main UrlRewriting.config file too. Typically, XML build transformations are only applied to web.config files, but we are going to do some extra work to apply transforms to our UrlRewriting.config file. That way, we can have different URL's in dev than the ones we see in production.
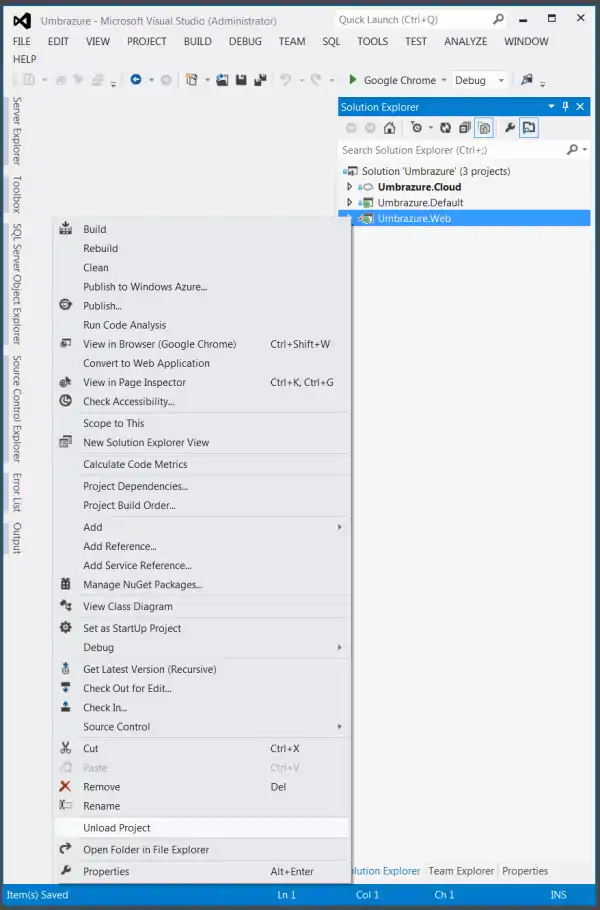
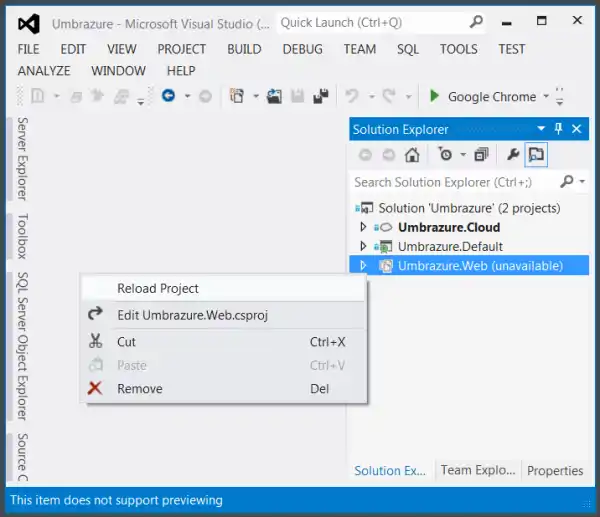
Next, we'll be modifying the project file manually. Start by unloading the project.
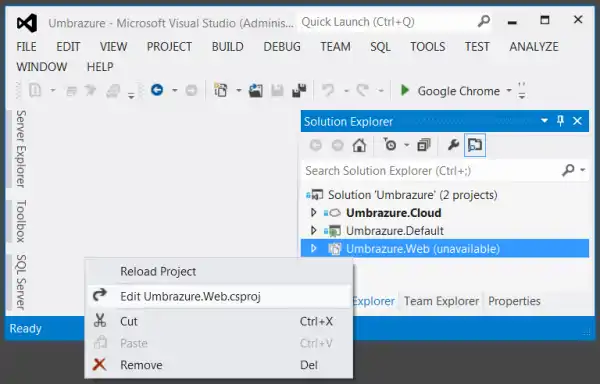
Then, open the project file in the text editor.
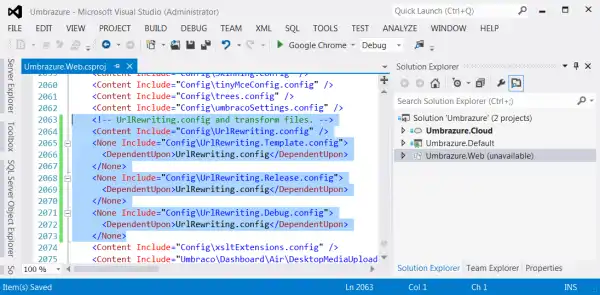
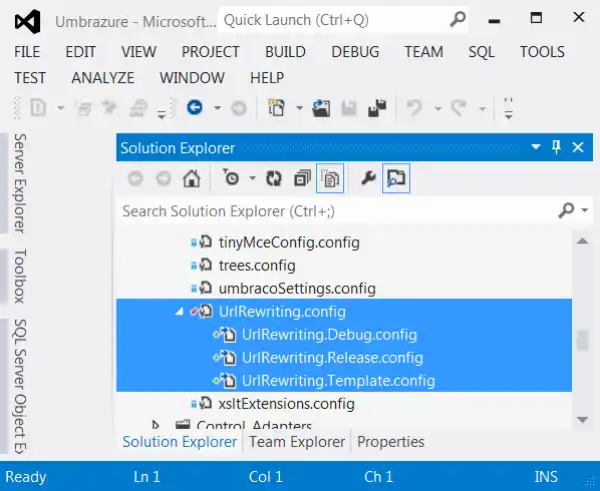
Find the lines that refer to the UrlRewriting files we just modified, and change them to look like the ones below. This will make the transform files nest under the primary file. It will also mark the transform files as non-content so they don't get deployed to production.
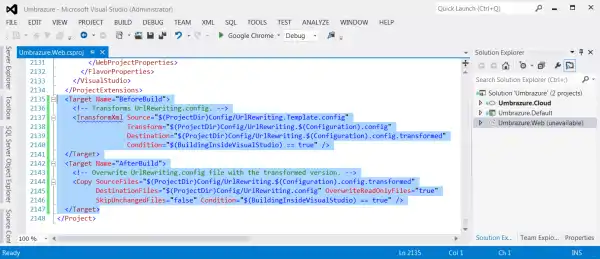
At the very bottom of the file, add the lines shown as selected in the below image. These lines will cause the XML transform files to transform the primary UrlRewriting.config file based upon the current build configuration (e.g., release or debug).
Now that you are done making your manual changes, reload the project.
Looks like the nesting is working.
You should already have a Web.Release.config. Modify it so that it looks like the one below. Only, instead of using my connection string, use your production connection string. Remember to put in the appropriate password.

Now, if you run the site from Visual Studio, you'll see the content specific to dev. Go ahead and modify the info on the homepage node so it's clear that info came from the dev version of Umbraco. Publish.
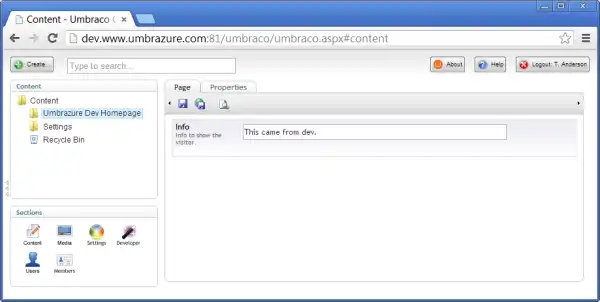
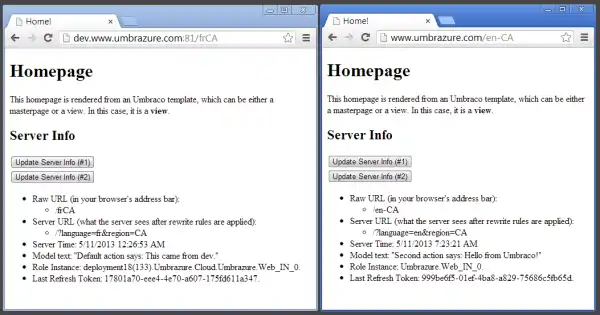
If you visit the dev homepage, you can see the dev content. Note that the XML transformations modified the URL rewrite rule so that you don't need to type the dash in between the language and region in the URL. I know how much you developers hate typing extraneous characters!
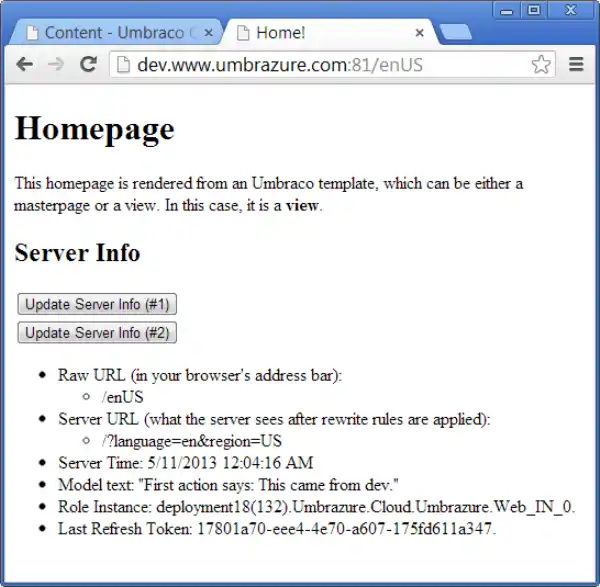
When you view dev next to production, the content is different. This is because they are using different databases. Even if you package up the project you are working with right now and deploy it to production, you will still see different content. This is thanks to the XML transforms we added for different build configurations.
Twitter Bootstrap Sample Website
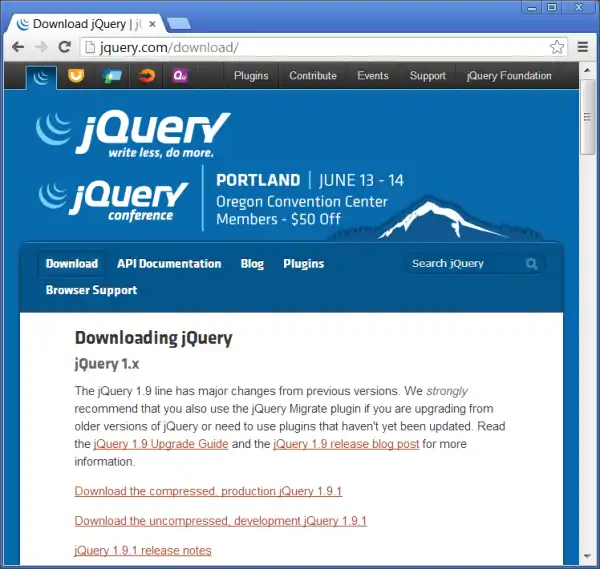
Twitter Bootstrap requires jQuery, so start by downloading that.
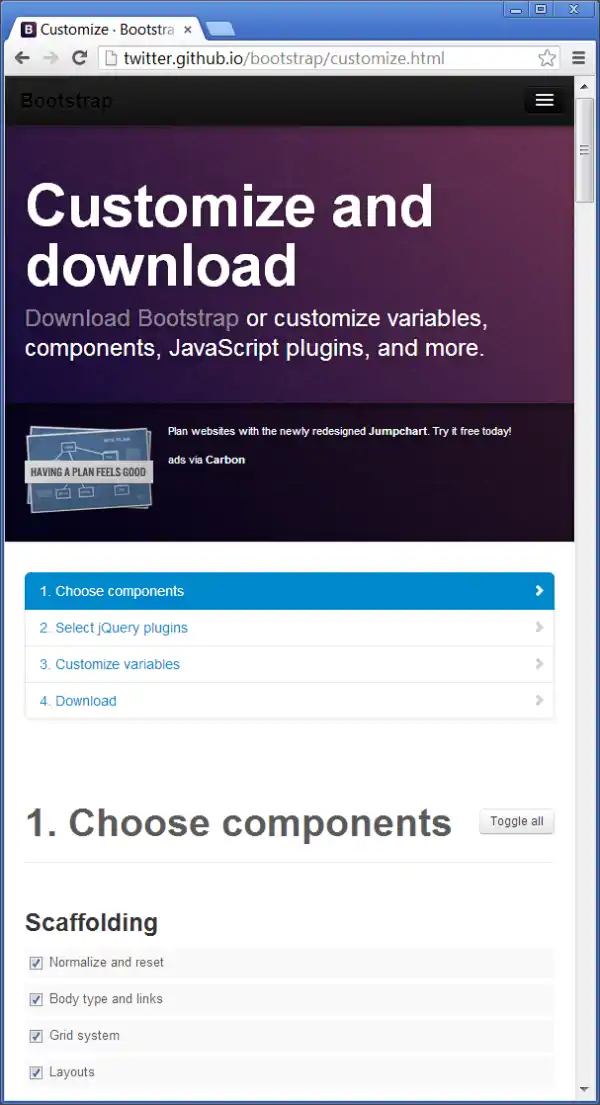
Next, go to the customize page to download the full Twitter Bootstrap package.
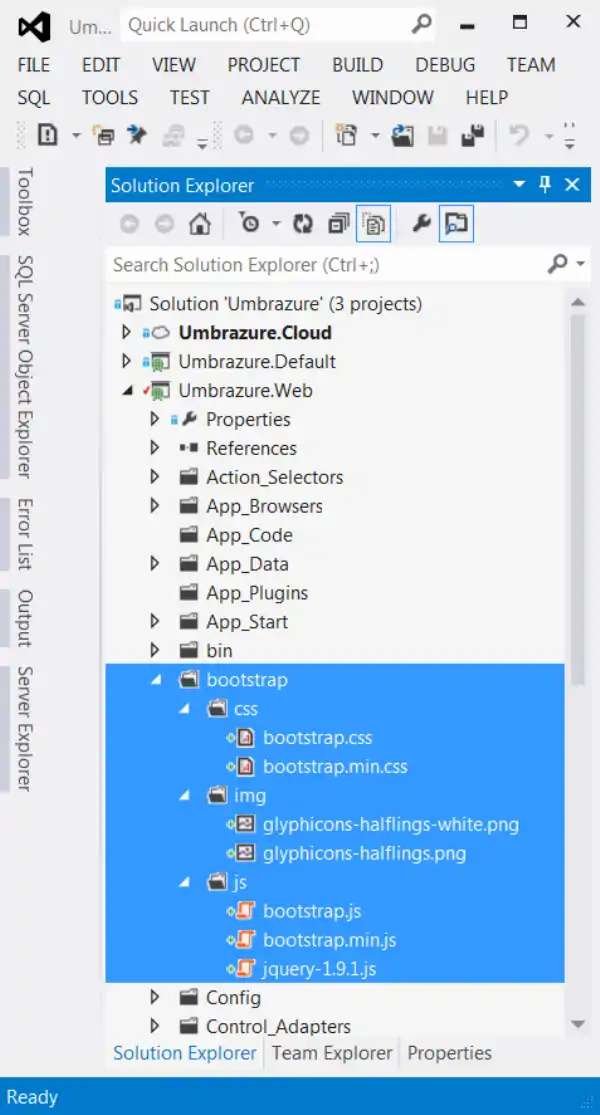
Add all the files you just downloaded (and unblocked and unzipped) to your project in the following folder structure.
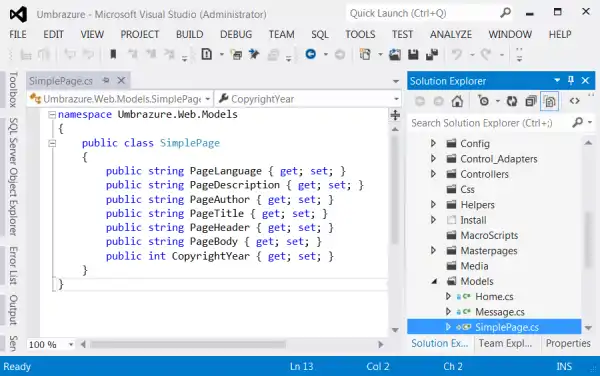
Add a model called SimplePage. You can use this in many places in the future, but we'll just be using it for a few pages.
namespace Umbrazure.Web.Models
{
    public class SimplePage
    {
        public string PageLanguage { get; set; }
        public string PageDescription { get; set; }
        public string PageAuthor { get; set; }
        public string PageTitle { get; set; }
        public string PageHeader { get; set; }
        public string PageBody { get; set; }
        public int CopyrightYear { get; set; }
    }
}
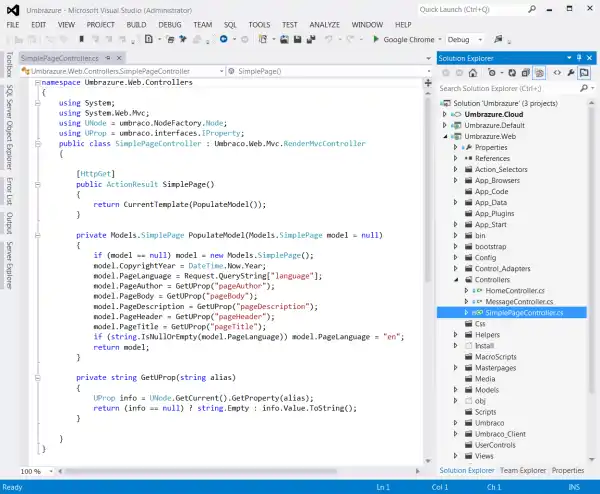
Add a controller called "SimplePageController".
namespace Umbrazure.Web.Controllers
{
    using System;
    using System.Web.Mvc;
    using UNode = umbraco.NodeFactory.Node;
    using UProp = umbraco.interfaces.IProperty;
    public class SimplePageController : Umbraco.Web.Mvc.RenderMvcController
    {

        [HttpGet]
        public ActionResult SimplePage()
        {
            return CurrentTemplate(PopulateModel());
        }

        private Models.SimplePage PopulateModel(Models.SimplePage model = null)
        {
            if (model == null) model = new Models.SimplePage();
            model.CopyrightYear = DateTime.Now.Year;
            model.PageLanguage = Request.QueryString["language"];
            model.PageAuthor = GetUProp("pageAuthor");
            model.PageBody = GetUProp("pageBody");
            model.PageDescription = GetUProp("pageDescription");
            model.PageHeader = GetUProp("pageHeader");
            model.PageTitle = GetUProp("pageTitle");
            if (string.IsNullOrEmpty(model.PageLanguage)) model.PageLanguage = "en";
            return model;
        }

        private string GetUProp(string alias)
        {
            UProp info = UNode.GetCurrent().GetProperty(alias);
            return (info == null) ? string.Empty : info.Value.ToString();
        }

    }
}
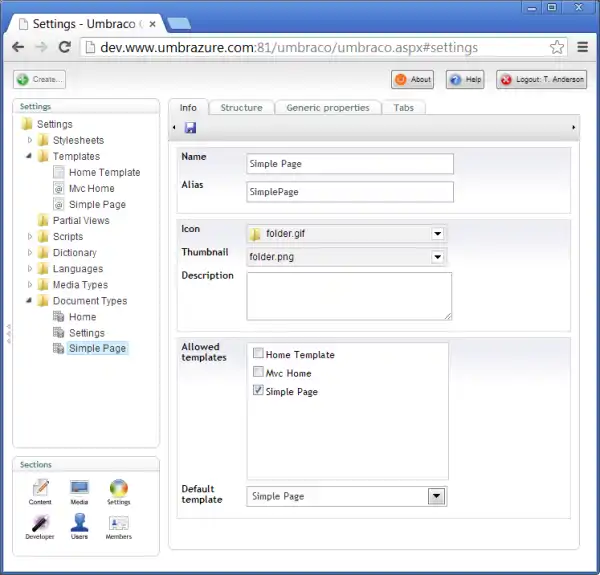
Start debugging and create the "Simple Page" template (an MVC view) and a "Simple Page" doctype. Remember, you must create the template in Umbraco first, as it stores info about the template to the database. Make sure the doctype allows the template.
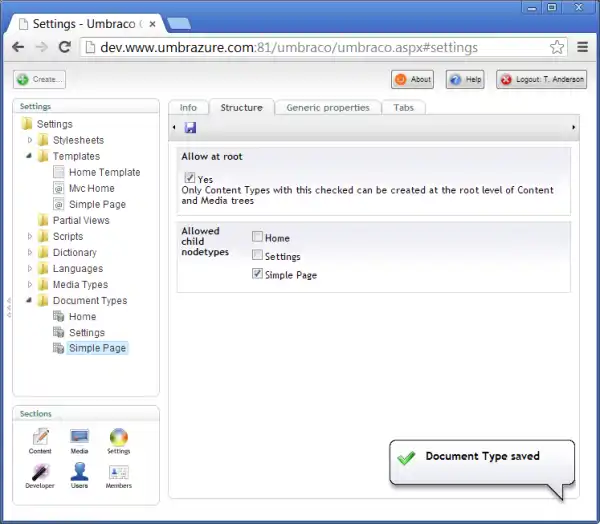
Allow the doctype to be created at the root of the content tree, and allow it to be a child of itself (Umbraco allows grandfather paradoxes).
Add a tab called "Page" and add the properties shown below to that tab.
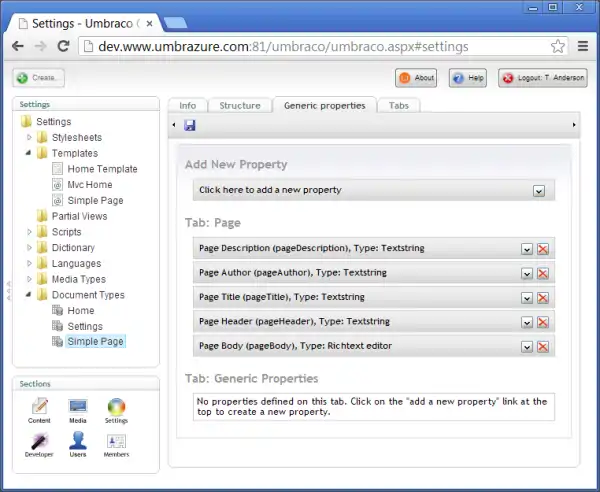
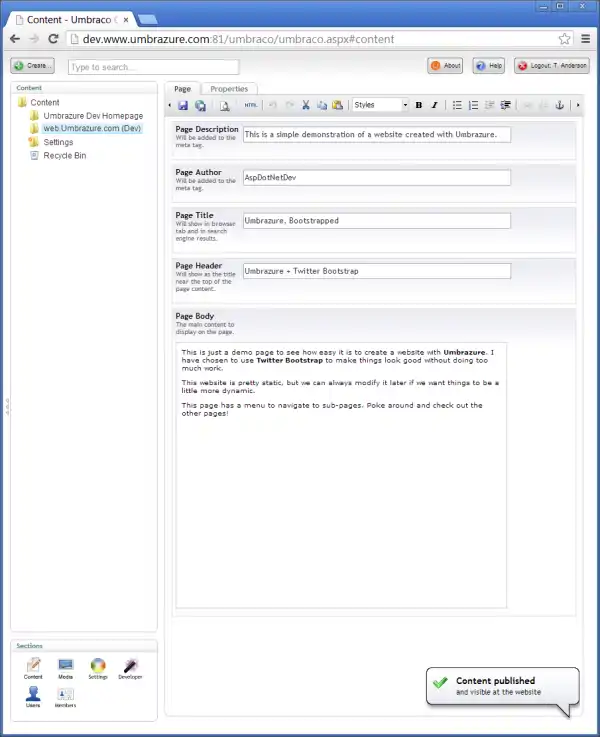
Create a new top-level content node from your "Simple Page" doctype, fill in the "Page" properties as you like, and publish it. Also sort it so that it is situated above the "Settings" node.
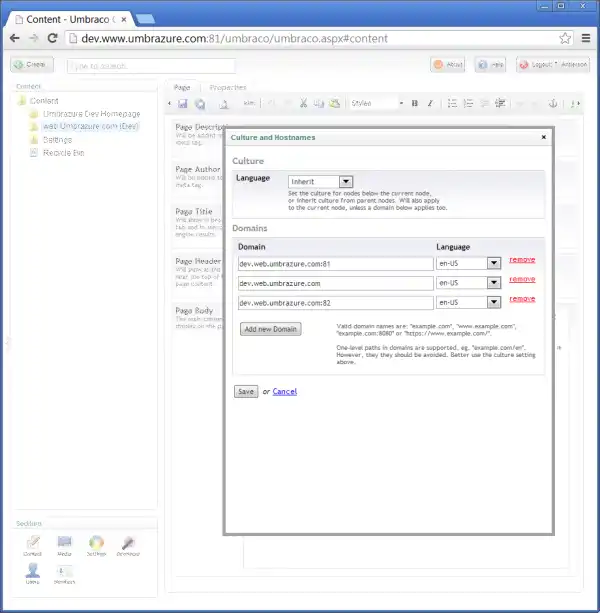
Edit the hostnames as shown below. I was having issues seeing the site properly, and I think it is because the emulator converts the port 81 you usually see in the address bar into a port 82 by the time it gets to Umbraco. Just to be safe, add the domain with port 82.
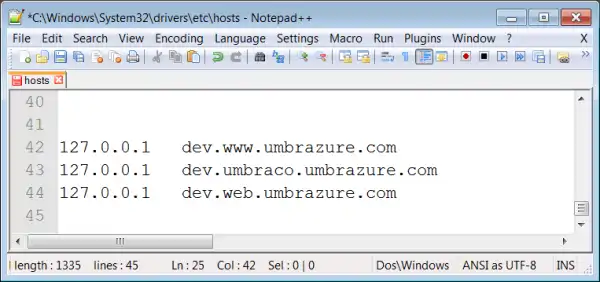
Modify your hosts file to add the new development domain.
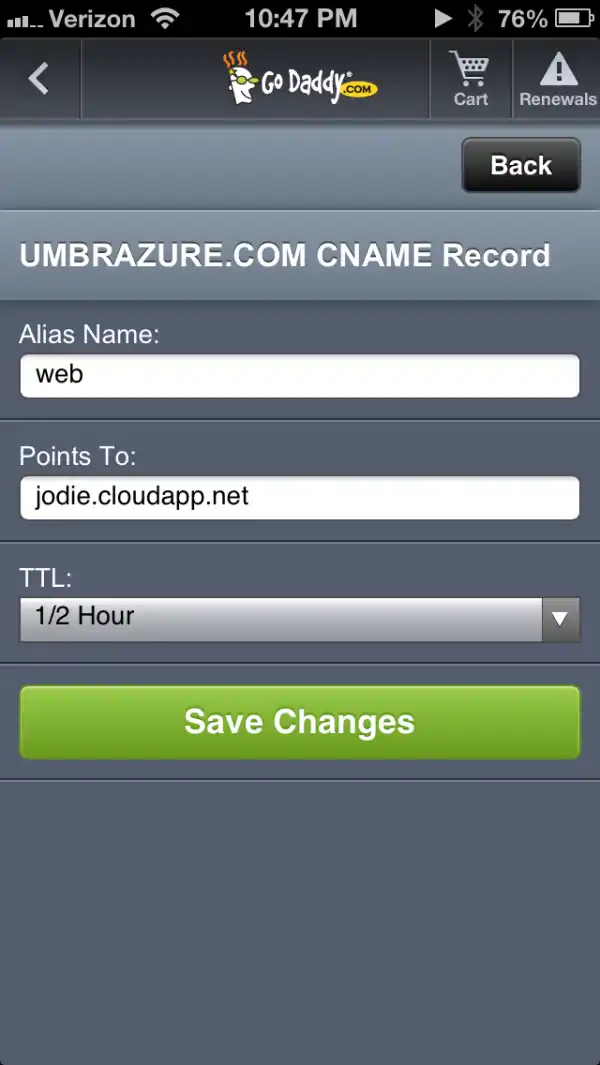
Create a new CNAME record with your live domain. Again, you can use the domain you've been using, or you can create an entirely new one.
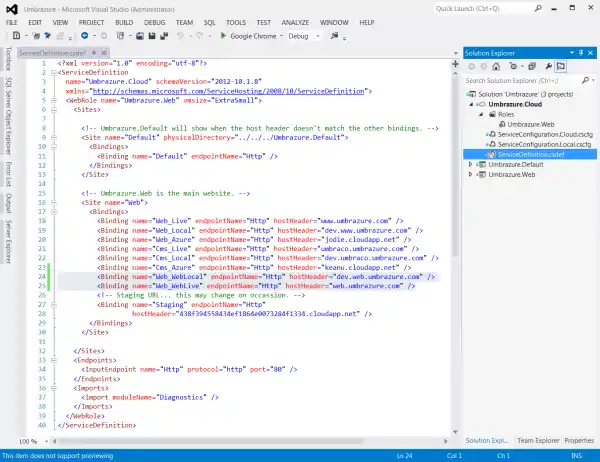
Add bindings so Azure knows which project to serve when an HTTP request is made (shown highlighted below).
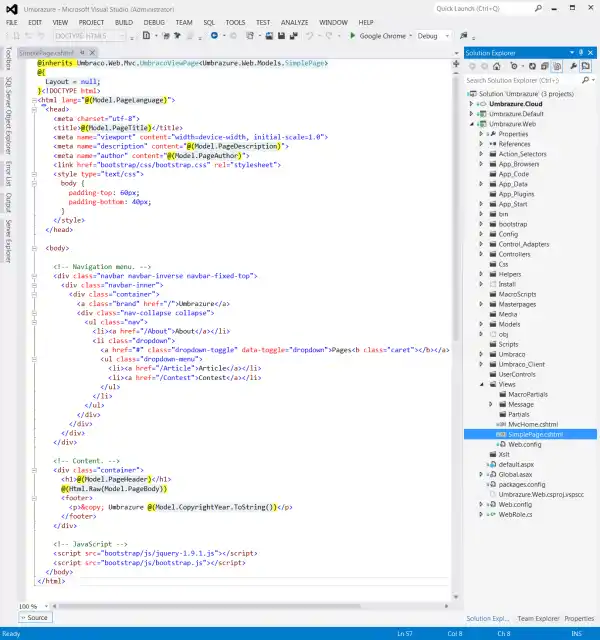
Include the view (aka template) you created in Umbraco into your project, and modify it so it matches the markup shown below.
@inherits Umbraco.Web.Mvc.UmbracoViewPage<Umbrazure.Web.Models.SimplePage>
@{
Layout = null;
}<!DOCTYPE html>
<html lang="@(Model.PageLanguage)">
<head>
<meta charset="utf-8">
<title>@(Model.PageTitle)</title>
<meta name="viewport" content="width=device-width, initial-scale=1.0">
<meta name="description" content="@(Model.PageDescription)">
<meta name="author" content="@(Model.PageAuthor)">
<link href="bootstrap/css/bootstrap.css" rel="stylesheet">
<style type="text/css">
body {
padding-top: 60px;
padding-bottom: 40px;
}
</style>
</head>
<body>
<!--
<div class="navbar navbar-inverse navbar-fixed-top">
<div class="navbar-inner">
<div class="container">
<a class="brand" href="http://www.codeproject.com/">Umbrazure</a>
<div class="nav-collapse collapse">
<ul class="nav">
<li><a href="http://www.codeproject.com/About">About</a></li>
<li class="dropdown">
<a href="#" class="dropdown-toggle" data-toggle="dropdown">Pages<b class="caret"></b></a>
<ul class="dropdown-menu">
<li><a href="http://www.codeproject.com/Article">Article</a></li>
<li><a href="http://www.codeproject.com/Contest">Contest</a></li>
</ul>
</li>
</ul>
</div>
</div>
</div>
</div>
<!--
<div class="container">
<h1>@(Model.PageHeader)</h1>
@(Html.Raw(Model.PageBody))
<footer>
<p>© Umbrazure @(Model.CopyrightYear.ToString())</p>
</footer>
</div>
<!--
<script src="bootstrap/js/jquery-1.9.1.js"></script>
<script src="bootstrap/js/bootstrap.js"></script>
</body>
</html>
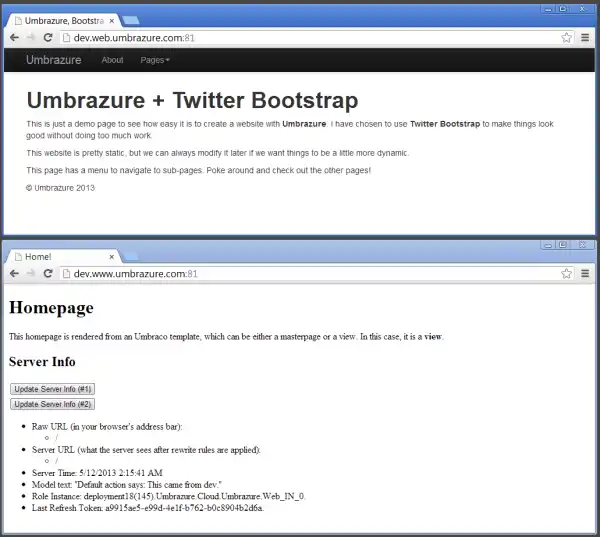
Start debugging your cloud project and visit your dev domain and you should see your new site running. The "old" site still runs at its own domain too.
Before you deploy the package to Azure, make sure to create the template there first. This would also be a good time to create the doctype (make sure it matches the one you created locally). Also, there is no need to put anything in the template on Azure yet... it will be replaced when you deploy your package.
Create the content node on your production environment, making sure to add your domain via the UI Umbraco provides to manage hostnames (shown below). And make sure the node is above Settings, just as you did locally.
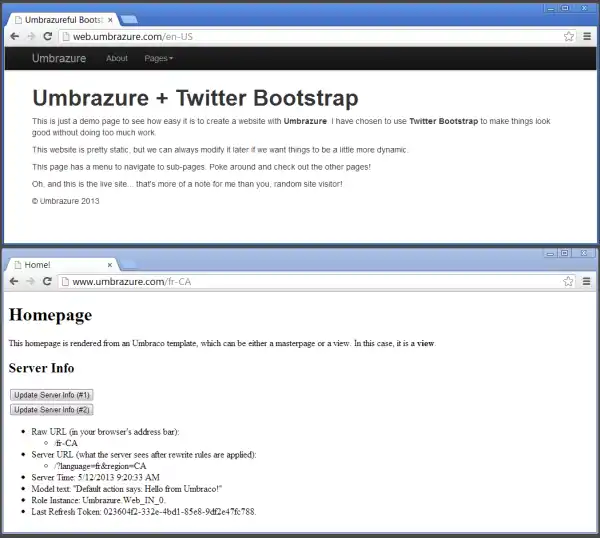
Finally, create your package and deploy it to Azure. You should now be able to see both of your websites.
Next, you are going to create some subpages under your root node.
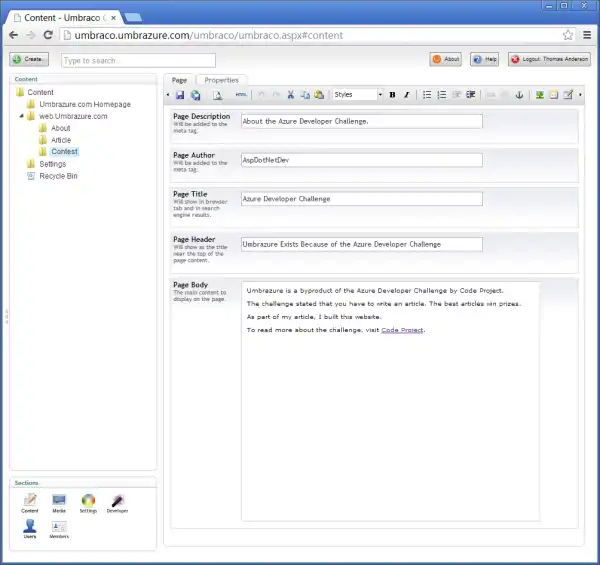
These are the subpage nodes you will create. Fill them in with whatever information you want, and publish them all.
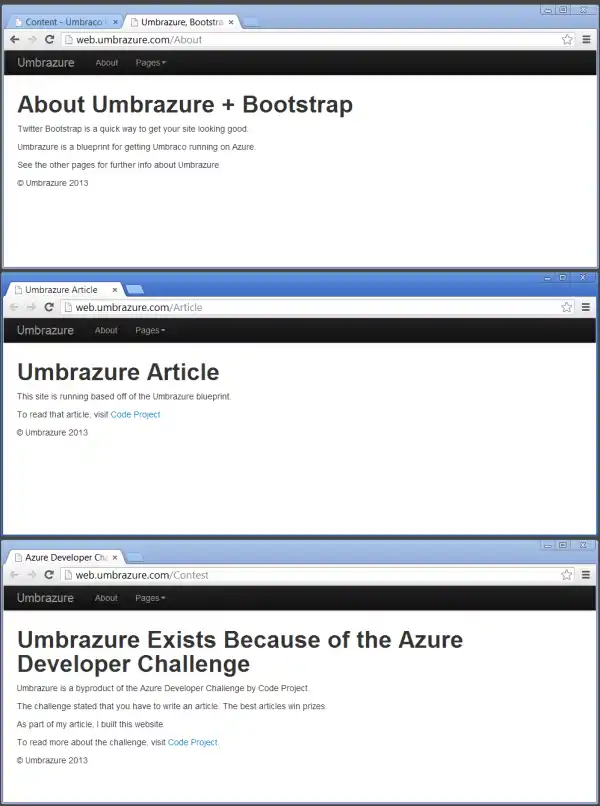
You're done! Here are all the subpages you just created.
Pitfalls / Fixes
Here are a few things I've come across while writing this article or in the past that you'll want to watch out for.
- Content node order. Ensure the content nodes are in the right order (ones without domains associated with them on the bottom). This cause me some issues. However, it may have just been because I wasn't using port 82 (the Azure emulators do some weird things).
- Ports. The Azure emulator does weird things with ports when you run your website from Visual Studio. Make sure to take into account the possibility that you may have to use port 81 in the address bar and your server code may encounter port 82. The typical port (though unseen) is port 80.
- Template creation. Templates are masterpages and views. If you try to create one in Umbraco when one already exists on the file system, you'll get an error, and who knows what side effects. Always create in Umbraco first.
- Cache issues. I had some issues with caches not being updated. Something to do with the transition from my old code to my new code. If you run into issues, simply reimage your instances (or delete them and reupload a package).
- Mixed configurations with XML transforms. The transforms I showed you for UrlRewriting.config work a little different than the ones for the web.config. With the web.config, you always debug in visual studio with the primary file. That is, the transforms are only applied when you package or publish. However, with the UrlRewriting.config transforms, they get applied every time you build, and they overwrite the primary file. That's why you store the main content in the UrlRewriting.Template.config file. Keep this in mind, as it could cause you to encounter mixed configurations.
- Session. Avoid server-side session unless absolutely necessary. If you do need it, you will have to create a custom session provider and share the session (such as in a database) across your web role instances. If yo don't do it right, that could slow your sites down.
- Machine key. I read somewhere that Azure automatically inserts a machine key into your web role web.config files. That would be good, but if it doesn't and you use ASP.NET Web Forms with Azure, you may have to do this yourself. I haven't done any view state stuff on Azure, so I'm not sure about this myself yet.
- SQL Server Management Studio limitations. SSMS can connect to your SQL Azure databases, but the functionality is very limited (e.g., no designers). Visual Studio has some SQL tools built in that work a little nicer, but still you will be dealing with limited GUI's when dealing with SQL Azure. It's not quite as nice as dealing with SQL Server.
- Run as administrator. If you have limited rights on your computer, always run Visual Studio as administrator. You'll run into problems if you don't. The same applies to Notepad++ when editing the hosts file.
- Umbraco likes Chrome. I have found strange issues when dealing with Umbraco in the past with any browser other than Chrome. When dealing with Umbraco, stay on the safe side and use Chrome when you can.
- Corporate proxies/firewalls. Ugh. Corporate proxies/firewalls are the bane of my existence. They can cause countless issues. For one, you may need to have port 1433 opened up to connect to SQL Azure. Also, the Server Explorer in Visual Studio requires strange workarounds to connect to blob storage. And entries in the hosts file don't seem to work unless I unplug my network cable. If you are doing this from work, be prepared for some hair pulling.
- Don't clean solution. If you do a "Clean Solution" in Visual Studio, you may lose your Umbraco DLL's in your bin folder. As long as you can restore them (such as via source control), that's fine, but keep that in mind. You might also want to look into keeping them in a different folder and having them copy to the bin on build. I haven't tried that approach myself, but I don't see why it wouldn't work.
- Version conflicts. I saw some warnings in Visual Studio related to different versions of DLL's being referenced. I think that's because I created the projects to target .Net 4.5, but Umbraco's web.config expects .Net 4.0. Didn't seem to cause any issues, but if you run into any maybe consider using .Net 4.0 projects or giving the web.config some TLC.
- Create user double tap. Don't click "Create User" twice during the Umbraco install. It may look like it's not doing anything, but if you hit it a second time, it may corrupt your database and you'll have to start over.
- Umbraco best practices. Some things in Umbraco seem like a good idea when you are learning (e.g., macros), but become a hindrance later on. Develop your own best practices and do what works for you. That it allows you to do so is one of Umbraco's greatest strengths.
Conclusion
If you've read all the way through the article, I'm impressed. However, your time hasn't been wasted. Getting a CMS up and running is a very marketable skill for a web developer to have. Getting one up and running on Azure, even more so, especially since that seems to be where the future is headed. Companies are shifting away from their old style of spending a huge amount of money on the personnel and extra servers (for peak load) necessary to maintain their web presence. The fact is, even the biggest of companies have been susceptible to very high load situations that their infrastructure was unable to handle (e.g., lots of web traffic after a successful Super Bowl ad).
With cloud technologies like Azure, they no longer have to constantly pay for worst case scenarios they will probably never be able to afford anyway. They can dynamically scale as necessary. With a blueprint like Umbrazure, you have a real way to help build the solution to their problem. You can work for any company that has a need for multiple websites, and that updates their content regularly enough to warrant a CMS. And with the Azure integration, you can make sure your implementation is rock solid for whatever the future holds. In all likelihood, that you are working on a project like this right now is why you read this article. Whatever the case may be, I hope this article has served you well. If you do end up using some of the techniques you've learned here, please leave a comment at the bottom of the article; I'd love to hear about it! And if you run into any issues, I'll see if I can help too.
Addendum: About The Source Code Downloads
There are currently two downloads for challenge two, both listed at the top of the article. One is the full code from the article, and the other is the same minus a few of the bigger files. I recommend you download the full version rather than the partial version. Due to a Code Project limitation, I couldn't upload the bigger one directly to their servers, so I stored it elsewhere and uploaded the partial one so you can use Code Project's source code browser feature to look at the files without leaving the article or downloading anything.
Note also that I removed some other items from the downloads out of necessity. For example, I removed my source control bindings, my user files, and the connection strings. The source code is really meant more for reference anyway, as you'll have to complete a few steps to get it up and running with your Azure setup.
One more thing. There is an easter egg in the code. Search for "easter egg" in the code and you should find it, should you want to remove it. I'm not going to say what it is though; I wouldn't want to ruin the surprise!
Glossary
Here are a few of the terms mentioned in the article, explained here for your reference.
- CMS. A content management system. It's a way for those who build the website to enter content into a clean UI without having to know a lot about web development. They can just type in some text and click a button, and they will see their changes on a web page. Makes building large websites much faster and easier.
- Umbraco (pronounce). Umbraco an an open source ASP.NET content management system. Here are some Umbraco related terms:
- Content Node. A chunk of data to display on the website. Usually, a content node defines all the data for a specific page. However, content nodes need not correspond to a page (they can be data containers only).
- Document Type / Doctype. A document type (doctype for short) is a way of defining the structure of the data entered on a content node. For a given document type, you can create many nodes, each with their own values specified according to the structure dictated by the document type.
- Template. This is the Umbraco term for two concepts (masterpages and views). Since Umbraco can work with ASP.NET Web Forms and ASP.NET MVC, you get to choose which type of template you want to use. When you create a content node, you can choose which template you want to use to display the data on that content node.
- Property. A property is a key/value pair you add to a document type. In the doctype, you specify the name of the property, and when a content node is created from that doctype, the creator will fill in the values for each property. The values on the properties are then displayed by the templates.
-
- Azure (pronounce). Microsoft's cloud offering. Allows you to create a bunch of web servers and databases and file servers as a service, rather than paying for the hardware yourself. Some related terms:
- Web Role. The Azure version of a web server. Has some extra features. Since Azure does load balancing by default, you can create multiple web role instances to allow for more website traffic.
-
- Umbrazure (pronounce). A blend word of the two words "Umbraco" and "Azure". That is what this article is all about. A way to deploy and use Umbraco on the Azure cloud. I made this term up, but feel free to use it as if it were in a dictionary somewhere.
- Twitter Bootstrap. A set of client-side components that make your pages look good and function well. Things like styles for common elements and JavaScript for common functions such as drop down menus. It was created by the folks at Twitter.
- Hostname / Domain. I use these two terms interchangeably. Basically, the main part of the URL, without the path.
Resources
Here are some resources you can use to further your understanding of Umbraco, Azure, and the rest of the concepts in this article.
- Umbraco
- Azure
- Windows Azure Documentation
- Azure Portal. The portal itself has some nice documentation. Just click the question mark on the bottom right of the screen and you'll get help about that particular screen.
-
- Other
