Introduction
When Windows 7 was announced, some years ago, I was expecting a total revamp of the menu system which Microsoft introduced with Windows 95. But to my disappointment, it hasn't changed anything drastically. But multi-touch enabled OS was my idea (I've seen people saying so many weird things as their idea in the Win 7 TV ads, so I wanted to call this as mine.) On the other hand, I was inspired by the iPhone’s UI which is really designed in a finger friendly manner and I though I should implement something like that for Windows too. As a result, this simple application came into reality.

What is it?
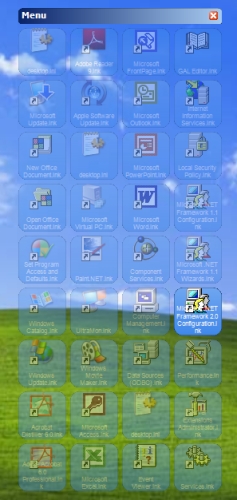
This is a control that creates buttons for each item added to the menu items collection and sets the buttons to semi transparent. When the mouse is hovered over, the button 'slowly' becomes fully visible and goes back to semi transparent when the mouse moves out.
It also let you re-arrange the buttons. When the title bar is double clicked, the buttons start wobbling and the user can drag-drop and re-arrange the order.
What is this Sample?
The sample what I have given here is a very simple one which allows the users to drag and drop any files from a Windows folder into the title bar and the application creates a shortcut for each file you dropped. It extracts the icons and file names to create the button and then when the button is clicked, it will launch the file in its registered application.
What Techniques Have I Used?
A number of simple techniques have been used here to achieve all these functionalities.
Dimmable Button Array
To my knowledge, none of the Windows Form controls other than Form object support the opacity property which allows setting transparency levels. Therefore, I have created an array of forms like buttons.
Private Sub MoveChildForms()
Dim iY As Integer = Me.Bottom + m_DimmableMenu.Spacing
Dim iX As Integer = Me.Left
For Each oMenu As frmMenu In ChildMenus.Values
oMenu.SetPosition(New Point(iX, iY))
Me.MaximumSize = New Size((iX - Me.Left) + m_DimmableMenu.ItemSize.Width, 20)
Me.Size = Me.MaximumSize
Me.MinimumSize = Me.MaximumSize
If iY < (Me.Top + m_DimmableMenu.Size.Height) Then
iY = oMenu.Bottom + m_DimmableMenu.Spacing
Else
iY = Me.Bottom + m_DimmableMenu.Spacing
iX = oMenu.Right + m_DimmableMenu.Spacing
End If
If oMenu.m_iAnimationId = 1 Then
oMenu.StartAnimation()
End If
Next
Dim r As Rectangle = Me.RectangleToScreen(Me.ClientRectangle)
m_DimmableMenu.UpdateRect(r.X, r.Y, Me.Width, iY - Me.Top)
End Sub
Wobbly Buttons
When the title bar is double clicked, the buttons become wobbly. I've been wondering how to make this. But this is the simplest of all.
Me.Location = New Point(m_InitPos.X + m_oRnd.Next(-2, 2), _
m_InitPos.Y + m_oRnd.Next(-2, 2))
Curvy Buttons
I wanted to make the buttons look like the iPhone buttons with the curvy corners. A simple geometry helped me in achieving this.
Public Shared Function GetRoundedRectanglePath(ByVal r As Rectangle, _
ByVal d As Integer) As GraphicsPath
Dim gp As New GraphicsPath()
gp.AddArc(r.X, r.Y, d, d, 180, 90)
gp.AddArc(r.X + r.Width - d, r.Y, d, d, 270, 90)
gp.AddArc(r.X + r.Width - d, r.Y + r.Height - d, d, d, 0, 90)
gp.AddArc(r.X, r.Y + r.Height - d, d, d, 90, 90)
gp.AddLine(r.X, r.Y + r.Height - d, r.X, CInt(r.Y + d / 2))
gp.CloseFigure()
Return gp
End Function
Registered File Icon Extraction
In my sample application, I am creating button with icons. This is an interesting thing I found. I always wanted to know how the registered icon for file extension can be extracted without making horrendous Windows API calls. Finally, I found a simple functionality in the .NET Framework's Icon class itself.
Public Shared Function ExtractAssociatedIcon(ByVal filePath As String) _
	As System.Drawing.Icon
Member of: System.Drawing.Icon
Summary:
Returns an icon representation of an image contained in the specified file.

Parameters:
filePath: The path to the file that contains an image.

Return Values:
The System.Drawing.Icon representation of the image contained in the specified file.

Exceptions:
System.ArgumentException: filePath does not indicate a
valid file.-or-filePath indicates a Universal Naming Convention (UNC) path.
How You Can Use It?
I've developed this on my own interest and it is free to be used by anyone for their personal use. But I think it is reasonable to expect a cut for myself, if anyone is trying to use this for commercial purposes.
As I mentioned earlier, I've created this as a control so that it can be re-used for different purposes. The following 2 images show 2 simple applications.

An example shows how to create buttons with default settings.

An example shows how to create colourful buttons.
What's Next?
- Download the code and compile the
WobblyMenu.Control project - Create a new project and add reference to
WobblyMenu.Control assembly - Create an instance to:
WobblyMenu.Control.DimmableMenu
- [Optional] Set the maximum size of your work area
[control].Size = New Size(width, height)
- [Optional] Set the button size:
[control].ItemSize = New Size(width, height)
- Add menu items and assign them to
WobblyMenu.Control.MenuItem
Dim WobblyMenu.Control.MenuItem Instance = _
	[control] .MenuItems.AddMenuItem(Text, Image)
- Add menu items and assign them to
AddHandler [menuitem].OnClick, AddressOf ItemClickHandler
- [Optional] Handle OnClose event
[control].OnClose, AddressOf CloseEventHandler
- Display the menu
[control].Show()
I found this control very useful and I am using this in many different applications. I will be happy to hear your comments and suggestions for improvements. Please keep an eye on the history section and I might be updating or fixing bugs.
History
- V 1.00 - 09/Mar/2010 11:39 - First submission
- V 1.20 - 17/Mar/2010 10:19 - Added the following functionalities:
- Specify Rearrangement Animation effect (Wobble / Wiggle / Both)
- Ability to delete a menu item
- Save the order after rearrangement
- Tooltip
