Introduction
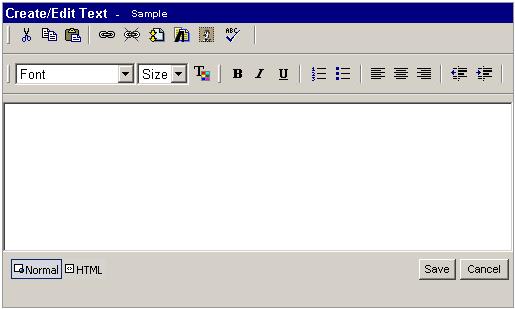
This control is used in master driven template web pages.
Say if you want to create a mail box and allow user to create a page to
compose with rich text editor, you can use this component which allows you to
have all sorts of formatted text like Colored, Bold, Italicized, Indented,
....... you can even have the Links and pictures added.
You also can view the HTML part of the text being added in the control.
Getting In
Before getting in to the part -- coding the control, I would like to explain
how to add the control in the web page. For that, the dependencies of the
controls are:
- HtmlEditUtility.js
- index.htm
- colorpanel.htm
These three files are necessary to add the control.
Steps to Add the Control:
- Add the HtmlEditUtility.js in
script block.
<SCRIPT language="javascript" src="HtmlEditUtility.js"></SCRIPT>
- Then in the area from where you want the control to be visible, you need
to call the JavaScript method
ShowCM() with two parameters, one
is the result textbox and the other is the title to be displayed.
Example:
<asp:textbox id="t1" textmode="multiline"
       name = "t1" runat = "server/">
<img src="show.jpg" onclick = "ShowCM(t1,'Sample')">
Here, you can see the ShowCm method. That is, here
t1 is the text box where the resultant edited text of the control
will fall, and if you write something in the textbox and click on the
image, it will populate the control with the text you typed in
t1.
- Make sure you copy the control's HTML which is available in the
download, and copy it in the page where you wanted to display. If you want
them in any particular position, specify the style
Z-Index,
Top, and Bottom properties for fixing them in
specified areas.
Like:
style="DISPLAY: none; Z-INDEX: 101;
    LEFT: 235px; POSITION: absolute; TOP: 258px"
This displays it at the top of all the controls, in the (235,258)
position.
With this, the control is ready for you to work.
Now, we can move to the actual stuff, creating the Control:
I had used a IFrame for this process and set its design mode ON,
so that it allows us to type in the web page (index.htm). I think now you
can understand why we used index.htm. Same way the colorpanel.htm
is used to pick the color from the table and fill in to the selected text.
We have a method execCommand().
Iframe.document.execCommand();
which allows us to execute commands on the Iframe. Specify the
Iframe name there.
We can execute the Iframe with commands like
CreateLink, InsertImage, ForeColor....
Like this, there are a set of many commands.
Execute them like this:
NewsBody_rich.document.execCommand("InsertImage","TextEdit.jpg");
Here, the NewsBody_rich is the Iframe and the
InsertImage is the command that inserts the image in the
Iframe, and the image is TextEdit.jpg.
The function in the HtmlEditUtility.js that does the trick is:
function cmdExec(cmd,opt)
{
  if (isHTMLMode)
  {
    alert("Formatting happens only in Normal mode");
    return;
  }
  NewsBody_rich.focus();
  NewsBody_rich.document.execCommand(cmd,"",opt);
  NewsBody_rich.focus();
}
This is the function that makes every thing happen.
For Spell Check you need to do the Following
In Internet Options security Settings --> Custom Level --> Initialize and
Script controls not Marked as safe --> enable
actually this uses the Word applications as the default spell checker so u
need to do some macro settings there that is
Tools --> options --> security--> macro security --> Medium Level
this will do the rest for the spell checker to work.
The main logic used here is:
- First is, as the design mode of
iframe is turned on, we are
typing the text and all formats in the inner text of the iframe.
- Second one is, executing all the contents by using the
execCommand method in JavaScript.
- Third and final is, retrieving the
InnerText of the
Iframe. This is the trick used to accomplish the task.
Now, the code and the control is ready for use!


 General
  News
News  Suggestion
  Question
  Bug
Bug  Answer
  Joke
Joke  Praise
  Rant
Rant  Admin
Admin 


 I decided to start developing a "Rich Text Editor" as a "Component".
 It seems to be working well when I include my "richEditor" Component in a webform file (ASPX) in this way:
![Rose | [Rose]](https://codeproject.global.ssl.fastly.net/script/Forums/Images/rose.gif) Pleease, Help me
Pleease, Help me 
 ok so that its not possible in the manner u tried what u do when u click ok inthe button in the editor have a javascript fired and poppulate it to a hidden filed or to a textbox made invisble and from there u can get the test typed in the editor so fromt here u can collect the data and so what ever u want !!
  this will work the same logic is used in this article u can refer the same for this
  .
.
 ohh is it ok i will check and tell u, am not gettng any error... ok will check and tell u