We use the SyntaxHighlighter from Alex Gorbachev on this page to highlight our code. Unfortunately, TinyMCE has some issues with pre-formatted text (pre HTML element). Most important: It places line breaks (<br />) after the lines. After some research, I ended up with the following setup:
$(document).ready(function () {
fixNewLines = function (content) {
var codeBlocks = content.match(/<pre.*?>[^]*?<\/pre>/mg);
console.log('codeBlocks', codeBlocks);
if(codeBlocks == null) return content;
for(var index=0; index < codeBlocks.length; index++) {
content = content.replace(codeBlocks[index],
codeBlocks[index].replace(/<br\s*\/?>/mgi, "\n"));
}
return content;
}
tinymce.init({
selector: "#@ViewData.TemplateInfo.GetFullHtmlFieldId(string.Empty)",
entity_encoding: "raw",
content_css : "/Content/tinymce/Customized.css",
height: 450,
width: 790,
plugins: [
"advlist autolink lists link image charmap print preview anchor template",
"searchreplace visualblocks fullscreen",
"code additional_formats",
"insertdatetime media table contextmenu paste@(canUploadPictures ? " jbimages" : null)"
],
toolbar1: " formatselect styleselect template link image@(canUploadPictures ?
" jbimages" : null) | undo redo code",
toolbar2: "bold italic codeElement varElement | bullist numlist outdent indent |
alignleft aligncenter alignright alignjustify ",
relative_urls: true,
templates: [
{ title: 'C# Code Template',
content: '<pre class="brush: csharp;">/*Code Goes Here*/</pre>' },
{ title: 'JavaScript Code Template',
content: '<pre class="brush: js;">/*Code Goes Here*/</pre>' }
],
setup: function (editor) {
editor.on('BeforeSetContent', function (e) {
console.log('BeforeSetContent event', e);
e.content = fixNewLines(e.content);
});
editor.on('SaveContent', function (e) {
console.log('SaveContent event', e);
e.content = fixNewLines(e.content);
});
editor.on('GetContent', function (e) {
console.log('GetContent event', e);
e.content = fixNewLines(e.content);
});
}
});
});
This code removes the <br /> stuff from the pre elements. It is not very elaborate at the moment, but it works quite good.
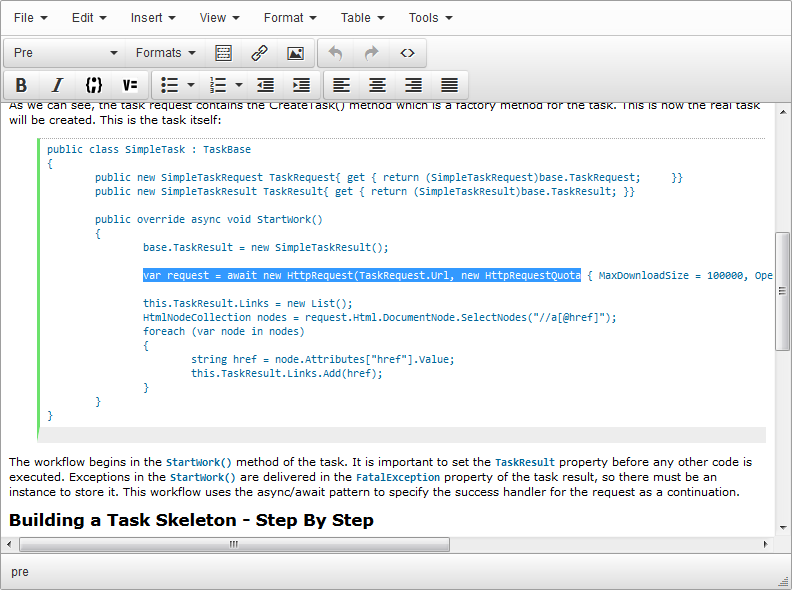
Additionally, I want to have a better WYSIWYG experience with TinyMCE, so I added a custom style sheet, to make a pre element look nicer in the editor. This is the stylesheet.
h1 {
}

h2 {
    margin-top: 10px;
    margin-bottom: 5px;
}

h3 {
    margin-top: 8px;
    margin-bottom: 4px;
}

p {
    margin-top: 3px;
    margin-bottom: 7px;
}

a {
    color: #003399;
    text-decoration: underline;
}

pre {
    font-family: consolas, monospace;
    font-weight: normal;
    color: #069;
    border-top: 1px dotted #a9a9a9;
    border-bottom: 16px solid #ededed;
    border-left: 3px solid #6CE26C;
    margin-left: 28px;
    padding: 3px 0px 5px 7px  ;
}

code {
    font-family: consolas, monospace;
    font-weight: bold;
    color: #069;
}

    code a {
        font-family: consolas, monospace;
        font-size: 100%;
        font-weight: bold;
        color: #069;
        text-decoration: underline;
    }

a > code {
    font-family: consolas, monospace;
    font-size: 100%;
    font-weight: bold;
    color: #069;
    text-decoration: underline;
}

ul {
    list-style-type: disc;
    padding-left: 14px;
    margin-top: 3px;
    margin-bottom: 7px;
}

    ul > li {
        margin-bottom: 4px;
    }

ol {
    list-style-type: decimal;
    padding-left: 14px;
    margin-top: 3px;
    margin-bottom: 7px;
}

    ol > li {
        margin-bottom: 4px;
    }
These styles give the pre and code elements the same spacing and kind of the same visual appearance as they have on the real site. Now it looks like this when I edit topics with pre elements:

The topic in the editor is: Simple Task Sample: Crawl a Website and Extract all Links
