Introduction
This article is a continuation of Create a CRUD web app using JQuery Mobile and LocalStorage and seeks to add functionality for authentication control in our JQuery Mobile App. The purpose is for the end user to provide credentials to use the NoteKeeper application. A user is requested to enter their email address and their registered password. The application retrieves the records from Localstorage and compares the user's password and if these does not match show an alert that the user cannot sign in. The password is CaSeSenSitIvE, however is stored as plain text. A plugin that can decrypt and encrypt the password can be added to ensure passwords are secure, however that has not been implemented. We can look at that in another day.
The previous article spoke in depth about Creating, Reading, Updating, Deleting and Listing records and I will not delve into that here as the principles applied here are the same. The attached zip contains all the code in the previous NoteKeeper app but with a Sign In, Sign Up / Add User and List Users screens.
For more details about (a) adding records, (b) updating records, (c) deleting records and (d) listing records please refer to the article mentioned above. Here emphasis will be on the Sign In Screen and we will just touch base on Adding users or preferebly, Sign Up screen. This is the purpose of this article.
1. Provide a sign in screen with an email and password prompt to ask the user to Sign In. This is depicted with Figure 1 below
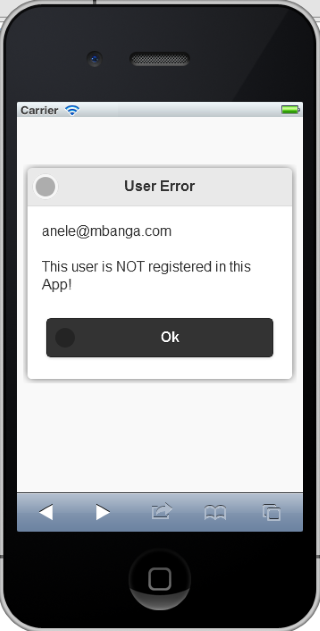
2. If the user has entered incorrect credentials/account is in-active, show an alert box as depicted with Figure 2 below and
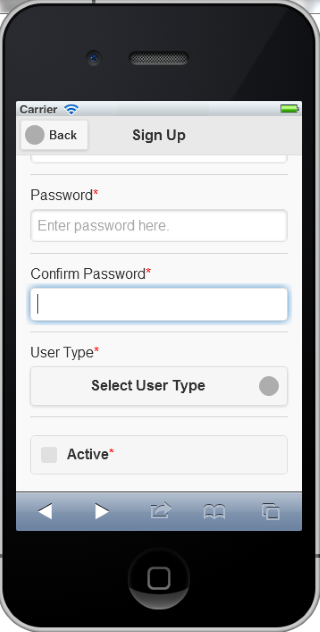
3. If the user does not exist, provide ability to Sign Up i.e. this is the same as Creating a user record. This is depicted with Figure 3 below.
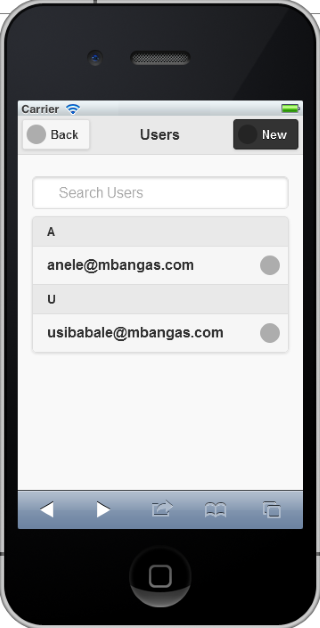
3. List available users that can be updated as depicted with Figure 4 below,
5. Toggle a page header between Sign Up and Add User. The same screen will be used to Create a new user and Sign Up.
6. Get and Set DropdownList/SelectMenu/ComboBox item using JQuery.
7. Hide and show form elements using JQuery.
NB: The same assumptions made in the previous article still stand.
Here is the updated source that includes security: Download notekeeper.zip
Background
A user of the NoteKeeper application should be authenticated to ensure that access to the Notes of end users are secured. Authorization however has not been implemented yet to check if users have authority to perform updates and deletions, thus such permissions are not checked or verified here. I have however provided a dropdown list to choose between an Administrator and a User, this just for demonstration to put a point about item 6 above.
This is just to demonstrate how we can provide security to our JQuery Mobile app. The limitation of this however is that irrespective of which user Signs Up and then Signs In to Notekeeper, they will access all the notes. To eliminate that, one could define the LocalStorage key with a suffix of the user's email address i.e. changing the key from notekeeper-notes to notekeeper-notes-email@domain.com.
For the purposes of this exercise, the email address is the key that identifies each user in the system.
Using the code
To define our app to include security features, a Sign In and a Sign Up screen should be defined. When one started the previous NoteKeeper, they saw the Springboard however in this case, before the springboard is shown, a screen prompting the user to Sign In/Sign Up will be shown as depicted below.
Sign In - screen html definition and resulting output.
<body><div id="pgSignIn" data-role="page">
<header id="pgSignInheader" data-role="header" data-position="fixed">
<h1>Welcome to NoteKeeper</h1>
</header>
<div id="pgSignIncontent" data-role="content" class="content">
<form action="#" method="post">
<div data-role="fieldcontain">
<label for="pgSignInEmail" id="lblpgSignInEmail">Email Address<span style='color:red;'>*</span></label>
<input type="email" required="required" title="Enter email address here." name="pgSignInEmail" id="pgSignInEmail" placeholder="Enter email address here." autocomplete="off" data-clear-btn="true"></input>
</div>
<div data-role="fieldcontain">
<label for="pgSignInPassword" id="lblpgSignInPassword">Password<span style='color:red;'>*</span></label>
<input autocomplete="off" type="password" required="required" title="Enter password here." name="pgSignInPassword" id="pgSignInPassword" placeholder="Enter password here." data-clear-btn="true"></input>
</div>
<div><button type="submit" id="pgSignInIn" class="ui-btn ui-corner-all ui-shadow ui-btn-b">Sign In</button>
</div>
<div><button id="pgAddUserUp" class="ui-btn ui-corner-all ui-shadow">Sign Up</button>
</div>
</form>
</div>
<footer id="pgSignInfooter" data-role="footer" data-position="fixed">
<h1>Powered by JQM.Show © Anele Mbanga 2015</h1>
</footer></div>
Figure 1

When a user clicks on Sign In, the entered email address and password are checked against local storage and if these match the user is taken to the new springboard. If the user is not found or the password is not matching or the user is no longer active, an alert box is shown telling the user of this error. This is depicted with Figure 2 below.
Alert Box - screen html definition and resulting output when incorrect user credentials or account inactive.
In the previous article I spoke in detail about the message box. The same principle applied in the message box applies here however the alert box does not perform any methods in this case but just displays and takes the user to the same screen. The alert box just like the messagebox is dynamically updated as per error that we want to raise.
<section data-transition="pop" id="alertbox" data-role="dialog">
<header id="alertboxheader" data-role="header" data-position="fixed">
<h1>Error</h1>
</header>
<div id="alertboxcontent" data-role="content" class="content">
<div id="alertboxtitle">
</div>
<br><div id="alertboxprompt">
<p>An error has been encountered!</p>
</div>
<br><div style="text-align: center;" id="alertboxbuttons" class="ui-grid-solo">
<div class="ui-block-a">
<a data-method="" data-id="" data-topage="" id="alertboxok" data-role="button" data-icon="check" data-theme="b">Ok</a>
</div>
</div>
</div>
</section>
- The alertboxheader will be updated with the title of the Alert box.
- The alertboxtitle will display a title as per item we want to display.
- The alertboxprompt will contain the message we want to show the user and
- alertboxok is the only button to click of the alert.
I also did not want to use a plugin for this alert box and will look at ways of showing it on top of the screen in question.
Figure 2

Sign Up - screen html definition and resulting output.
There are two ways to add users to the app, through Sign Up or an existing user adding a new user by selecting New from the Users listing page. A users listing page will be similar in structure to the Notes listing page as discussed in the previous article however will show user's emails. Selecting a user from that list will show up the Edit User page where a user can update the user details.
<div id="pgAddUser" data-role="page">
<header id="pgAddUserheader" data-role="header" data-position="fixed">
<h1>Add User</h1>
<a data-role="button" id="pgAddUserBack" data-icon="arrow-l" class="ui-btn-left">Back</a>
</header>
<div id="pgAddUsercontent" data-role="content" class="content">
<form action="#" method="post" id="pgAddUserForm" name="pgAddUserForm">
<div data-role="fieldcontain">
<label for="pgAddUserFirstName" id="lblpgAddUserFirstName">First Name<span style='color:red;'>*</span></label>
<input type="text" required="required" title="Enter first name here." name="pgAddUserFirstName" id="pgAddUserFirstName" placeholder="Enter first name here." autocomplete="off" data-clear-btn="true"></input>
</div>
<div data-role="fieldcontain">
<label for="pgAddUserLastName" id="lblpgAddUserLastName">Last Name<span style='color:red;'>*</span></label>
<input type="text" required="required" title="Enter last name here." name="pgAddUserLastName" id="pgAddUserLastName" placeholder="Enter last name here." autocomplete="off" data-clear-btn="true"></input>
</div>
<div data-role="fieldcontain">
<label for="pgAddUserEmail" id="lblpgAddUserEmail">Email Address<span style='color:red;'>*</span></label>
<input type="email" required="required" title="Enter email address here." name="pgAddUserEmail" id="pgAddUserEmail" placeholder="Enter email address here." autocomplete="off" data-clear-btn="true"></input>
</div>
<div data-role="fieldcontain">
<label for="pgAddUserPassword" id="lblpgAddUserPassword">Password<span style='color:red;'>*</span></label>
<input autocomplete="off" type="password" required="required" title="Enter password here." name="pgAddUserPassword" id="pgAddUserPassword" placeholder="Enter password here." data-clear-btn="true"></input>
</div>
<div data-role="fieldcontain">
<label for="pgAddUserConfirmPassword" id="lblpgAddUserConfirmPassword">Confirm Password<span style='color:red;'>*</span></label>
<input onfocus="ValidatePassword(document.getElementById('pgAddUserPassword'), this);
" oninput="ValidatePassword(document.getElementById('pgAddUserPassword'), this);
" autocomplete="off" type="password" required="required" title="Enter confirm password here." name="pgAddUserConfirmPassword" id="pgAddUserConfirmPassword" placeholder="Enter confirm password here." data-clear-btn="true"></input>
</div>
<div data-role="fieldcontain">
<label for="pgAddUserUserType" id="lblpgAddUserUserType">User Type<span style='color:red;'>*</span></label>
<select name="pgAddUserUserType" id="pgAddUserUserType" data-native-menu="false">
<option value="null" data-placeholder="true">Select User Type</option>
<option value="admin">Administrator</option>
<option value="user">User</option>
</select>
</div>
<div data-role="fieldcontain">
<input type="checkbox" required="required" title="" name="pgAddUserActive" id="pgAddUserActive" autocomplete="off" value="Active"></input>
<label for="pgAddUserActive" id="lblpgAddUserActive">Active<span style='color:red;'>*</span></label>
</div>
<div><button type="submit" id="pgAddUserSave" class="ui-btn ui-corner-all ui-shadow ui-btn-b">Save User</button>
</div>
</form>
</div>
</div>
The Sign Up screen asks the user for the following details: First Name, Last Name; Email Address; Password; User Type; Active Status. Now that I think of it, you can by default hide the User Type and Active when a user is signing up. The user should not see these as by default when a person Signs Up they are Active and will receive a User type as they will not be administrators. It's easy to hide and show elements with JQuery. You just pass the name of the element you want to show or hide.
$('#pgAddUserActive').hide();

$('#pgAddUserUserType').hide()
To show an element, replace .hide with .show.
The Add User screen's header will be changed to Sign Up using
$('#pgAddUserheader h1').text('Sign Up');
when accessed from the Sign In scree and back to
$('#pgAddUserheader h1').text('Add User');
When accessed from by clicking the New button from the User's listing page.
Figure 3

Figure 3.1

Users Listing - html definition and outout
The users listing screens acts the same way as the Notes Listing. When a user's email address is selected, a screen to edit the user details is opened.
<div id="pgUser" data-role="page">
<header id="pgUserheader" data-role="header" data-position="fixed">
<h1>Users</h1>
<a data-role="button" id="pgUserBack" data-icon="arrow-l" class="ui-btn-left">Back</a>
<a data-role="button" id="pgUserNew" data-icon="plus" data-theme="b" class="ui-btn-right">New</a>
</header>
<div id="pgUsercontent" data-role="content" class="content">
<ul data-role="listview" data-inset="true" id="pgUserList" data-autodividers="true" data-filter="true" data-filter-placeholder="Search Users" data-filter-reveal="false">
<li data-role="list-divider">UserHdr</li>
<li id="noUser">You have no users</li>
</ul>
</div>
</div>
Figure 4

Adding a new user
Adding a new user screen will open the same Sign Up screen but toggle the header to be Add User as depicted in Figure 5 below.
Figure 5

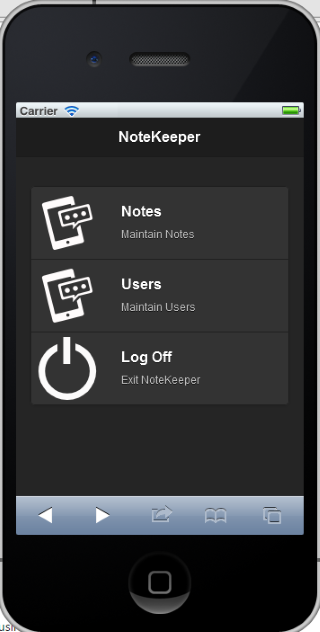
That concludes how to add security features to the NoteKeeper application. Now when you run the application, after Sign In, your springboard will be different with a users item and Log off, see below. Selecting Notes will open the list of notes available and selecting Users will take one to the list of users available. Selecting Log Off will take the user to the Sign In page.

Thanks for taking time to view this article and please dont forget to vote if you like it.
Points of Interest
This article seeks to demonstrate how to add simple security features in a crud jquery application. A user is prompted for a username and password and also functionality to sign up. One of the interesting elements added to this app is the dropdown list that is able to get read and also set via jquery code. For that kind of control to reflect changes, one needs to perform a refresh method of the element. I will relook the issue of hiding and showing elements as this seems to be a little buggy though the recommended way of doing it has been applied.
History
Compared to the last article, security features have been added and ability to sign up have been added to the web app. The springboard has also been updated to include the new users item for users to enable access to existing users.
