Square to Rounded Button
Introduction
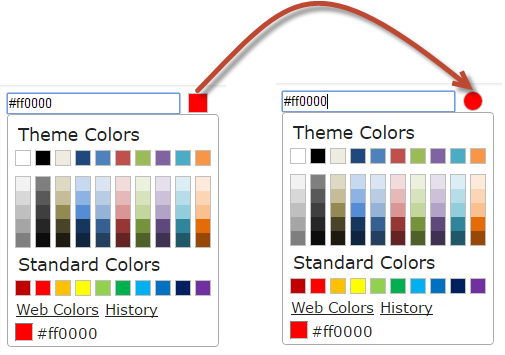
In this blog, we will explore the trick to replace the default square ColorPicker Button with a rounded one.
Background
One recent requirement lead to this research, where rounded button was needed instead of the default square one.
Step by Step
We will use ColorPicker plugin for our task. Let’s start coding.
Step-1: Add Plugin References
You need to refer jQuery and ColorPicker Plugin references.
We need
- jQuery
- jQuery UI (js and CSS)
- ColorPicker (js and CSS)
<script src="https://ajax.googleapis.com/ajax/libs/jquery/2.1.1/jquery.min.js" type="text/javascript" charset="utf-8"></script>
<script src="https://ajax.googleapis.com/ajax/libs/jqueryui/1.11.1/jquery-ui.min.js" type="text/javascript" charset="utf-8"></script>
<script src="js/evol.colorpicker.min.js" type="text/javascript" charset="utf-8"></script>

<link rel="stylesheet" type="text/css" href="http://ajax.googleapis.com/ajax/libs/jqueryui/1.11.1/themes/ui-lightness/jquery-ui.css">
<link href="css/evol.colorpicker.css" rel="stylesheet" type="text/css">
You can use the online googleapi links, otherwise download and use from the official jQuery Site. For ColorPicker, Save the files from GitHub Source and use it in your project. According to the code, there is a js folder, where evol.colorpicker.min.js is present and css folder, where evol.colorpicker.css is stored. Please be careful with the paths to the files, otherwise it won’t work.
Step-2: Add Input Control for ColorPicker
Just add a TextBox with HTML input tag.
<input type="text" id="mycolor" />
Step-3: Script for ColorPicker
$(document).ready(function () {
$("#mycolor").colorpicker({
color: "#ff0000"
});
});
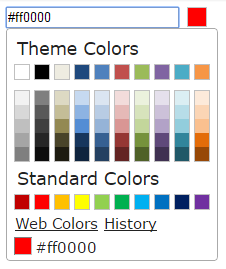
Now, if you click on the TextBox or the “square button”(next to the TextBox), it will show you a widget below to that to pick a color. Picture shown below.

ColorPicker Square Button
Step-4: Inspect the HTML ColorPicker Source
When you inspect the area which shows the ColorPicker along with the TextBox, you will get the below div.
<div style="width:201px;">
    <input type="text" id="mycolor" class="colorPicker evo-cp0">
    <div class="evo-pointer evo-colorind" style="background-color:#ff0000"></div>
</div>
So, it surrounded the input with a div and inside that it added another div (see highlighted), which is the button. Now we just need to change it to round. Is it easy? Let’s explore in the next step.
Step-5: Assign Border Radius to the Button Div
Let’s add CSS property border-radius to the button div having classes evo-pointer evo-colorind. I have just selected the div by one class, that is evo-pointer
$(document).ready(function () {
$("#mycolor").colorpicker({
color: "#ff0000"
});
$(".evo-pointer").css("border-radius", "15px");
});
The HTML changes to the below with border-radius: 15px; added to the style.
<div style="width:201px;">
    <input type="text" id="mycolor" class="colorPicker evo-cp0">
    <div class="evo-pointer evo-colorind" style="border-radius: 15px; background-color: rgb(255, 0, 0);">
    </div>
</div>
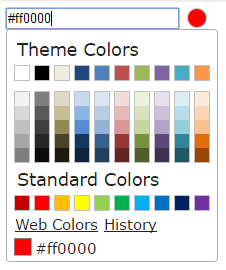
Wow !!! It is done. See the picture below.

ColorPicker Rounded Button
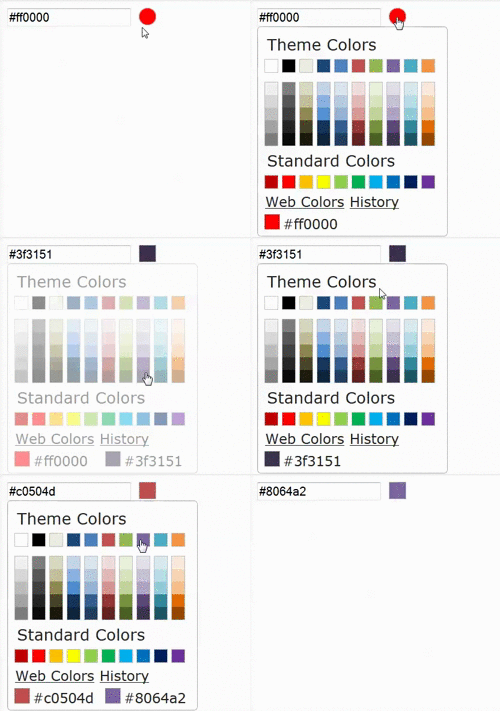
Is it done? No, not yet. Hold on. Let’s test. If you select any color from the widget, then you will see that the button again reverts to the square one. The reason is the button div is dynamically assigned each time you select any color from the picker. The HTML reverts back to the original.
<div style="width:201px;">
    <input type="text" id="mycolor" class="colorPicker evo-cp0">
    <div class="evo-pointer evo-colorind" style="background-color:#f79646">
    </div>
</div>
Here border-radius: 15px; is now missing.
Watch how the button is changing again to square in below gif.

Rounded Button Changed to Square
Step-5: Handle Change Color Event
So, let’s handle the Change Color Event to turn the shape of the button to round again.
$(document).ready(function () {
$("#mycolor").colorpicker({
color: "#ff0000"
});
$(".evo-pointer").css("border-radius", "15px");
$(".colorPicker").on("change.color", function (event, color) {
$(this).next().css("border-radius", "15px");
});
});
We are assigning css property to the next element of the ColorPicker TextBox, which is the button.
Demo
[Demo] Rounded ColorPicker Button
Conclusion
I hope you enjoyed reading this blog. If you have questions, please comment below. I will try to answer. If you like it, please share on your social channels.
Thanks for reading. Have a nice day. :)
CodeProject


