Introduction
What is XSS?
How can we prevent the same in MVC?
What is the difference between “ValidateInput” and “AllowHTML” in MVC ?
In this blog we will try to understand how we can prevent and fine tune XSS(Cross Site Security) security attacks in ASP.NET MVC.
XSS(Cross Site Security) is a security attack where the attacker injects malicious code while doing data entry. This code can be a javascript, vbscript or any other scripting code. Once the code is injected in end user’s browser. This code can run and gain access to cookies,sessions, local files and so on.
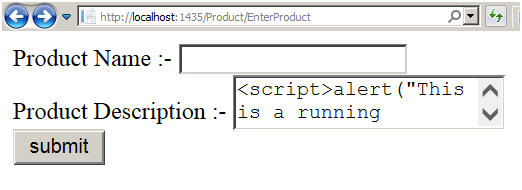
For instance below is a simple product data entry form. You can see in the product description how the attacker has injected a javascript code.

Once we click submit you can see the JavaScript code actually running.

In MVC by default XSS attack is validated. So if any one tries to post javascript or HTML code he lands with the below error.

As said in the previous question in ASP.NET MVC we are not allowed to post scripts and HTML code by default. But consider the below situation where we want HTML to be written and submitted.
The other scenario where we need HTML to be posted is HTML editors. So there is always a need now and then to post HTML to the server.

So for those kinds of scenarios where we want HTML to be posted we can decorate the action with “ValidateInput” set to false.This by passes the HTML and Script tag checks for that action.
You can see in the below code we have requested the MVC framework to NOT VALIDATE the input to the action.
[ValidateInput(false)]
public ActionResult PostProduct(Product obj)
{
return View(obj);
}
But the above solution is not proper and neat. It opens a complete Pandora box of security issues. In this product screen scenario we just HTML in product description and not in product name.
But because we have now decorated validate false at the action level , you can also write HTML in product name field as well. We would love to have more finer control on the field level rather than making the complete action naked.

That’s where “AllowHTML” comes to help. You can see in the below code we have just decorated the “ProductDescription” property .
public class Product
{
        public string ProductName { get; set; }
        [AllowHtml]
        public string ProductDescription { get; set; }
}
And from the action we have removed “ValidateInput” attribute.
public ActionResult PostProduct(Product obj)
{
            return View(obj);
}
If you now try to post HTML in product name field you will get the below error saying you cannot post HTML tags in product name field.

So the difference between ValidateInput and AllowHTML is the granularity of preventing XSS attacks.
Hope you have enjoyed this blog.
Also the other dead attack which happens on a MVC website is CSRF, see the below facebook video which demonstrates how CSRF attack can be prevented.

CodeProject
For further reading do watch the below interview preparation videos and step by step video series.
