Introduction
Sometimes, you may need to put a hyperlink within a row. Let’s consider a simple example; you have a database of best viewed links with comments. Or say for example, there are some student details with photo and CVs within a database you want to display to the college authority; the CVs and photos are stored physically on the server.
In ASP.NET 2.0, there is a control called GridView. I want to discuss about the thing called HyperLinkField, the great support from Microsoft.
There are too many discussions and contributions on the web about this topic, but I've not seen anything without SQLDataSource control.
I like to work with 3 layer architecture and my students and corporate clients require this.
Here, I'm taking a step by step approach to create HyperLink field in GridView.
Background
It's expected that you have some ideas about the 3 layer architecture and have worked with that. Apart from this, you have at least created a simple web application once. (Obviously, you know basic C# syntaxes).
Let’s start.
Step 1: Create a table with the following design (Are you lazy like me? Download the SQL Script and generate the table).
| Column Name | Data Type |
UID | varchar(50) |
PhotoPath | varchar(50) |
UName | varchar(50) |
FilePath | varchar(50) |
Ready with the table? Good. Move to Step 2.
Step 2: Open a new Web Application Template with Visual Studio 2005/2008
Now perform the following steps...
- Take a
GridView Control from ToolBox. - Click on the SmartTag and Click on "Edit Columns".
- The "Fields" Dialog Box will Pop-up.
- Take 4 Bound Fields (Click
BoundField on the Left pane and Click "Add" button). - Set "
HeaderText" property for each BoundField (Select from the lower left pane and set on property window). - Now Click on "Convert this field into a templatecolumn" link for each and every
boundfield. - Do not forget to uncheck the "Auto Generate Fields".
- Now, we are ready with the
GridView. It's time to edit the templates. First click on the smart tag and then click on "Edit Templates" to edit all the 4 templates created. - Right Click on the Grid and Click "Edit Template"; A pop-up menu will appear. Click Column[3]-FilePath.
- On the "
ItemTemplate" part, a Label will be there, Delete and put a HyperLink from ToolBox and name that. If you want, you can set other properties as well. - Click the Smart Tag of the Hyper link; Click "Edit Data Bindings".
- On the
Text Property, I wanted to display the Files Path; so write Eval("FilePath"); means the field name of the DB. - Similarly click
NavigateURL property and type the same thing; as I wanted to open the file also.
- Follow the same procedure (Right Click on the Grid --> Edit Templates --> Column[2]-PhotoPath) to display the image. I deleted the label control (default) and put one Image Control from toolbox and then typed
Eval("PhotoPath") on the ImageURL property. - Now, Click "End Template Editing" from the Smart Tag Menu of the
Gridview to get the normal view. - At last, it's time to play with the code.
I have already said, I'm going to use a 3 layer architecture....
Firstly, I have the following code in my DataBase Access Layer (DAL). (Everything is there within the App_Code folder.) The Class Name is DB:
public DataTable FillAndReturnDataTable(string SelectQuery)
{
    SqlDataAdapter adp = new SqlDataAdapter(SelectQuery, GetConnection());
    DataTable dt = new DataTable();
    adp.Fill(dt);
    CloseConnection();
    return dt;
}
It's time to concentrate on the Business Logic Layer (BLL) (under App_Code folder).
I have added the following code on my BLL; the class name is bllRegistration.
DB dbObj = new DB();
public DataTable RetrieveProfile()
{
DataSet ds = dbObj.FillAndReturnDataSet("Select * from Profile");
return ds.Tables[0];
}
We are almost ready. Finally, you can add the code to your User Interface (UI Layer).
Your Page_Load event will contain the following:
protected void Page_Load(object sender, EventArgs e)
{
    FillMyGrid();
}
So, what about the FillMyGrid() Method within the UI?
public void FillMyGrid()
{
bllRegistration bllObject = new bllRegistration();
DataTable dtProfile = bllObject.RetrieveProfile();
if (dtProfile.Rows.Count != 0)
{
GridView1.DataSource = dtProfile;
GridView1.DataBind();
}
}
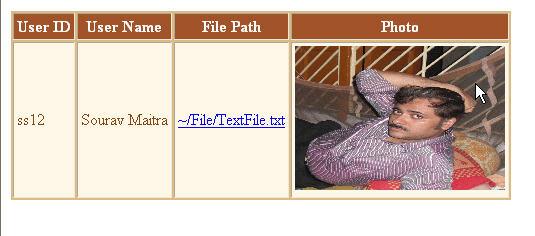
Ultimate Output????

History
This is my first article. So, I'm really happy with this. If you like this and the PDF with images, just put a line on "Contact Us" page at http://www.souravmaitra.com.
Wish you all happy Hyperlink Field-ing......
