Introduction
In this article, I'll explain how one can add a 5 day forecast to their website using the National Weather Service's Experimental National Digital Forecast Database XML Web Service.
The National Digital Forecast Database (NDFD) XML is a service that provides data from the National Weather Service's digital forecast database. Requests for data are made over the Internet via a SOAP request and responses are returned in an XML format. The web service exposes two functions:
NDFDgen() - provides several weather parameters for a particular time range down to the hour.
NDFDgenByDay() - provides a "forecast at a glance" for a given date range.
In this project, the NDFDgenByDay() will provide the data that is needed to create a 5-day forecast.
Down to Business
In order to get started, we need to understand what is required to make a SOAP request to the NDFD XML service in order to get our forecast.
The NDFDgenByDay() request is made with the following parameters:
| Input Name | Type | Description | Example parameter value |
| Latitude | Decimal | the latitude of the location you want to retrieve the forecast for | 34.088808 |
| Longitude | Decimal | the longitude of the location you want to retrieve the forecast for | -118.406120 |
| Format | String | There are two formats available:
- 24 hourly - The 24 hourly returns summarized data for a 24 hour period of time from 6 a.m. to 6 a.m.
- 12 hourly - The 12 hourly returns summarized data for a 24 hour period of time in two 12 hour periods:
- 6 a.m. to 6 p.m.
- 6 p.m. to 6 a.m.
| 12 hourly |
| Start Date | XML Date String | This is the start date that you want to retrieve the forecast for. If left empty, the service will pull the earliest date available in the database. | 2005-04-23 |
| Number of Days | Integer | The number of days you want data for in the forecast retrieved. | 5 |
Wait a minute... Latitude? Longitude? Most of us are accustomed to retrieving forecast on other weather websites either by City, State combo or by ZIP code. How do we get the latitude and longitude for the area we're looking?
There are two approaches that we can take here. In working on this project, I did find some web services out there that would provide latitude/longitude pairs given a ZIP code. Not wanting to be dependent on a web service to provide this cross reference look up, I decided to see if I could find a ZIP code database that I could store locally. There are quite a few ZIP code databases that are available on a subscription basis. I did stumble on one or two that were free. So, I chose one of the free databases and loaded the data into my database. I can't necessarily guarantee the accuracy of the database, but for my purposes, it was sufficient.
Using the Code
After building up a blank web application project in Visual Studio .NET (albeit I just use a Notepad-like editor for these small projects), we need to create a proxy to the NDFD XML web service. It's fairly simple in Visual Studio .NET as you just add a web reference to the site. When prompted for the WSDL reference, use this link.
Since I'm not using Visual Studio .NET for this project, I had to build the proxy class by hand. If you do it this way, you'll have to create the proxy class using the command-line utility wsdl.exe. This utility is available in the Web Services Enhancement (WSE) SDK downloaded from Microsoft. To create the proxy class, issue the following command:
wsdl.exe http://weather.gov/forecasts/xml/DWMLgen/wsdl/ndfdXML.wsdl
After executing this command, the following proxy class will be generated: ndfdXML.cs.
At this point, I should note that if you are using Visual Studio .NET, you'll have to add a reference to the WSE SDK as well. Since I'm doing this project by hand without Visual Studio .NET, later in this article, I'll show how to include this as a reference in the build process.
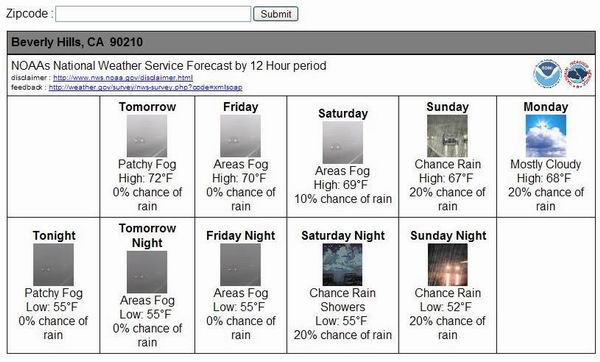
Let's look at the ASP page first. There's not a lot to it. There's a text box to accept a ZIP code, a Submit button for the user to execute their request, and a DIV that I use as a place holder so that I can inject the forecast into it:
<body>
   <form id="Form1" method="post" runat="server">
      <table style="border-collapse: collapse;" border="0">
         <tr>
       <td align=right>Zipcode :</td>
            <td>
          <asp:TextBox id="txtZip" runat="server"
            Width="300px" Font-Names="Arial"
            Columns="40"></asp:TextBox><FONT face="Arial">
       </td>
       <td>
          <asp:Button id="btnSubmit" runat="server"
            Text="Submit"></asp:Button>
       </td>
    </tr>
      </table>
      <DIV id="content" style="WIDTH: 100%;
        FONT-FAMILY: Arial" runat="server"
        ms_positioning="FlowLayout"></DIV>
   </form>
</body>
Next, let's look at the code behind the page. On the Page_Load function, I just call a function I wrote called populatePage().
private void Page_Load(object sender, System.EventArgs e)
{
if(!IsPostBack)
populatePage();
}
Here's the populatePage() function:
private void populatePage()
{
string result = System.String.Empty;
string xmlForecast = System.String.Empty;
string formattedForecast = System.String.Empty;
decimal nLat = 0.0M;
decimal nLon = 0.0M;
string strCity = System.String.Empty;
string strState = System.String.Empty;
string element = System.String.Empty;
long zip = 0;
try
{
if ( Request["zip"]==null )
{
result = "<p>Please enter a zip code to retrieve a "
+ m_numOfDays + " day forecast.</p>";
}
else
{
zip = long.Parse(Request["zip"].ToString());
getDemo(zip, ref nLat, ref nLon, ref strCity, ref strState);
ndfdXML proxy = new ndfdXML();
xmlForecast = proxy.NDFDgenByDay(nLat,
nLon, DateTime.Now, m_numOfDays, formatType.Item12hourly);
formattedForecast =
transformForecast(xmlForecast, m_xslForecastTransform);
result = "<p><table style='border-collapse: collapse;'" +
" border=1 bordercolor=#111111 cellpadding=5 " +
"cellspacing=0 width=800px align=center><pre>" +
"<tr class=subtitle1>" + " <td>";
result += " <strong>" + strCity + ", " + strState +
" " + Request["zip"].ToString() + "</strong>";
result += " </td></tr></table>";
result += formattedForecast;
}
content.InnerHtml = result;
}
catch(Exception)
{
content.InnerHtml = "<p>Are you sure you entered a valid zip code?</p>";
}
}
There's not much to the getDemo() function. Basically, you give it a ZIP code, and it will retrieve the latitude, longitude, city and state for it from my database.
Once we have the XML response from the web service, we need to transform it using our XSL transform.
The code-behind is fairly simple:
private string transformForecast(string xmlForecast, string strXsl)
{
string result = System.String.Empty;
string resultDoc = System.String.Empty;
try
{
XslTransform xsl = new XslTransform();
xsl.Load(Request.PhysicalApplicationPath + strXsl);
XmlDocument xml = new XmlDocument();
xml.LoadXml(xmlForecast);
StringBuilder sb = new StringBuilder();
StringWriter sw = new StringWriter(sb);
XmlTextWriter wrtr = new XmlTextWriter(sw);
xsl.Transform(xml.CreateNavigator(), null, wrtr, null);
result = sb.ToString();
return result;
}
catch(Exception excp)
{
return "<p>transformForecast: An error" +
" occurred: " + excp.ToString() + "</p>";
}
}
As you can see, there's not much to it. All the work is done in our XSL.
The XSL
I am, by no means, an expert in XSL coding. I do it on a rare occasion. So, please pardon any inefficiencies you may see in here.
First, we process the root of the XML file as you normally would do:
<xsl:template match="/">
   <xsl:apply-templates select="dwml" />
</xsl:template>
The XML response is broken up into two main sections: head and data.
The head section contains basic information such as the type of product retrieved (e.g. forecast by 12 hour period), disclaimer, feedback URL, etc.
We process the head element as follows:
<xsl:template match="head">
   <tr>
      <td>
         <xsl:attribute name="colspan">10</xsl:attribute>
         <a>
            <xsl:attribute name="target">_blank</xsl:attribute>
            <xsl:attribute name="href">
               <xsl:value-of select="source/credit" />
            </xsl:attribute>
            <img>
               <xsl:attribute name="border">0</xsl:attribute>
               <xsl:attribute name="align">right</xsl:attribute>
               <xsl:attribute name="src">
                  <xsl:value-of select="source/credit-logo" />
               </xsl:attribute>
            </img>
         </a>
         <xsl:value-of select="product/title" /><br/>
         <font size="-2">
            disclaimer :
         <a>
            <xsl:attribute name="target">_blank</xsl:attribute>
            <xsl:attribute name="href">
               <xsl:value-of select="source/disclaimer" />
            </xsl:attribute>
            <xsl:value-of select="source/disclaimer" />
         </a>
         <br/>
         feedback :
         <a>
            <xsl:attribute name="target">_blank</xsl:attribute>
            <xsl:attribute name="href">
               <xsl:value-of select="source/feedback" />
            </xsl:attribute>
            <xsl:value-of select="source/feedback" />
         </a>
         <br/>
         </font>
      </td>
   </tr>
</xsl:template>
Now, we'll process the data section. The data section contains the actual forecast information. This section is a little tricky to process with XSL because the data is laid out based on three different time layout formats.
- The first layout is for the time period from 6 a.m. to 6 p.m. So, you'll see values in here such as Today, Tomorrow, Sunday, Monday, etc.
- The second layout is for the time period from 6 p.m. to 6 a.m. So, typical values found here are Tonight, Tomorrow Night, Sunday Night, Monday Night, etc.
- The last time layout is a combination of the first and second time periods laid out like this: Today, Tonight, Tomorrow, Tomorrow Night, Sunday, Sunday Night, Monday, Monday Night, etc.
It's important to note that each of these layouts have a key associated with them as well. The <layout-key> element contains this key.
After the time layout periods, the weather parameters section contains the elements for our forecast. The parameters section contains:
- maximum temperatures
- minimum temperatures
- the probability of precipitation
- the weather type, coverage, and intensity
- condition icons for the associated forecast
The catch here is that each of these elements are associated to a particular time layout period. For example, the maximum temperature is associated to the first time layout period (e.g. 6 a.m. to 6 p.m.). The minimum temperature is associated with the second time layout period (e.g. 6 p.m. to 6 a.m.). The remaining parameters are associated to the third layout period. So, we can't use a basic dropdown flow to process the XML response. We'll have to explicitly call templates to process particular sections out of order.
In processing the parameters section, I used the third time layout period to drive the processing.
<xsl:template match="time-layout">
<xsl:if test="/dwml/data/parameters/*[@time-layout=current()/
layout-key]/@type = '12 hour' ">
<tr>
<xsl:for-each select="/dwml/data/time-layout
[position()=3]/start-valid-time[position()]">
<xsl:if test="position()=1">
<xsl:if test="@period-name='Tonight'">
<td>
 
</td>
</xsl:if>
</xsl:if>
<xsl:if test="substring(.,12,8)='06:00:00'">
<td align="center">
<strong>
<xsl:value-of select="@period-name" />
</strong>
<br/>
<xsl:call-template name="conditions-icon">
<xsl:with-param name="position" select="position()"/>
</xsl:call-template>
<br/>
<xsl:call-template name="weather">
<xsl:with-param name="position" select="position()"/>
</xsl:call-template>
<br/>
<xsl:call-template name="temperature">
<xsl:with-param name="temp_type" select="'maximum'"/>
<xsl:with-param name="position"
select="round(position() div 2)"/>
</xsl:call-template>
<br/>
<xsl:call-template name="POP">
<xsl:with-param name="position" select="position()"/>
</xsl:call-template>
</td>
</xsl:if>
</xsl:for-each>
</tr>
<tr>
<xsl:for-each select="/dwml/data/time-layout
[position()=3]/start-valid-time[position()]">
<xsl:if test="substring(.,12,8)='18:00:00'">
<td align="center">
<strong>
<xsl:value-of select="@period-name" />
</strong>
<br/>
<xsl:call-template name="conditions-icon">
<xsl:with-param name="position" select="position()"/>
</xsl:call-template>
<br/>
<xsl:call-template name="weather">
<xsl:with-param name="position" select="position()"/>
</xsl:call-template>
<br/>
<xsl:call-template name="temperature">
<xsl:with-param name="temp_type" select="'minimum'"/>
<xsl:with-param name="position"
select="round(position() div 2)"/>
</xsl:call-template>
<br/>
<xsl:call-template name="POP">
<xsl:with-param name="position" select="position()"/>
</xsl:call-template>
</td>
</xsl:if>
</xsl:for-each>
</tr>
</xsl:if>
</xsl:template>
As we're processing each element in the third time layout period, we're retrieving the relative information in the conditions-icon, weather conditions, temperature and probability of precipitation sections. We do this by passing parameters to these relative template sections such as position and temperature type.
All of the following templates retrieve data from the XML file relative to the position passed to it. In the case of the Temperature template, we pass the type of temperature we're wanting to retrieve: maximum or minimum.
The Temperature template:
<xsl:template name="temperature">
<xsl:param name="temp_type"/>
<xsl:param name="position" />
<xsl:if test="/dwml/data/parameters/temperature
[@type=$temp_type]/value[position()=$position]/. != ''">
<xsl:if test="$temp_type='maximum'">
High: <xsl:value-of
select="/dwml/data/parameters/temperature
[@type=$temp_type]/value[position()=$position]/."/>°F
</xsl:if>
<xsl:if test="$temp_type='minimum'">
Low: <xsl:value-of
select="/dwml/data/parameters/temperature[@type=$temp_type]
/value[position()=$position]/."/>°F
</xsl:if>
</xsl:if>
</xsl:template>
Probability of Precipitation template:
<xsl:template name="POP">
<xsl:param name="position" />
<xsl:if test="/dwml/data/parameters/probability-of-
precipitation/value[position()=$position]/. != ''">
<xsl:value-of
select="/dwml/data/parameters/probability-of-
precipitation/value[position()=$position]/."/>%
chance of rain
</xsl:if>
</xsl:template>
Weather Conditions Icon template:
<xsl:template name="conditions-icon">
   <xsl:param name="position" />
   <xsl:if test="/dwml/data/parameters/conditions
                 -icon/icon-link[position()=$position]/. !=''">
      <img>
         <xsl:attribute name="src">
         <xsl:if test=".!=''">
            <xsl:value-of
              select="/dwml/data/parameters/conditions
                   -icon/icon-link[position()=$position]/."/>
         </xsl:if>
         </xsl:attribute>
         <xsl:attribute name="align">center</xsl:attribute>
      </img>
   </xsl:if>
</xsl:template>
Weather Conditions template:
<xsl:template name="weather">
   <xsl:param name="position" />
   <xsl:if test="/dwml/data/parameters/weather/
          weather-conditions[position()=$position]/@weather-summary !=''">
      <xsl:value-of select="/dwml/data/parameters/weather/
            weather-conditions[position()=$position]/@weather-summary"/>
   </xsl:if>
</xsl:template>
The only thing left to present is how to build the application. The .CS files are compiled as follows:
csc /r:bin\MySQLDriverCS.dll,
           "C:\Program Files\Microsoft WSE\v2.0\Microsoft.Web.Services2.dll"
    /out:bin\webWeather.dll
    /target:library *.cs
The MySQLDriverCS.DLL reference is in here because I loaded my ZIP code into a MySQL database. Note the reference to WSE in the build command. This is how you include it as a reference (in addition to the using directive in the C# code). The location of the WSE SDK will vary depending on where you've installed it on your system.
Points of Interest
As always, XSL proves to be a powerful tool to transform XML files. The nice thing about this particular implementation is that I have also been able to create a page for my mobile phone using the exact same ASP and C# code. All I needed to do was create a new XSL stylesheet to format the data accordingly.
Currently a manager at a healthcare IT company, I've spent the last 7 years managing a variety of projects that range from web based kiosk applications to larger transaction based applications. Previously, I spent 8 years as a software engineer developing messaging, image editing, web based applications, and mainframe applications.


 General
  News
News  Suggestion
  Question
  Bug
Bug  Answer
  Joke
Joke  Praise
  Rant
Rant  Admin
Admin 


