Introduction
Every time we need a new dialog in our applications, we have to do all the same things over and over again. We have to create a new descendant of the System.Windows.Forms.Form class, change a whole bunch of properties through property grid, place a couple of buttons on the form, make a decision on how to pass data in and out of the dialog, and find a proper place for initialization and completion code. Although, all this is not a big deal, doing it all over again is quite boring and seems to be nothing but just plain waste of time. In this article, we will try to create a base class for modal dialogs.
If you have any experience in programming with Borland Delphi, you are probably familiar with "visual inheritance" concept. This technology existed for years in Delphi products and proved itself to be a useful and very powerful feature. You also may know that using visual inheritance in Delphi is sometimes quite tricky. The problems grow from Delphi's model of forms and components persistence. Fortunately, Visual Studio .NET stores all the properties through code and this makes Windows Forms classes no different from any other class in .NET framework. We can easily create more specialized derivatives of System.Windows.Forms.Form class and use them as a base in our .NET applications.
Creating Dialog class
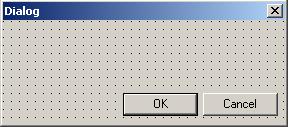
This is the simplest part of the job. All we need to start is a new form and two Button controls on it (named btnOk and btnCancel). Having this done, we'll use property grid to change the form's properties as shown below:
this.Controls.AddRange(new System.Windows.Forms.Control[]
   { this.btnCancel, this.btnOk });
this.AcceptButton = this.btnOk;
this.CancelButton = this.btnCancel;
this.FormBorderStyle = System.Windows.Forms.FormBorderStyle.FixedDialog;
this.MaximizeBox = false;
this.MinimizeBox = false;
this.Name = "Dialog";
this.ShowInTaskbar = false;
this.StartPosition = System.Windows.Forms.FormStartPosition.CenterScreen;
this.Text = "Dialog";
Note that, both buttons have their modifier property set to protected. This will allow us to change behavior or even hide these buttons in derived classes. After this, our dialog looks like this:
Passing data in and out
In a typical scenario, a modal dialog accepts some data from its application, processes it and then returns the modified data back to the caller. Although, there is nothing difficult in passing data to the dialog, it would be useful to have a unified solution for data transfer operations. We'll start unification with the definition of an abstract base class, which is going to be an ancestor for all data transfer classes.
public class DialogData
{
    public static readonly DialogData Empty = new DialogData();

    public DialogData()
    {
    }
}
As you may notice, this class is very similar to the standard System.EventArgs class. Our DialogData has almost the same purpose, with only one exception - EventArgs transfers data in and out of event handlers and DialogData transfers data in and out dialogs boxes. Now, we have to decide how to pass the data to the dialog and how to get it back. We could create a special constructor accepting an instance of DialogData, but in some cases, the same instance of a dialog may be used many times before it gets disposed with different data associated with each call. System.Windows.Forms.Form class provides an overloaded ShowDialog() method, which seems to be a good match for our data object, as it gets called every time we need our dialog to be shown. So, we have to create new versions of this method and add some new overloads:
public new DialogResult ShowDialog()
{
    return this.ShowDialog(null, null);
}

public new DialogResult ShowDialog(IWin32Window owner)
{
    return this.ShowDialog(owner, null);
}

public DialogResult ShowDialog(DialogData data)
{
    return this.ShowDialog(null, data);
}

public DialogResult ShowDialog(IWin32Window owner, DialogData data)
{
    this.data = data;

    DialogResult result = base.ShowDialog(owner);
    return result;
}
Initializing and finishing dialog
The Dialog class is almost complete. One more thing we'll definitely need is a place for dialog's initialization and finishing code. This can be easily accomplished with events. First, we we'll create two new System.EventArgs descendants for InitDialog and FinishDialog events.
public class InitDialogEventArgs
{
private DialogData data = null;
internal InitDialogEventArgs()
{
}
internal InitDialogEventArgs(DialogData data)
{
this.data = data;
}
public DialogData Data
{
get{ return data; }
}
}
public class FinishDialogEventArgs
{
private DialogData data = null;
private DialogResult result;
internal FinishDialogEventArgs(DialogResult r)
{
result = r;
}
internal FinishDialogEventArgs(DialogData data, DialogResult r)
{
this.data = data;
result = r;
}
public DialogData Data
{
get{ return data; }
set{ data = value; }
}
public DialogResult Result
{
get{ return result; }
}
}
InitDialogEventHandler and FinishDialogEvent handlers are declared as follows:
public delegate void
  InitDialogEventHandler(object sender, InitDialogEventArgs e);
public delegate void
  FinishDialogEventHandler(object sender, FinishDialogEventArgs e);
InitDialogEventArgs class exposes a new property called Data which is always set to the value passed to ShowDialog() as data parameter. InitDialogEventArgs has the same Data property and a DialogResult property of type System.Windows.Forms.DialogResult. The latter always has a value that will be returned to a caller as a result of a call to ShowDialog() method. We can use this value to make a decision whether we should modify the Data object or discard any changes made to the dialog. Finally, we'll add protected methods that fire InitDialog and FinishDialog events and complete the implementation of ShowDialog() method.
public DialogResult ShowDialog(IWin32Window owner, DialogData data)
{
    this.data = data;
    OnInitDialog(new InitDialogEventArgs(this.data));


    DialogResult result = base.ShowDialog(owner);


    OnFinishDialog(new FinishDialogEventArgs(this.data, result));
    return result;
}

protected virtual void OnInitDialog(InitDialogEventArgs e)
{
    if(InitDialog != null)
        InitDialog(this, e);
}

protected virtual void OnFinishDialog(FinishDialogEventArgs e)
{
    if(FinishDialog != null)
        FinishDialog(this, e);
}
Using the Dialog class
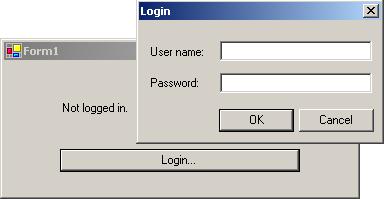
Demo project provided with this article shows how we may use our Dialog class to create a very simple login dialog.
Working as a sr. software developer for a large company based in St.Petersburg, Russia.


 General
  News
News  Suggestion
  Question
  Bug
Bug  Answer
  Joke
Joke  Praise
  Rant
Rant  Admin
Admin 


