Introduction
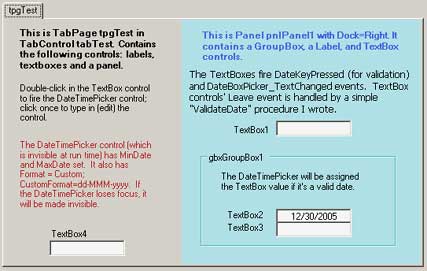
Sometimes we have forms with many TextBox controls that are used for dates. If you have a form with a TabControl control and each TabPage contains many TextBox controls for dates and you don't want to use a DateTimePicker for each TextBox control, then go through this article that describes how to use one DateTimePicker for all the TextBox controls. The DateTimePicker control is hidden until a TextBox control's DoubleClick event is raised.
We also need to validate these TextBox controls, because here I allow the user to manually edit the TextBox.Text property. The user may want to delete the date or just modify it manually. I wanted to take the advantage of the DateTime class' built-in validation, so that I need not write a complex date validation procedure. In this demo, I use the DateTime class in conjunction with simple text validations for the TextBox controls.
The following code snippets are key to this small application. Comments are interspersed throughout the code for clarification.
Class-level variable
I declare a class-level variable (txtDateBoxSender) of type TextBox, so that I can access its attributes from any method:
private System.Windows.Forms.TextBox txtDateBoxSender;
Event Handlers
In the InitializeComponent() method, I have the following event handlers for all the date TextBox controls:
DateKeyPressed
DateBox_TextChanged
TextBoxEnter
ValidateDate
this.TextBox3.KeyPress +=
    new System.Windows.Forms.KeyPressEventHandler(this.DateKeyPressed);
this.TextBox3.DoubleClick +=
    new System.EventHandler(this.DateBox_TextChanged);
this.TextBox3.Enter += new System.EventHandler(this.TextBoxEnter);
this.TextBox3.Leave += new System.EventHandler(this.ValidateDate);
In the InitializeComponent() method, I have the following event handlers for the DateTimePicker control:
dtpDatePicker_Leave
dtpDatePicker_ValueChanged
this.dtpDatePicker.Leave +=
    new System.EventHandler(this.dtpDatePicker_Leave);
this.dtpDatePicker.ValueChanged +=
    new System.EventHandler(this.dtpDatePicker_ValueChanged);
Each of these event handlers will be explained later in this article.
Controls
The DateTimePicker control has a custom format: dd-MMM-yyyy. The user may enter a date in any of the following formats in the TextBox controls:
- mm/dd/yyyy
- mm/dd/yy
- mm\dd\yyyy
- mm\dd\yy
- mm-dd-yyyy
- mm-dd-yy
The DateTimePicker control will change the text to dd-MMM-yyyy format.
this.dtpDatePicker.CustomFormat = "dd-MMM-yyyy";
this.dtpDatePicker.Format =
    System.Windows.Forms.DateTimePickerFormat.Custom
As mentioned earlier, the TextBox controls I'm using for dates have the following events defined:
KeyPress
DoubleClick
Enter
Leave
Methods
DateKeyPressed is a simple method to validate data entry in the TextBox controls I use for dates. I allow numbers and the following characters: \, / and -. The KeyPress event is raised each time the user presses a key in the keyboard. If the key pressed doesn't meet the rules, then the character will not be typed in the textbox.
private void DateKeyPressed(Object o, KeyPressEventArgs e)
{
if( !char.IsNumber(e.KeyChar) &&
!(e.KeyChar == Convert.ToChar("-"))
&& !(e.KeyChar == Convert.ToChar("\\"))
&& !(e.KeyChar == Convert.ToChar("/"))
&& !char.IsControl(e.KeyChar) )
e.Handled = true;
}
ValidateDate method is fired when the user leaves the TextBox control. This is a simple way to validate dates in TextBox.Text.
If TextBox.Text is empty, I exit the method. Otherwise, I assign TextBox.Text to the DateTimePicker control. This date assignment is merely to validate the data entry; I really don't need to assign it to the DateTimePicker at this point. If DateTime.Parse is unable to convert the text to a valid date, an Exception is thrown and an appropriate message is displayed.
private void ValidateDate(Object sender, EventArgs e)
{
try
{
txtDateBoxSender = (TextBox)sender;
if (this.txtDateBoxSender.Text.ToString().Trim()=="")
{return;}
this.dtpDatePicker.Value =
DateTime.Parse(this.txtDateBoxSender.Text);
txtDateBoxSender.Text =
string.Format("{0:dd-MMM-yyyy}",
this.dtpDatePicker.Value);
}
catch (Exception ex)
{
MessageBox.Show("Please enter a valid date." +
"\nAllowed formats: " +
"mm/dd/yyyy, mm/dd/yy, mm-dd-yyyy, mm-dd-yy." +
"\nMinimum value: " +
this.dtpDatePicker.MinDate.ToShortDateString() +
"\nMaximum value: " +
this.dtpDatePicker.MaxDate.ToShortDateString(),
"Date Validation",
MessageBoxButtons.OK, MessageBoxIcon.Warning);
this.txtDateBoxSender.Undo();
this.txtDateBoxSender.Focus();
}
}
dtpDatePicker_ValueChanged method is fired when the value of the DateTimePicker is changed. We assign the date chosen by the user to the TextBox control that raised the DateBox_TextChanged event.
private void dtpDatePicker_ValueChanged(object sender, System.EventArgs e)
{
try
{
txtDateBoxSender.Text = string.Format("{0:dd-MMM-yyyy}",
this.dtpDatePicker.Value);
this.dtpDatePicker.Visible = false;
}
catch (Exception ex)
{
MessageBox.Show(ex.Message.ToString() +
"\nAn error occurred in dtp_ValueChanged." +
"\nControl: " + txtDateBoxSender.Name +
".\nContact Systems staff.\nThank you.",
"Date Validation",
MessageBoxButtons.OK, MessageBoxIcon.Error);
}
}
DateBox_TextChanged method is fired by all the date TextBox controls.
Points of interest
- In order to place the
DateTimePicker control in the appropriate location in our form, we need to find out which TextBox control raised this event. This event handler has two arguments. I will use the object argument to determine the control that raised this event. sender is the control that raised this event. We need to cast sender before assigning it to txtDateBoxSender, because it's an object. In this application, I cast it as TextBox control.
Control ctlParent is the control that is the parent (container) of the control that raised this event.
private void DateBox_TextChanged(object sender, System.EventArgs e)
{
try
{
txtDateBoxSender = (TextBox)sender;
Control ctlParent = txtDateBoxSender.Parent;
ctlParent.Controls.Add(this.dtpDatePicker);
if (this.txtDateBoxSender.Text != "")
{
this.dtpDatePicker.Value =
Convert.ToDateTime(this.txtDateBoxSender.Text);
}
this.dtpDatePicker.Location = this.txtDateBoxSender.Location;
this.dtpDatePicker.BringToFront();
this.dtpDatePicker.Visible = true;
}
catch (Exception ex)
{
MessageBox.Show(ex.Message.ToString() +
"\nAn error occurred in DateBox_TextChanged." +
"\nControl: " + txtDateBoxSender.Name + ".",
"Date Validation",
MessageBoxButtons.OK, MessageBoxIcon.Error);
}
}
dtpDatePicker_Leave method is fired when the DateTimePicker loses focus. This is where I make the DateTimePicker invisible when the User leaves the control. This handler is called when dtpDatePicker.Leave and dtpDatePicker.MouseLeave events are raised.
private void dtpDatePicker_Leave(object sender, System.EventArgs e)
{
this.dtpDatePicker.Visible = false;
}
The TextBoxEnter method reformats a TextBox date from dd-MMM-yyyy to mm-dd-yyyy. The reason I use dd-MMM-yyyy for displaying dates in textboxes is just a personal preference. Use any format that you like.
private void TextBoxEnter(object sender, System.EventArgs e)
{
txtDateBoxSender = (TextBox)sender;
if (this.txtDateBoxSender.Text != "")
{
txtDateBoxSender.Text =
DateTime.Parse(txtDateBoxSender.Text).ToString("d", null);
}
}
Conclusion
I hope you will find these code snippets useful. I have been programming in C# for 3 months, so I'm sure there is room for improvement. I welcome any feedback.
History
- July 9th, 2005 - Version 1.0.0
- July 11th, 2005 - version 1.0.1
- commented out
MouseLeave event for DateTimePicker control.
- removed redundant authorship comments.
- added code to update the date format of a manually edited
TextBox.
- removed console (never meant to open a console).
- July 12th, 2005 - version 1.0.2:
- added
TextBoxEnter method for date TextBox controls' Enter event.
This member has not yet provided a Biography. Assume it's interesting and varied, and probably something to do with programming.


 General
  News
News  Suggestion
  Question
  Bug
Bug  Answer
  Joke
Joke  Praise
  Rant
Rant  Admin
Admin 


