Introduction
The main concern of this tip is, how can we upload and delete any video file to Microsoft Azure Blob Storage using ASP.NET MVC. This tip pretends that reader has sufficient knowledge about Azure Cloud Services mainly on Azure Blob Storage. Here, I am not going to discuss How to create a Storage Account and How to Create a Container. We will directly start working from Visual Studio.
To know more about Azure Blob Storage, visit my previous article:
Prerequisites
To start working with this demo, you must have the following installed in your System:
- Visual Studio 2013 with update 4
- Azure SDK 2.5
- ASP.NET MVC 4 or higher versions
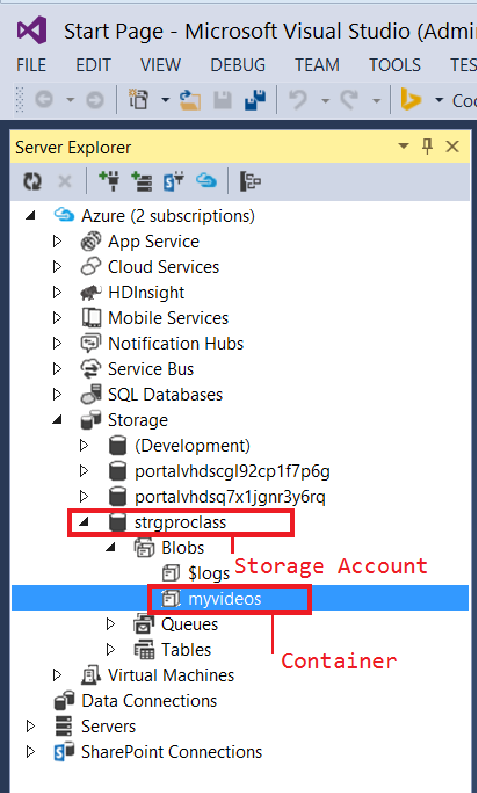
You already should have an Azure Storage account and a container created on it. Here, I am using Storage Account "strgproclass" and Container "myvideos" created on "strgproclass" Storage Account. To move forward, we need to connect our Visual Studio with our Microsoft Azure subscription.
Connect Visual Studio to Microsoft Azure Subscription.
Follow the below steps to connect with Azure account:
- Open Visual Studio.
- Go to server explorer.
- Click on Azure, it will prompt you to login to your Azure account.
- Fill the credentials and Login to your Azure account.
- After successful connection, navigate to storage.
The below snapshot shows the connected Storage Account and Container.
After successful connection, now we need to create Azure Cloud Service.
To create Azure cloud service using Visual Studio, see the following steps:
Steps
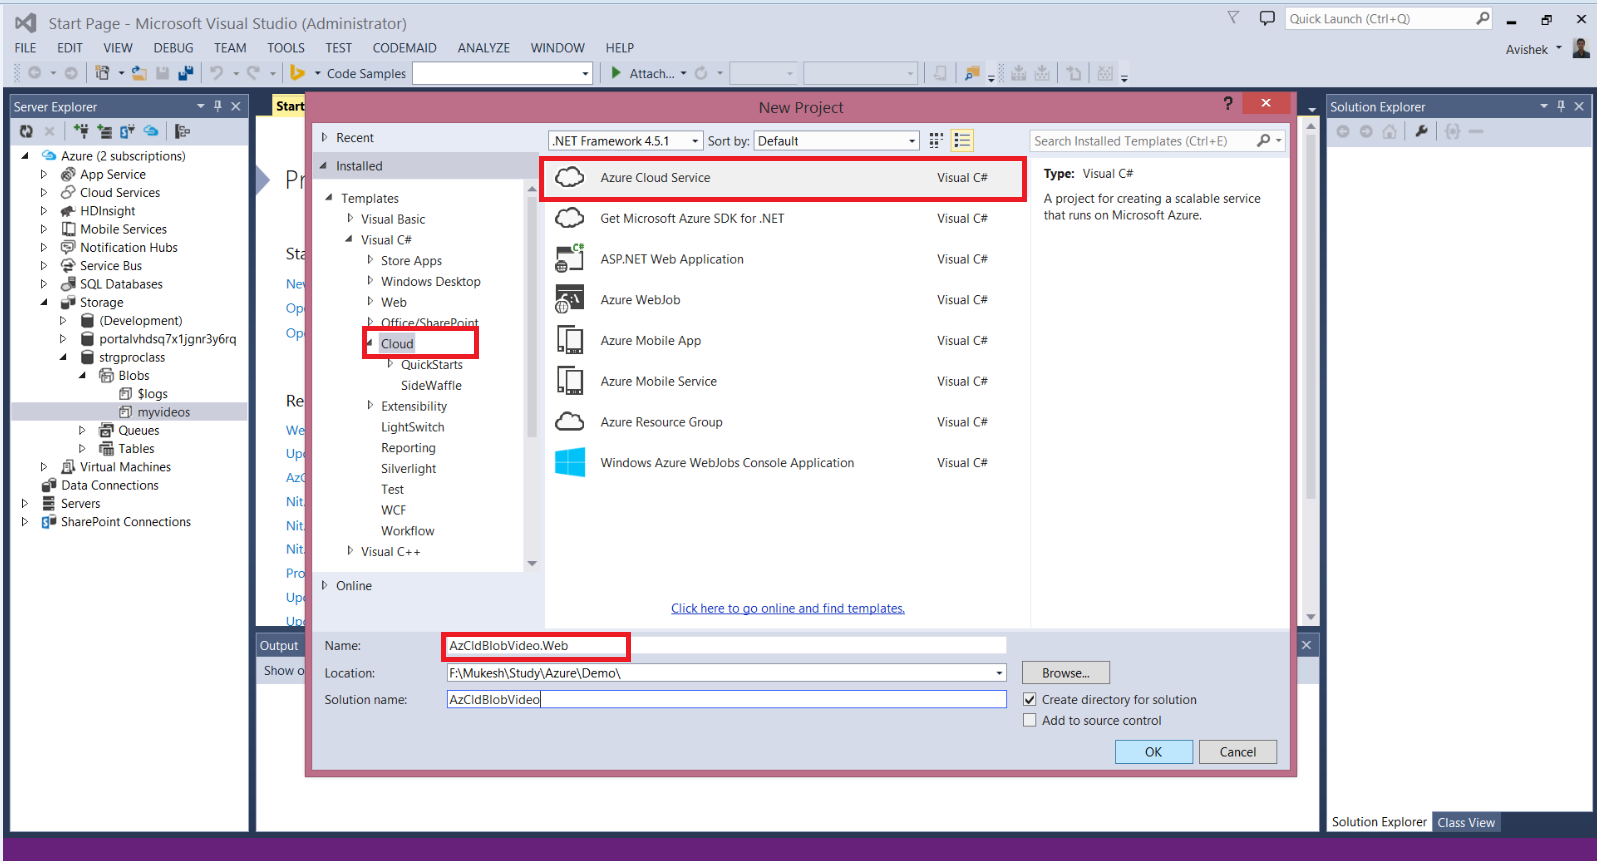
- In your Visual Studio, Go to File-> New Project.
- Navigate to Installed->Templates->Visual C#.
- Select Cloud.
- Select Azure Cloud Service.
- Enter the name of your project and click OK. Here Name of my Project is "
AzCldBlobVideo.Web".
The following snapshot illustrates the above steps:
After clicking on Ok, it will Pop Up a window to add Roles. Here in our demo, we need only one Web Role, i.e., MVC Web Role.
Steps
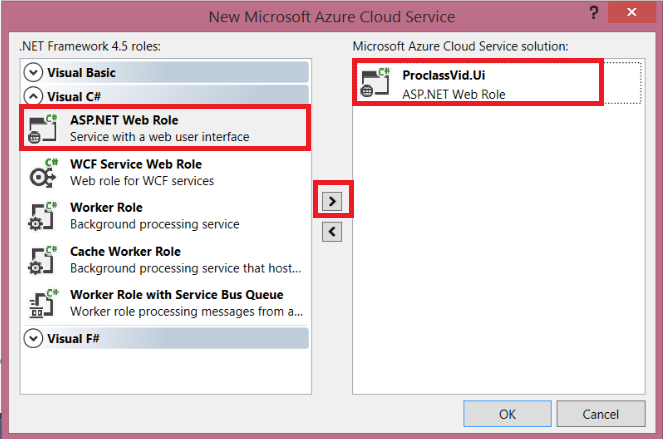
- Select "ASP.NET Web Role".
- Click on right mark arrow head button to add web role.
- Name it something your choice, Here it is "
ProclassVid.Ui". - Click on OK button.
Following is the snapshot that describes the above steps to create a Web role in your application.
After clicking on "Ok" button, another window will appear on that window select MVC and click on OK.
See the below snapshot.

It will create an ASP.NET MVC project in your Solution file.
After completing all the above steps, you will get the following structure in your Solution explorer. Here you have Two Projects, one is Cloud project and another is ASP.NET MVC project (Web Role).
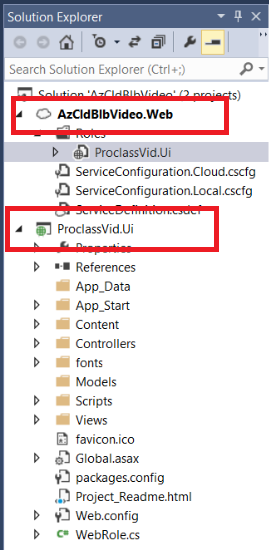
After this, create storage connection string.
Now we need to create Storage connection string. To do this, follow the below steps:
Steps
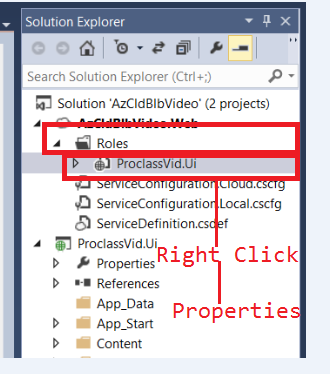
- Go to Cloud project.
- Navigate Roles Folder.
- Right click on role and select properties. See the below snapshot.
- Now Go to Settings.
- Click on Add Settings.
- You will find three Tabs in the window, i.e., Name, Type and Value.
- Name--> Enter your connection string name.
- Type--> Select "Connection string".
See the below snapshot.

Value-->Click on Browse button and select your subscription and Storage Account.
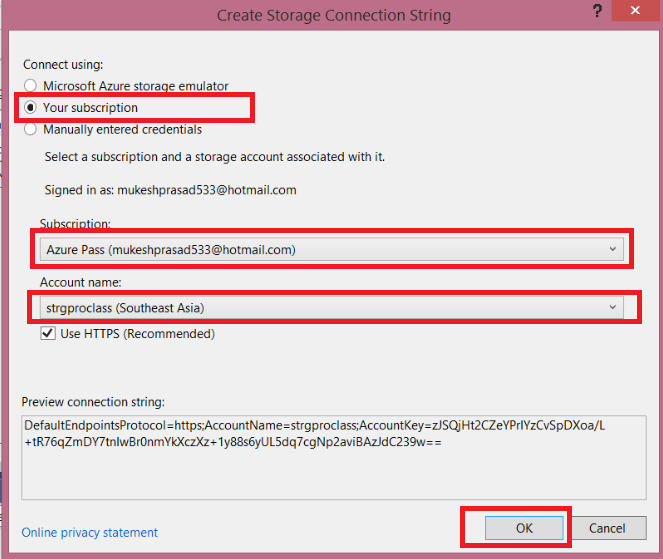
Now go to MVC project and add a class. Here it is BlBlobs.cs.
Copy paste the following code to BlBlobs.cs file.
using Microsoft.WindowsAzure.ServiceRuntime;
using Microsoft.WindowsAzure.Storage;
using Microsoft.WindowsAzure.Storage.Blob;
using System;
using System.Collections.Generic;
using System.IO;
using System.Linq;
using System.Threading;
using System.Web;

namespace ProclassVid.Ui
{
    public class BlBlobs
    {
        public CloudBlobContainer GetBLOBRef()
        {
            CloudStorageAccount storageac = CloudStorageAccount.Parse(
            RoleEnvironment.GetConfigurationSettingValue("SCN"));
            CloudBlobClient blobclient = storageac.CreateCloudBlobClient();
            CloudBlobContainer blobcontainer = blobclient.GetContainerReference("myvideos");
            if (blobcontainer.CreateIfNotExists())
                blobcontainer.SetPermissions(new BlobContainerPermissions
		{ PublicAccess = BlobContainerPublicAccessType.Blob });
            return blobcontainer;
        }
        public List<string> GetBlobList()
        {
            CloudBlobContainer blobcontainer = GetBLOBRef();
            List<string> blobs = new List<string>();
            foreach (var item in blobcontainer.ListBlobs())
            {
                blobs.Add(item.Uri.ToString());
            }
            return blobs;
        }
        public void AddBlob(HttpPostedFileBase pic)
        {
            if (pic.ContentLength > 0)
            {
                CloudBlobContainer blobcontainer = GetBLOBRef();
                CloudBlockBlob blob = blobcontainer.GetBlockBlobReference(pic.FileName);
                blob.UploadFromStream(pic.InputStream);
            }
        }
        internal void DeleteBlob(string name)
        {
            Uri ur = new Uri(name);
            string fname = Path.GetFileName(ur.LocalPath);
            CloudBlobContainer blobcontainer = GetBLOBRef();
            CloudBlockBlob blob = blobcontainer.GetBlockBlobReference(fname);
            blob.Delete();
        }
    }
}
Now go to Controller and add a controller. Here, it is BlobsController.cs.
See the following controller code:
using System;
using System.Collections.Generic;
using System.Linq;
using System.Web;
using System.Web.Mvc;
namespace ProclassVid.Ui.Controllers
{
public class BlobsController : Controller
{
BlBlobs objbl = new BlBlobs();
public ActionResult Index()
{
return View(objbl.GetBlobList());
}
[HttpPost]
public ActionResult Add(HttpPostedFileBase pic)
{
objbl.AddBlob(pic);
return RedirectToAction("Index");
}
[HttpPost]
public string Remove(string name)
{
objbl.DeleteBlob(name);
return "Blob Removed Successfully";
}
}
}
Right click on Index Method of BlobsController.cs class and add select Add View.
Select Empty View name it as "index".
And add the following code to the index.cshtml file.
@model List<string>
@{
    ViewBag.Title = "Index";
}
<h2>Index</h2>
@using (Html.BeginForm("Add", "Blobs",
FormMethod.Post, new { enctype = "multipart/form-data" }))
{
    <div>
        <input type="file" name="pic" id="pic" />
        <input type="submit" value="Upload Now" id="s1" />
    </div>
}
<ul>
    @foreach (var item in Model)
    {
        <li>
            <input type="button" name="b1" id="b1"
                   value="Delete"
                   onclick="Remove('@item')" />
            <video src="@item" height="200" width="200" controls />
        </li>
    }
</ul>
@section scripts{
    <script>
function Remove(x) {

var uri = "/Blobs/remove";
$.post(uri, { name: x }, function (y) {
window.location.href = "/blobs/index";
alert(y);
});
}
    </script>}
Now run the project and enter your controller name and method name.
For example: http://localhost:63073/Blobs/Index
You will get the following screen:
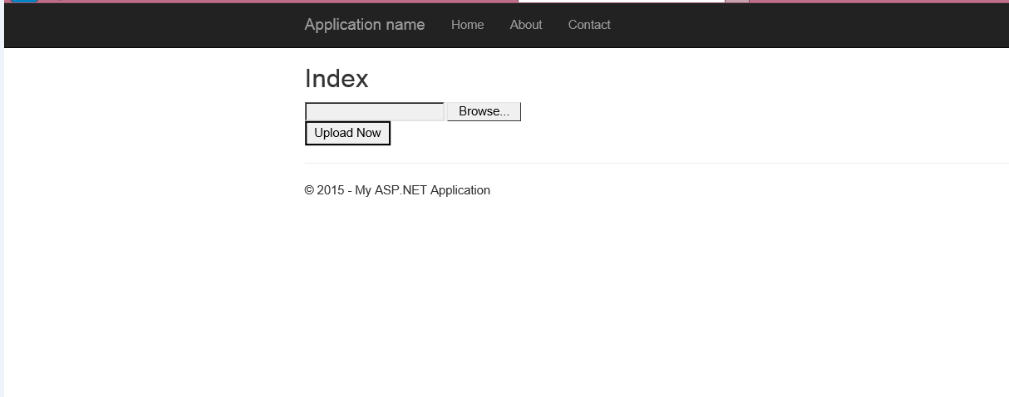
Click on browse button and select any Video file.
Click on Upload Now.
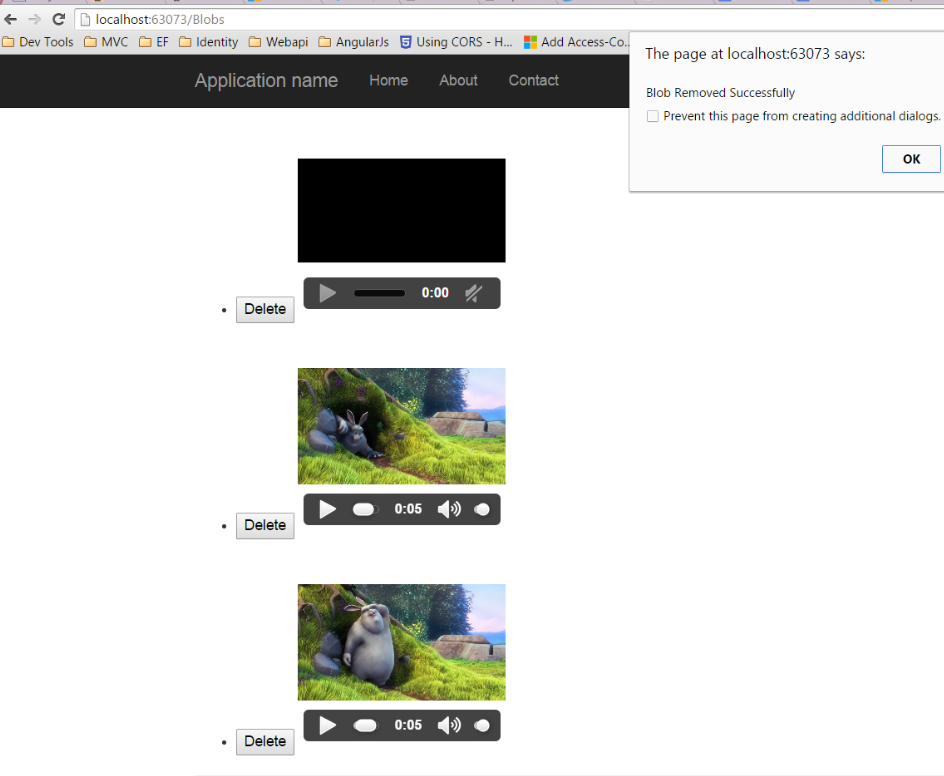
It will upload video file to "myvideos" container. See the below snapshot I have uploaded some video files to my container.
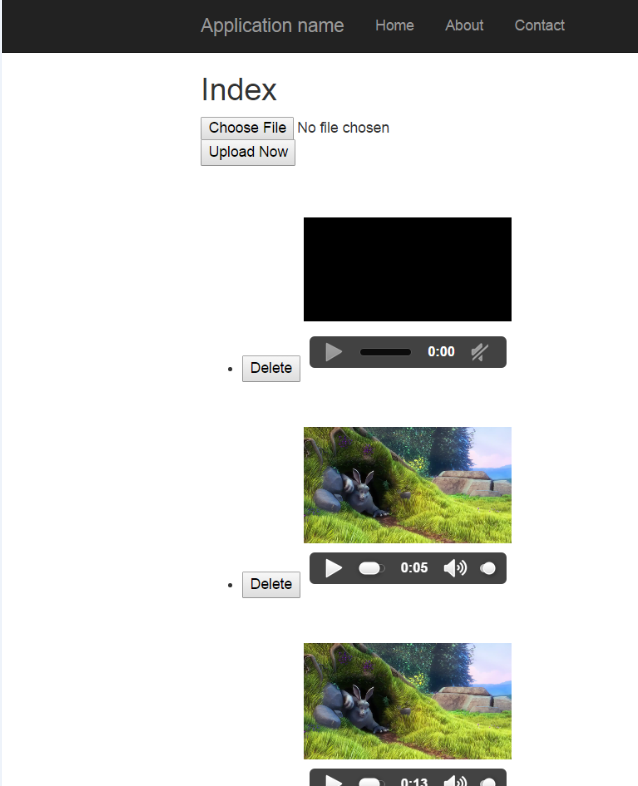
Click on Delete button to delete a blob.
It will pop up an alert saying that following blob removed successfully.
