Introduction
At my work, we use Jira (https://www.atlassian.com/software/jira/) to track issues. To create an issue we simply add a Jira server email when replying back to the email which describes the issue. We have to add few details like whom to assign the issue and the category the issue falls in. All this information is added at the top of the message body of the email which we will as Jira Headers.
When you respond with this information added to the email, Jira server creates a ticket and assigns it to the assignee mentioned in the Jira Headers. This became a little repetitive because most of the times the Jira headers are same or needs a little modification for just one or two parameters.
The motivation to develop this Outlook plugin was to address following things:
- Have a reply button in the Outlook Ribbon which would automatically add the default template when raising a ticket Jira via email.
- Have an ability to create multiple templates and provide the user with an option to select one of them and reply with that template.
- Additional templates can be added in the plugin and user can select any of them as default template.
- User can select the Jira server email in To/Cc section and can even remove the recipients and only send it to Jira server email. To/Cc can be useful if you have mail filters on Outlook to route emails to particular folder. Removing all recipients other than Jira Server email helps reduce the amount of emails everyone gets on the mailing list receives.
Feedback/Bug reports are always welcome and please vote the article if you found it useful.
Background
The plugin is tested on Outlook 2013 and built using Visual Studio 2015. I am not sure if Visual Studio Express editions support Office Addin development.
I have added some links in the source code for reference. This was the first time I was developing a plugin for Outlook and these tutorials helped me gain good understanding of Outlook plugin model.
Plugin Design
I am using registry to store Plugin configuration and Jira templates. The registry is CurrentUser hive to have separate user configuration even on a single PC.
Code contains following classes:
1. ThisAddIn: This class adds the Jira template selected by user into the message body of the email. More on this later. Also, it creates a mail item when user clicks on feedback/report a bug.
2. DataModel: I chose to store template data in the current user registry hive. This saves me permissions errors if I try to create a persistent file on host pc. All information in registry is saved in binary data to avoid Unicode/ascii conversion issues. This class is instantiated in ThisAddin and if no templates are defined, it automatically create one which can be later edited by user. The default template is useful for starting plugin for first time since no templates would be available. DataModel maintains list of JiraTemplate and any changes made are stored in registry right away.
3. JiraTemplate: In the current implementation, JiraTemplate contains template Name and Content. Content is basically all the Jira Headers inserted in the message body.
4. RegistryOperation: This is helper class which helps store all the data in binary format and retrieves them back and performs conversion from binary to string/Boolean/int data type. DataModel class use the functions exposed to save and retrieve data from registry.
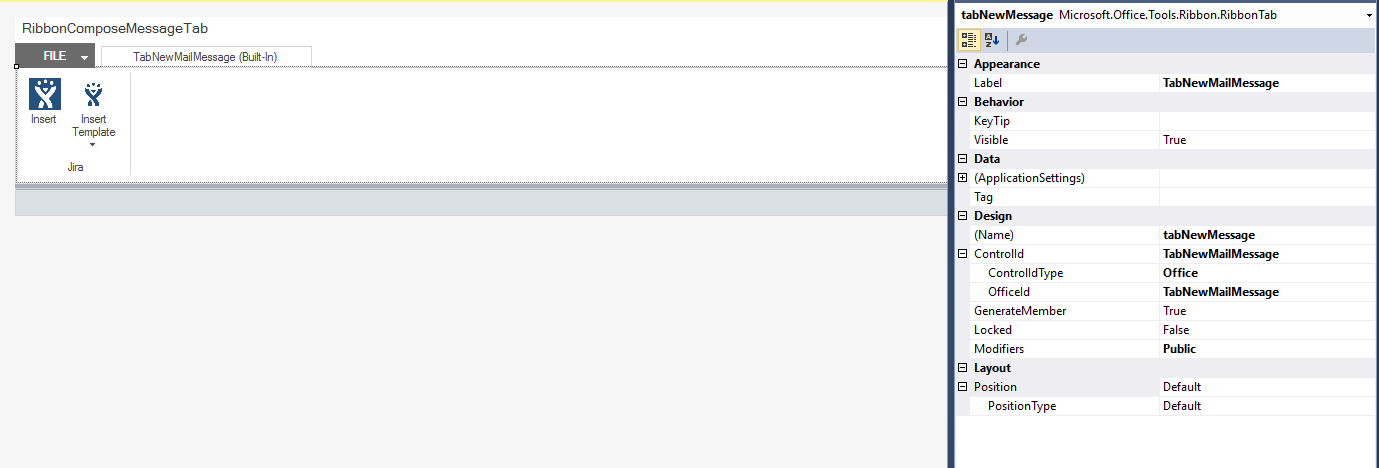
5. RibbonComposeMessageTab: This class along with next two classes add menu items in the Outlook ribbon to display and select the template when composing or replying to the email. This particular class adds two menu items when composing a new email i.e.:
1. Reply with default Jira Template
2. Select one of the Jira Templates from dropdown menu and use it to compose the email.
When use selects a new email, the message tab shows these two button on the extreme right.
Microsoft uses Control IDs to get access to the various tabs in the Outlook to add custom menu items. The full listing of the Control IDs can be downloaded from https://www.microsoft.com/en-us/download/details.aspx?id=6627.
I am showing the control ID used to add the menu items in the compose tab below via visual studio.

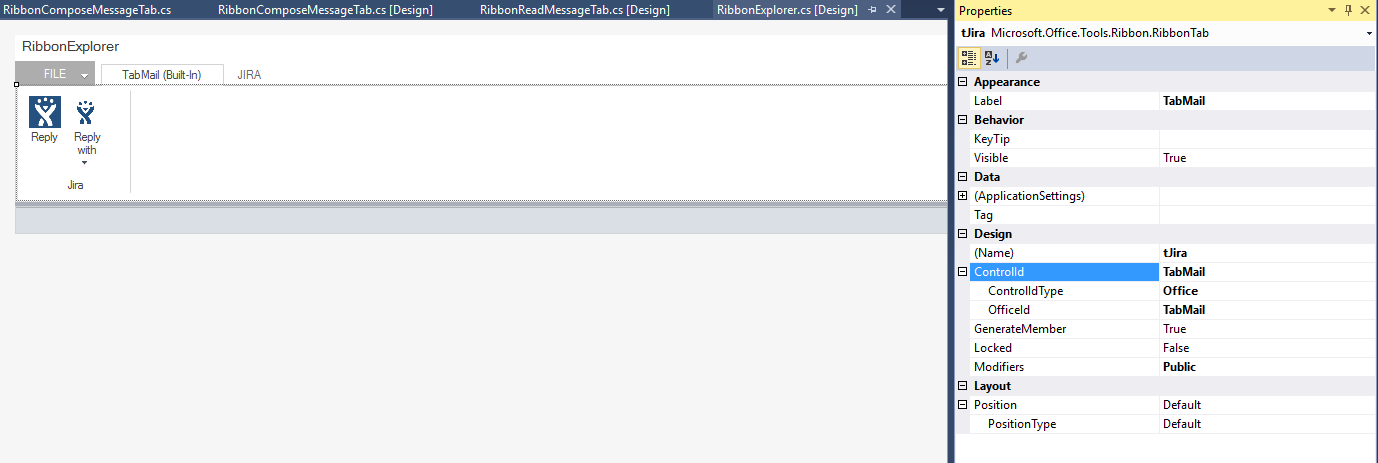
6. RibbonExplorer: When the Outlook starts and the main ribbon is called Explorer Ribbon. You can see it has all the available tabs. This class adds two options:
1. Add the reply and reply with template option in the main message ribbon tab.
2. Provide a separate tab to use to configure plugin option likes Jira email, edit/delete templates, provide feedback etc.
Again, we have to rely on the Control IDs as discussed above to get the correct reference for message tab and add menu items. The snapshot of the Control ID for Message tab is below:

For adding additional Jira tab at the end of the default tabs, we use the following ControlIDs

7. RibbonReadMessageTab :
This shows options when the user double clicks on the email and it opens in a new window. At this point, use will still see the option to reply with Jira Template.
You will observe that this tab doesn’t have much code available. I am using a trick as defined in the link below to reuse the tab group I created in the Ribbon explorer reply group. http://blogs.msdn.com/b/vsto/archive/2009/12/15/making-a-custom-group-appear-in-the-message-tab-of-a-mail-item-norm-estabrook.aspx
Now that I have provided a small overview of the classes, I would like to highlight one point from the ThisAddIn class. The template content needs to be added on the top of the email which most of the times already has some content.
Outlook provides three types of content options i.e. plaintext, HTML, rich text. The simplest way to add the content would have been
mailItem.Body = dataModel.JiraTemplates[0].Content + mailItem.Body;
However, this use to work only for plain text and would break formatting for rich text and HTML. After much experimenting I finally found a way to use the Word Editor to edit the content of the body. This ensured that it preserved the formatting for all the three type of formats described above.
Word.Document word = mailItem.GetInspector.WordEditor;
Word.Range range = word.Range(0, 0);
range.InsertAfter(jiraTemplate.Content);
Quick Rundown of the Plugin.
In this section I am going to show some of the screenshots of the plugin. This will provide an overview of how this plugin fits in the Outlook user interface.
Once the plugin is installed, you would see JIRA tab in the main outlook window. Also, in the Home tab, you will see that there is option on the extreme right to reply using any Jira template.

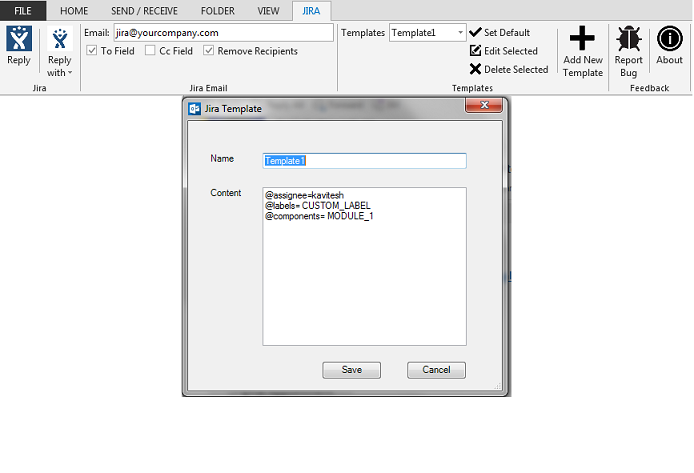
User is greeted with configuration settings when he/she clicks on the JIRA tab. Here user can edit/delete/create new templates and modify the Jira server email.

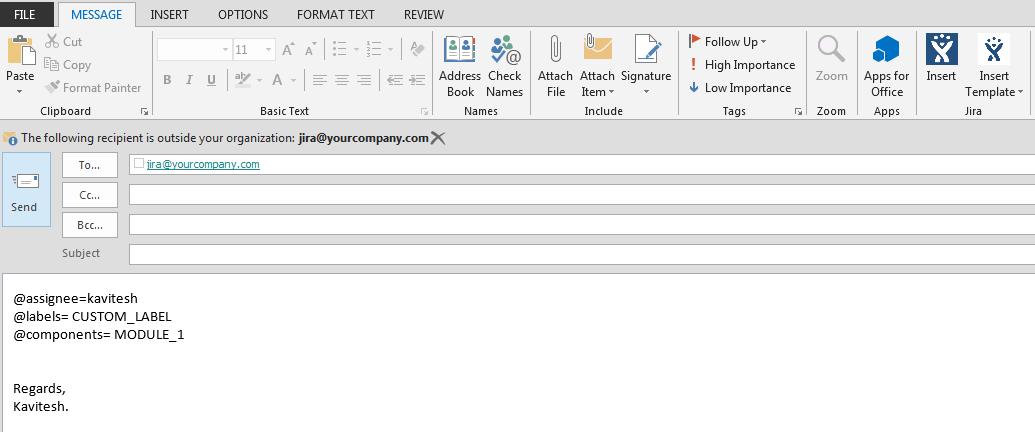
Whenever use clicks new mail option, two menu items for inserting Jira templates get added on the extreme left side.

The below snapshot shows information populated in the email when a template is selected.

The last screenshot shows the option to edit or create a new template. There is no limit to create the templates.

Installation
To install plugin, the best way it to publish using the plugin. This creates a setup and adds an entry in the Control Panel-> Programs and Features if you need to uninstall the plugin.
Simply right click on the project settings and select the Publish option. Make sure to create the directory beforehand and select the Release configuration.

History
First release.
