Introduction to Entity Framework or My First Answer About Entity Framework
Entity Framework(EF) enables .NET developers to work with relational data using domain specific objects. Prior to EF7 update Entity Framework supports to create a model by writing code or using boxes and lines in the EF Designer. Both of these approaches can be used to target an existing database or create a new database. In this tip, I will demonstrate how we can incorporate Entity Framework with .NET console applications.
What Will You Learn
- Create a sample Console Application in .NET 4.5.1
- Install Entity Framework 6 in your application
- Use Code First approach to create and update your database
- Update the
DbContext to work with Microsoft SQL Server
Requirements
This tutorial will focus on only EF6 which will use the Microsoft SQL Server Provider. You can see the list of providers supported by EF6 at here. In the application, I have used the Visual Studio 2015 having .NET 4.5.1 installed.
Source Code
I have uploaded the source code at my github repository. You can get it from here. If you have any issues or comments, feel free to write here or on the github issue.
Create a New Project
- Open Visual Studio (this walkthrough uses 2015 but you can use any version from 2012 onwards)
- File > New > Project...
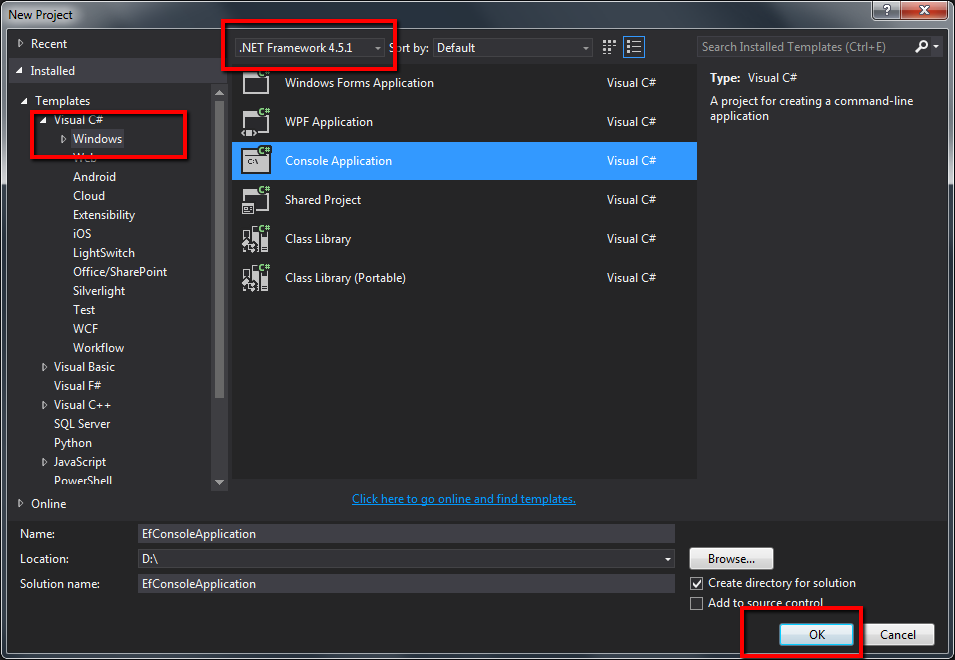
- From the left menu, select Templates > Visual C# ? Windows
- Select the Console Application project template
- Ensure you are targeting .NET 4.5 or later
- Give the project a name and click OK. I named the project as "
EfConsoleApplication"

Install Entity Framework
To use EF6, you install the nuget package from nuget.org. This walkthrough uses SQL Server. For a list of available providers, see Database Providers.
You can install the EntityFramework package by right-clicking on the References folder of your project and selecting Manage NuGet Packages…

Then search for Entity Framework in the nuget list. Install the Entity Framework for the project. In this solution, I have installed EF version 6.1.3

Installing from Package Manager Console
Alternatively, you can install EntityFramework by running the following command in the Package Manager Console.
Install-Package EntityFramework
Create Your Model
Now it’s time to define a context and entity classes that make up your model.
- Project > Add Class...
- Enter Model.cs as the name and click OK
- Replace the contents of the file with the following code:
namespace EfConsoleApplication
{
using System;
public class Person
{
public int PersonId { get; set; }
public string LastName { get; set; }
public string FirstName { get; set; }
public DateTime BirthDate { get; set; }
}
}
Create the DbContext
Now, we need to create the DbContext class to communicate with database. The recommended way to work with context is to define a class that derives from DbContext and exposes DbSet properties that represent collections of the specified entities in the context.
- Project > Add Class...
- Enter PersonDbContext.cs as the name and click OK
- Replace the contents of the file with the following code:
namespace EfConsoleApplication
{
using System.Data.Entity;
public class PersonDbContext : DbContext
{
public DbSet<Person> Persons { get; set; }
}
}
Here, I have added the DbSet property for my Person model in the PersonDbContext file.
Add ConnectionString for SQL Server
In this application, I have used Microsoft SQL Server to store the database. To configure Entity Framework for connecting with SQL server, I have added the connection string in the Popcorn file of the project.
<connectionStrings>
        <add name="PersonContext"
        connectionString="Data Source=.;Initial Catalog=PersonDb;
        	Integrated Security=true"
        providerName="System.Data.SqlClient"/>
</connectionStrings>
Next, I have edited my PersonDbContext file and added the default constructor to pass the connection string name to the DbContext base class.
namespace EfConsoleApplication
{
using System.Data.Entity;
public class PersonDbContext: DbContext
{
public PersonDbContext() : base("name=PersonContext")
{
}
public DbSet<Person> Persons { get; set; }
}
}
Run the Application
Go to Program.cs class and modify it like that:
namespace EfConsoleApplication
{
using System;
public class Program
{
public static void Main(string[] args)
{
PerformDatabaseOperations();
Console.Write("Person saved !");
Console.ReadLine();
}
public static void PerformDatabaseOperations()
{
using (var db = new PersonDbContext())
{
var person = new Person
{ FirstName = "Nadege",
LastName = "Deroussen", BirthDate = DateTime.Now };
db.Persons.Add(person);
db.SaveChanges();
}
}
}
}
In the application, I have added a method PerformDatabaseOperation which will create a database context and save the Person data in the database. Now, run the application and check the message before closing.

To test the application working successfully, open your SQL Management Studio and check the database named "PersonDb" in the database list. You can see the database and data in the Person table.
Conclusion
So this is the introduction for the Entity Framework to incorporate with .NET application. You will find a lot of resources from the official Entity Framework websites. You can also check the latest Entity Framework (EF7) which still in under development until I write this article on this link. Feel free to comment and let me know if there is any feedback from your side to improve my tip.
