Introduction
Recently, I was working on a project using DevExpress MVC Extensions, and I wanted to add drag and drop functionality within a FormLayout Control for a list view. So, user can add/remove or drag & drop to re-arrange the <li> elements, then get the final order after each updated arrangement. Since the functionality is not already built-into the DevExpress control, I decided to go with the existing open source library I was using, jQuery-UI.
Note: The code in this article uses DevExpress, Bootstrap, and jQuery-ui library.
Feature Overview
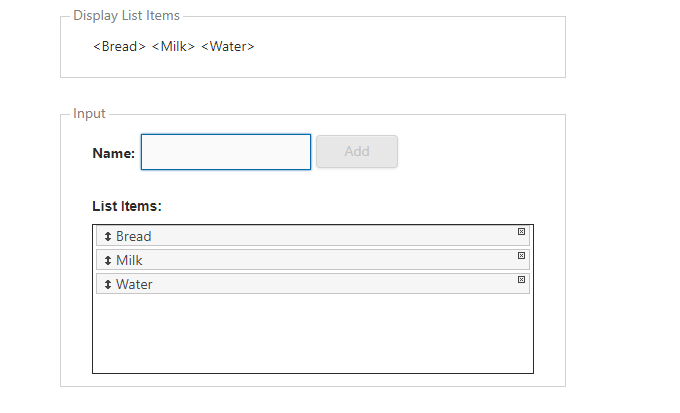
The user can add new items to the list using the text box and the "Add" button, rearrange the listed items by dragging & dropping, remove the item by clicking (x) button on the right of the item, and during all these events, the Display List items gets updated.
Note: Add button is disabled if the Name textbox is empty. This prevents empty items being added to the list.
See the image:

Using the Code
Note: For the complete Index.cshtml sample code, see the attached file.
The first step is to create a FormLayout using Razor code. Then add the jQuery-ui's sortable functionality on the <ul> element.
- Create the
FormLayout control in the Index.cshtml:
@**@
@Html.DevExpress().FormLayout(formLayoutSettings =>
{
formLayoutSettings.Name = "mainForm";
// sets the width to 50%
formLayoutSettings.Width = System.Web.UI.WebControls.Unit.Percentage(50);
// Display List Items Group
formLayoutSettings.Items.AddGroupItem(listItemsSettings =>
{
listItemsSettings.Caption = "Display List Items";
listItemsSettings.Items.Add(i =>
{
i.ShowCaption = DefaultBoolean.False;
i.SetNestedContent(() =>
{
// every time new item is added/removed or re-ordered, this display <p> will get updated
ViewContext.Writer.Write("<p id='listItems'></p>");
});
});
});
// Input Group
formLayoutSettings.Items.AddGroupItem(inputGroupSettings =>
{
inputGroupSettings.Caption = "Input";
inputGroupSettings.Items.Add(i =>
{
i.ShowCaption = DefaultBoolean.False;
i.SetNestedContent(() =>
{
// puts some padding for the layout
ViewContext.Writer.Write("<table><tr><td style=\"padding-right:5px;\">");
// Textbox for list item name
Html.DevExpress().TextBox(tbs =>
{
tbs.Name = "listItemTextBox";
tbs.Properties.Caption = "Name";
// clientside event checks when to enable/disable the Add button
tbs.Properties.ClientSideEvents.KeyUp = "OnlistItemTextBoxKeyUp";
}).GetHtml();
ViewContext.Writer.Write("</td><td>");
// Add button
Html.DevExpress().Button(bs =>
{
bs.Name = "addButton";
bs.Text = "Add";
bs.ClientSideEvents.Click = "OnAddButtonClick";
// by default or initial load keeps the button disabled
bs.ClientEnabled = false;
}).GetHtml();
ViewContext.Writer.Write("</td></tr></table>");
ViewContext.Writer.Write("<br />");
// List items are put into this unordered list element
ViewContext.Writer.Write("<h5><strong>List Items:</strong></h5><div style='width:100%; height:150px; overflow:auto; border:solid thin;'><ul id='ulContent'></ul></div>");
});
});
});
}).GetHtml()
- Next, add some CSS for the List items layout:
@* Custom style used for sortable <ul> element's content for draggable <li> elements, and remove button *@
<style>
    #ulContent {
        /*removes the default bullet point*/
        list-style-type: none;
        margin: 0;
        padding: 0;
    }

    /* makes the room for adding draggable icon on the left */
    #ulContent li {
        margin: 0 3px 3px 3px;
        display: list-item;
        padding-left: 1.5em;
    }

    /* aligns the span properly */
    #ulContent li span {
        display: inline-block;
        margin-left: -1.3em;
    }
</style>
- Now, add the JavaScript to handle the drag & drop event, update the display view after each remove/add/re-arrangement of the list items.
<script>
$(document).ready(function () {
$(function () {
$("#ulContent").sortable();
$("#ulContent").disableSelection();
});
$("#ulContent").sortable({
update: function (event, ui) {
UpdateDisplayLabel();
}
});
});
function OnRemoveListItem(buttonElement) {
$(buttonElement).parent().remove();
UpdateDisplayLabel();
}
function OnlistItemTextBoxKeyUp(s, e) {
if (s.GetText().trim() == "") {
addButton.SetEnabled(false);
} else {
addButton.SetEnabled(true);
}
}
function OnAddButtonClick(s, e) {
$('#ulContent').append("<li class='ui-state-default'><span class='ui-icon ui-icon-arrowthick-2-n-s' style='align-content:center'></span>" + listItemTextBox.GetText() + "<span role='button' onclick='OnRemoveListItem($(this))' class='ui-icon ui-icon-circlesmall-close' style='float:right'></span></li>");
listItemTextBox.SetText("");
addButton.SetEnabled(false);
UpdateDisplayLabel();
}
function UpdateDisplayLabel() {
var listItemsString = "";
$("#ulContent li").each(function (idx, li) {
listItemsString = listItemsString + " <" + $(li).text() + ">";
});
$("#listItems").text(" " + listItemsString);
}
</script>
History
- 9th July, 2017 - First version
References
