Introduction
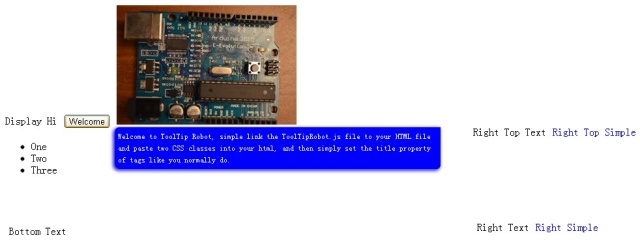
This library helps you to build and style your own tooltip simply by setting CSS properties and title property of tags

Background
Browser supplied tooltip control is not fashionable, here is the library to help you to style your own tooltip control without the need of implementing complicated CSS or JavaScript logic.
Using the code
Simple link the ToolTipRobot.js file to your HTML file and paste two CSS classes into your html, and then simply set the title property of tags like you normally do.
Download Demo Source
CSS Classes
.toolTipBox
{
   max-height:400px;
   max-width: 500px;
   background-color: rgb(0,0,255);
   position: absolute;
   display: none;
   z-index:10000;
   border-top-left-radius: 7px;
   border-top-right-radius: 0px;
   border-bottom-right-radius: 6px;
   border-bottom-left-radius: 8px;
   box-shadow:-2px 2px 7px 1px rgba(0,0,200,0.8);
   -ms-filter:"progid:DXImageTransform.Microsoft.dropshadow(OffX=-2,OffY=2,Color=#330000C8,Positive=true)";
   filter:progid:DXImageTransform.Microsoft.dropshadow(OffX=-2,OffY=2,Color=#330000C8,Positive=true);
}
.toolTipBox .toolTipContent
{
   max-height: inherit;
   max-width: inherit;
   overflow-y: auto;
   color: white;
   padding: 5px 5px 5px 5px;
   -ms-word-wrap: break-word;
   word-wrap:break-word;
   line-height: 1.5;
   font-size:9pt;
}
JavaScript Library:
function logMessage(text) {
}
function debugMessage(text) {
console.log(text);
}
var ToolTipRobot = new function () {
var ToolTipHtml = "<div id="ToolTipBox"
class="toolTipBox"><div class="toolTipContent"
id="ToolTipContent"></div></div>";
var ToolTipBoxSelector = 'div.toolTipBox[id="ToolTipBox"]';
var ToolTipContentSelector = 'div.toolTipContent[id="ToolTipContent"]';
var ToolTipAttribute = 'data-tooltip';
var hoveredObj;
var hideTipsTimeoutHandler;
var mouseX;
var mouseY;
this.BuildToolTips = buildToolTips;
function displayToolTip(element) {
clearHideToolTipEvent();
var text = element.attr(ToolTipAttribute);
var toolTipBox = $(ToolTipBoxSelector);
var toolTipContent = $(ToolTipContentSelector);
toolTipBox.css('left', 0);
toolTipBox.css('top', 0);
toolTipContent.html(text);
var boxHeight = toolTipBox.height();
var boxWidth = toolTipBox.width();
mouseX = mouseX + 10;
mouseY = mouseY + 10;
var left = (mouseX + boxWidth) > $(window).width() ? (mouseX - boxWidth - 20) : mouseX;
var top = (mouseY + boxHeight) > $(window).height() ? (mouseY - boxHeight - 20) : mouseY;
toolTipBox.css('left', left);
toolTipBox.css('top', top);
toolTipBox.fadeIn(200);
logMessage('displayed');
}
function closeToolTip() {
if (!hideTipsTimeoutHandler) {
hideTipsTimeoutHandler = setTimeout(closeToolTip, 700);
logMessage('set close timer');
return;
}
var toolTipBox = $(ToolTipBoxSelector);
toolTipBox.fadeOut(200);
logMessage('closed');
}
function clearHideToolTipEvent() {
if (hideTipsTimeoutHandler) {
clearTimeout(hideTipsTimeoutHandler);
hideTipsTimeoutHandler = undefined;
logMessage('cleared close timer');
}
}
function buildToolTips() {
var bodyObj = $('body');
bodyObj.append(ToolTipHtml);
$(ToolTipBoxSelector).bind({ mouseenter:
clearHideToolTipEvent, mouseout: function () { closeToolTip(); } });
var objs = $('[title!=""]');
objs.each(function () {
var obj = $(this);
var title = obj.attr("title");
var timeoutHandler;
if (!title || title.length == 0)
return;
obj.attr("data-tooltip", title);
obj.removeAttr("title");
obj.bind({
mouseenter: function (e) {
if (!hoveredObj || hoveredObj != obj) {
hoveredObj = obj;
clearHideToolTipEvent()
mouseX = e.pageX;
mouseY = e.pageY;
logMessage('Mouse: '+mouseX + ',' + mouseY);
timeoutHandler = setTimeout(function () {
displayToolTip(obj);
}, 700);
return;
}
},
mouseout: function () {
if (timeoutHandler) {
clearTimeout(timeoutHandler);
timeoutHandler = undefined;
}
hoveredObj = undefined;
closeToolTip();
}
});
});
}
}
$(document).ready(ToolTipRobot.BuildToolTips);
Points of Interest
Now you can forget about the ugly old tooltip, and start styling your own tooltip.
JavaScript is fun after all!!!
History
Version 1.0.
