Introduction
A simple modification to the TFS default build template to allow a build to clean up after itself when complete by deleting its build directory
on the build server. If you are not familiar with customising TFS Build or using Windows Workflow then this article is a nice introduction.
Background
For small TFS setups it in unlikely we would ever fill up our build servers with source code to the point that they run out of disk space but
in a large enterprise environment this is certainly possible.
In my current team we have a farm of build servers running up to 150 builds
a day from 50 distinct build definitions across many team projects. Each source directory, once compiled, built and tested, is in the order
of 2GB and this means we can easily fill up our build server hard disks if we are not careful.
This simple modification to the standard
build template allows the build to delete it's source, binaries and test directories on the build server once the build completes and puts this functionality
on a switch so you can control which builds do this and which do not.
Full example source is available and written in VS 2010 and against TFS 2010,
but is equally applicable to TFS2012
Using the code
TFS Build is written using Windows Workflow and customising the build process usually involves editing the .xaml workflow file using the workflow
editor in Visual Studio. We will start with the standard 'DefaultTemplate.xaml' build template provided with TFS 2010 and go from there.
Step 1) Adding the delete directory task to the workflow
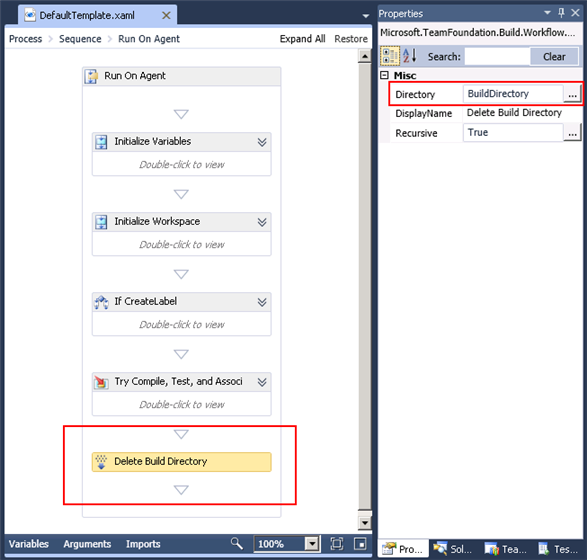
TFS provides a ready to use 'DeleteDirectory' activity. Just simply drag
and drop it into the end of the 'Run On Agent' section and set the directory to delete as BuildDirectory

Thats it (almost). This will delete the build directory on the build server once the build completes but theres more to do yet
Step 2) Ensure the directory is always deleted
If the build fails to compile or encounters any other error then the workflow will throw
an exception and the 'Delete Build Directory' task will be missed. We solve this by using a Try\Catch\Finally block which is a standard tool in the workflow toolbox

This ensures we always delete the build directory even if an error occurs during the build process.
Step 3) Create the UI
Sometimes it is useful to examine the build directory after a build to diagnose any errors. We will provide
an argument and UI to the build workflow so we can control when we delete the build directory.
First thing is to add a new boolean argument
DeleteBuildDirectory to the workflow file

Then we will update the Metadata, this will setup the UI so we can set this new argument through the Visual Studio UI.
The Metadata is accessed through the ellipsis button highlighted above. We want to edit the dialog so it looks something like this.
This adds a new option under the 'Basic' subsection of the build definition to control our new argument.

Finally, add an if/else activity to the workflow to only delete the directory if our new argument DeleteBuildDirectory is true

The result is a parameter you can set on the build definition

and we have a build template that cleans up after itself. You can see the directory being cleaned up in the build log, right at the end.

History
05/02/2013 - Minor modification to source
