Introduction
Displaying data in grids is a usual task in a web developer's life. Sometimes, the number of records to display are more than a user can handle (or needs) in one page. Plus, loading too much data in one page will make page load slow and frustrating. That's why we need to display data one page at a time.
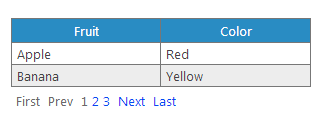
Pagination can be done easily in a DataGrid control. But, what if you wish to display your data in a repeater? In this tip, I will explain how to use my custom paging control to display data in a table using a repeater.

Using the Code
Step 1: Create Repeater
On your web page, create a new repeater.
<asp:Repeater ID="repeater" runat="server">
           <HeaderTemplate>
               <table class="datagrid">
                   <thead>
                       <tr>
                           <th style="width: 50px;">
                               Fruit
                           </th>
                           <th style="width: 50px;">
                               Color
                           </th>
                       </tr>
                   </thead>
                   <tbody>
           </HeaderTemplate>
           <ItemTemplate>
               <tr>
                   <td>
                       <%# Eval("Fruit")%>
                   </td>
                   <td>
                       <%# Eval("Color")%>
                   </td>
               </tr>
           </ItemTemplate>
           <FooterTemplate>
               </tbody>
               </table>
           </FooterTemplate>
       </asp:Repeater>
Step 2: Add Paging Control
We can drag the PagingControl to page designer or we can add it manually under the repeater. We will need to set the PageSize attribute which is the number of records displayed per page.
<uc1:PagingControl ID="PagingControl1" runat="server" PageSize="2" />
If the control is added manually, don't forget to register the control on the top of the page.
<%@ Register Src="PagingControl.ascx" TagName="PagingControl" TagPrefix="uc1" %>
Step 3: Populate Data
Let's create some data to display in the repeater. Create a new function, let's call it GetDataSource with the following signature:
private DataTable GetDataSource(int firstItemIndex, int lastItemIndex, out int totalRecordsCount)
This function takes as parameters the zero based index of the first item to be displayed on the current page and the zero based index of the last item. This function takes an output parameter which is the total number of records. The paging control needs the total number of records to calculate the number of pages.
For the sake of simplicity, this function creates a DataTable and adds 5 records to it. Then set the output parameter totalRecordsCount. Only records to be displayed on the current page will be returned.
private DataTable GetDataSource(int firstItemIndex, int lastItemIndex, out int totalRecordsCount)
{
DataTable table = new DataTable();
table.Columns.Add("Fruit");
table.Columns.Add("Color");
DataRow row = table.NewRow();
row["Fruit"] = "Apple";
row["Color"] = "Red";
table.Rows.Add(row);
row = table.NewRow();
row["Fruit"] = "Banana";
row["Color"] = "Yellow";
table.Rows.Add(row);
row = table.NewRow();
row["Fruit"] = "Strawberry";
row["Color"] = "Red";
table.Rows.Add(row);
row = table.NewRow();
row["Fruit"] = "Orange";
row["Color"] = "Orange";
table.Rows.Add(row);
row = table.NewRow();
row["Fruit"] = "Watermelon";
row["Color"] = "Green";
table.Rows.Add(row);
totalRecordsCount = table.Rows.Count;
return table.AsEnumerable().Skip(firstItemIndex).Take
(lastItemIndex - firstItemIndex + 1).CopyToDataTable();
}
Note
In real life, data will be returned from a database. It is totally useless to select all records from the database then only return the 10 or 20 records that will be displayed on the current page. So, what's the use of SQL to return the total records count and another statement to return data to be displayed. To return paged results using SQL Server, please refer to this article.
Step 4: Bind Data
This function simply binds data to the repeater. What is important in this function is setting the TotalRecordsCount of the PagingControl so the control can calculate the number of pages. And calling PagingControl1.BuildPages(). Calling this function creates the page numbers links of the paging control.
private void BindRepeater()
{
int totalCount = 0;
DataTable table = GetDataSource
(PagingControl1.FirstItemIndex, PagingControl1.MaxItemIndex, out totalCount);
repeater.DataSource = table;
repeater.DataBind();
PagingControl1.TotalRecordsCount = totalCount;
PagingControl1.BuildPages();
}
Let's call this on page load:
protected void Page_Load(object sender, EventArgs e)
        {
            if (!IsPostBack)
            {
                BindRepeater();
            }
        }
Step 5: Handle Paging Control Events
When a user clicks a link on the paging control, the click event is bubbled to the parent page. We should handle that. Here, we only call BindRepeater() to display data of the selected page.
protected override bool OnBubbleEvent(object source, EventArgs args)
{
CommandEventArgs e = (CommandEventArgs)args;
if (e != null)
{
if (string.Equals(e.CommandName, "MoveNext", StringComparison.OrdinalIgnoreCase))
{
BindRepeater();
}
else if (string.Equals(e.CommandName, "MovePrev", StringComparison.OrdinalIgnoreCase))
{
BindRepeater();
}
else if (string.Equals(e.CommandName, "MoveFirst", StringComparison.OrdinalIgnoreCase))
{
BindRepeater();
}
else if (string.Equals(e.CommandName, "MoveLast", StringComparison.OrdinalIgnoreCase))
{
BindRepeater();
}
else if (string.Equals(e.CommandName, "GoToPage", StringComparison.OrdinalIgnoreCase))
{
BindRepeater();
}
}
return base.OnBubbleEvent(source, e);
}
Step 6: (Optional)
Feel free to play with CSS to change the look and feel of the control. This implementation is very basic.
History
- 20th April, 2013: Initial version
