Introduction
This tip shows how to use kendo auto complete control to make it customized for our requirement and use it as a shared control into our ASP.NET MVC application.
Background
We have generally used the kendo auto complete control into the many .NET MVC applications. Now suppose if we have a requirement to customize this auto complete according to our own way for example.
If I have to show many existing organization lists of my application into the auto complete control and if user selects the 0th Index option, then we need to open the dialog box to allow for creating the new organization record as well as this control should be as shared control for application, then this kind of development requirement can be achieved with this example.
Using the Code
Here, I am trying to show you this by the code example from
one of my existing application code with the three very simple steps. I hope it
will help someone looking for this.
Steps 1 (How to Implement)
Go to view/shared folder of
ASP.MVC web project and then create the partials view with the name - "OrganizationAutoComplete.vbhtml"
Here we have declared modelType as a string, i.e., It will be
the control name which we need to pass as a model from the actual page where
we want to use this shared control.
So, when this shared control will render into the parent
page where we have called this, then the
Id of shared control will be the same as model value which we have passed.
@modelType String
@Code
  Dim ControlId = Model
End Code

<input type="text" id="@Model" class = "Organization"
style="width:250px" required="required" />
 <input type="hidden" id="hdnOrgId_@Model"
 class = "org" value="" />

           <span class="clr" style="color:red;font-size: 12px;"> </span>


<script type="text/javascript">

    var searchText = $('.Organization').val

        var selectedItem = "";
        $("#"+'@Model').kendoAutoComplete({
            minLength: 3,
            dataTextField: "Organization",

            template: '${ data.Organization }' +
                         '<span style="display:none;"
                         id="@Model${ data.Index }"> ${ data.OrganizationId }
                         </span>',
            dataSource: {
                type: "json",
                serverFiltering: true,
                serverPaging: true,
                pageSize: 20,
                transport: {
                    read: "@Url.Action("JsonGetOrganization",
                    "OrganizationOperations")",
                }
            },
            change: function (e) {

                if (selectedItem == "0")
                    $("#"+'@Model').val("");
            },
            select: onOrgSelect
        });

        function onOrgSelect(e) {

            if ($("#"+'@Model'+ e.item.index()).html() == 0) {
                selectedItem = "0";

                $("#"+'@Model').val("");
                $("#hdnOrgId_"+'@Model').val("");
                controlCreatesOrg = $("#"+'@Model').attr("id");
                controlCreatesOrgId = $("#hdnOrgId_"+'@Model').attr("id");

                var url = '@Url.Action("CreateNewOrgnization", "OrganizationOperations")';
                $.ajax({
                    type: 'GET',
                    cache: false,
                    url: url,
                    datatype: "json",
                    success: function (data) {
                        selectedItem = "";
                        $("#divNewOrganization").html(data);
                        $("#divNewOrganization").dialog({
                            autoOpen: true,
                            title: 'Create New Organization',
                            width: 800,
                            modal: true,
                            beforeClose: function (event, ui) {
                                $("#divNewOrganization").html('');
                                $("#divNewOrganization").dialog('destroy');
                            }
                        });
                        $("#divNewOrganization").dialog('open');
                    }
                });
            }
            else {

                $("#hdnOrgId_"+'@Model').val($("#"+'@Model'+ e.item.index()).html());
            }
        }

</script>
Step 2 (How to Call this Shared Function)
From the parent page, we can call this shared control like
this:
@html.Partial("EditorTemplates/OrganizationAutoComplete","txtOrganization")
Here "txtOrganization"
is passed as a model, so this will be the Id of the auto complete control.
Step 3 (Demonstration)
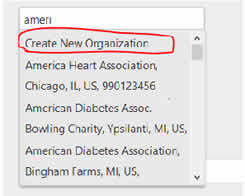
When you will start typing the name of any organization into auto complete, then it will look like this:

Here at 0th index,
there is a red highlighted option to create the new organization. When you click on this, it will open a dialog box where
the new organization can be created. And if any other option will be selected
apart from 0th index, then the existing organization can be selected.
