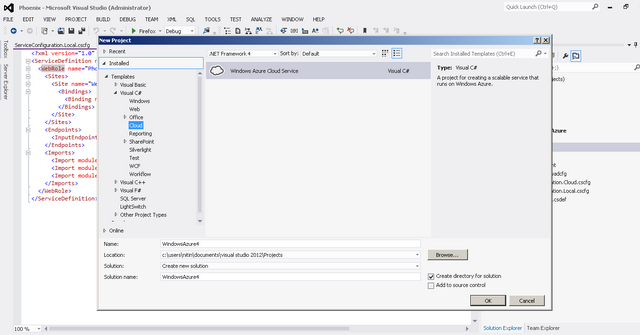
Step 1- Open Visual Studio and
say New>Project and then select project type cloud
from Visual C# and select Windows Azure Cloud Service
template.

Step 2:Click on Windows Azure
Cloud Service it will take you to the microsoft msdn page. There you
can go for the option of download azure sdk 2.0. This azure sdk is
compatible with visual studio 2010 SP1 and Visual Studio 2012. The
.NET framework supported by this sdk is .NET Framework 4.0 and above
.
The sdk can be easily downloaded using
the Windows Platform Installer 4.5.
Step 3:So in case your
application happens to be in 3.5 framework then you need to right
click on your project and select the properties option and then you
will see the following window. There in the target framework you can
set it up to be 4.0. and then the changes will be made automatically
to everywhere in the web config and other locations if required. Or
you can go with the lower version of the Azure SDK.

Step 4:In New Cloud Service
Project window select ASP.Net Web role and click on [>]
button and say OK
Now you can add web role to your Cloud
service project just created. Once you have added the role project.
This new role project will get added in the Solution Explorer
hierarchy.

Step 5:Solution explorer will
look like this-->

Step 6: Right click on WebRole1
project from solution explorer and Click on Remove

Step 7:After removing WebRole1
project from solution explorer

Step 8:Now you can associate
your web application project with this web role. So in our case we
associated it with our Phoenix project that was existing on our local
machine. So you can simply right click on the Web Role and click on
Associate With Existing Project . After associating with the existing
web project our solution explorer hierarchy becomes as follows.


Step 8.1 : Now if you are using
Third party DLLs in your ASP.Net Web Application then create a folder
named Shared under solution explorer. And add all the 3rd
party DLLs in that folder
Step 8.2 : Now go to
PhoenixWeb>References> and add the 3rd party references
from Shared folder created in step 11. Now select all the
references added just now and set their 'Copy Local' property
to true. Copy Local indicates whether the reference will be
copied to the output directory.


Step 9: Now the project has been
successfully set up in the proper hierarchical layout it has to be
in.now you can hit F5 on your PhoenixWindowsAzure and your
application will run fine on local development fabric. But still it
is not ready for cloud deployment.
So you need to first register for your
trial account on MicrosoftAzure website. Once that is done you can
move ahead with the underlying steps as follows.
Step 10: Then you need to right
click on the Cloud Service Project and click on publish then the
following screen will appear . The first tab on the left hand side
that is Sign In will be selected by default . Therein you will
see a link for Sign in with azure credentials . This link will open
up in the browser wherein you will need to login with the azure
account credentials . Once the login is done you will get the a
PublishSettings file. Now this file you need to import in the
place the Import option is available. You can browse to the
particular location where you have saved your file and the finally
the file gets imported you are through the first step.

Click on next to continue to next step.
Step 11: Now you have to create
your cloud service. You need to enter the name of your cloud service
with the location in which you are present. so for example for us the
location is SouthEastAsia.

Step 12: You need to select the
environment for which you need to place the build. Two options are
available that is staging and production.
Step 13: Then you need to decide
Service Configuration that is whether you want to deploy in cloud
or local.
Step 14: Then finally you can
enable the remote desktop for all the roles. Once you click on
this it will ask you to set up the remote desktop connection.

Step 15: Once all this done you
also need to create your Storage Service . You need to enter the name
of the Storage service and the Location.

Step 16: So once all this is
done you can move ahead with the next button click.You you will
finally reach a page where all the details will be mentioned
regarding the deployment details.


Step 17: Finally you can click
on Publish and the publishing process will start. You will be able to
see the process of the publish and the status will change from
Initializing ---> Busy -->
Stopping ---> Initializing--> so on..
Once the publish is done we will get a
Website URL and DeploymentID.

Finally once the deployment is done you
can see the website URL and DeploymentID being available in the
screenshot below.

The website URL may still not work as
we haven't set up our database up till now . So we need to move our
db from the SQL Server to SQL Azure.
Also as you can see if one clicks on
the website url then he will be able to see a bad request message
coming up. So we need to setup the default page or the startup page
for our project in the web config file.
We need to append the following tag in
the Web.config file.
<configuration>

   <system.webServer>

   <defaultDocument>

   <files>

   <clear/>

   <add value="login.aspx"/>

   </files>

   </defaultDocument>

   </system.webServer>

</configuration>.
For the rest of the db set up look into
the Database Integration With SQL Azure .
