Introduction
Directive is very exciting component when you develop web application with AngularJS. I have just research a lot of topic in the internet and try to complete simple datepicker directive using with Bootstrap latest version v3.2.0. With component you can use very easy and customize what you want to do. I referenced Angular Datepicker, but it so complicated control. Write the code with Datepicker help me to understand how to write directive in angular.
Background
With the sample project, It is the basic ideas about building application using RequireJS, Angular Routing, Binding. This a simple to understand create directive, controller, service, loading dependency in AngularJS. To understand the source code, you should basic knowledge about AngularJS, Bootstrap, HTML, CSS.
Using the code

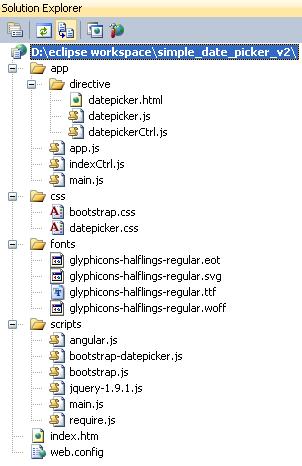
The source code step by step create simple page with only directive for the testing. The tree of project like this.
It include AngularJS libararies, Bootstrap, and our datepicker directive. The direcuve base on bootstrap datepicker libray. The basic flow of application: inject RequireJS in index.html to load main.js--> app.js. In main.js, I load directive and Index controller. Before going deeply the soure code. I explain the basic about isolated scope in directive.
While creating directives, AngularJS allows you to create an isolated scope with some custom bindings to the parent scope. There are 3 types of binding options which are defined as prefixes in the scope property. The prefix is followed by the attribute name of HTML element. These types are as follows
Text Binding (Prefix: @) It like variable
One-way Binding (Prefix: &) It like function
Two-way Binding (Prefix: =) It like value
In this project I used 2 way binding. I put direcive in the index.html and pass value 2 way binding to directive. I will explain more detail in the source below.
The first I create directive with type of attribute.
define(['app', 'directive/datepickerCtrl'], function (app) {
    app.directive('datepicker', function () {
        return {
            restrict: 'A',
            controller: 'datepickerCtrl',
            controllerAs: 'dp',
            templateUrl: 'app/directive/datepicker.html',
            scope: {
                'value': '='
            },
            link: function (scope) {

            }
        };
    });
});
In the directive, I inject datepicketCtrl to handle the scope. You can handle change value of scope variable in the controller or in the direct link: function.
define(['app'], function (app) {
    app.controller('datepickerCtrl', function ($scope) {
        var self = this;
        $('.date').datepicker({ autoclose: true, todayHighlight: true });
        $scope.$watch('value', function (oldVal, newVal) {
                        console.log("Value: "+ $scope.value);
        });
    } );
});
In the controller, I init for datepicker trigger libary javascript, some option params.
$('.date').datepicker({ autoclose: true, todayHighlight: true });
In the directive, I link to datepicker template html. In the template I use ng-model for 2 way binding. I pass
variable named "value" from parent controller to directive.
<div class="input-group date" data-date-format="dd-mm-yyyy" >
    <input type="text" ng-class={inputError:dp.validDate==false} class="form-control input-sm" ng-model="value" />
    <span class="input-group-addon"><span class="glyphicon glyphicon-th"></span></span>
</div>
I put input class inputError to check the input date for customize. You can remove it.
After creating directive, I load it using RequireJS in the main file
require(
    [
        'app',
        'directive/datepicker',
        'indexCtrl'

    ],
    function (app) {
        app.config([
        .....

        }
    ]);
        angular.bootstrap(document, ['testApp']);
    });
And put it in the index.html file
<div ng-controller="indexCtrl">
    <div class="col-xs-2" datepicker value="birthday">
</div>
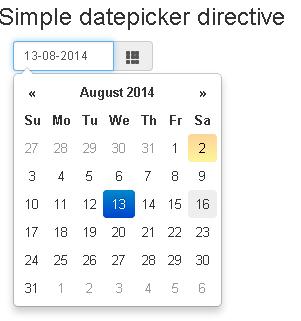
It is wrapped by index controller. You can pass varaibe from index controller to directive throught value atribute. The finally result on the browser like...

History
This is the first version of project.
Here is my update version with format update date time UTC using moment.js
Points of Interest
The datepicker libary I reference from http://bootstrap-datepicker.readthedocs.org/en/release/ so interest. With the new version, you dont care about corect format date time. For more detail about API you can reference the home page.
I want to say thank Stefan Petre, Andrew Rowls + who contributors datepicker bootstrap more completion. Enjoy your coding.
