Introduction
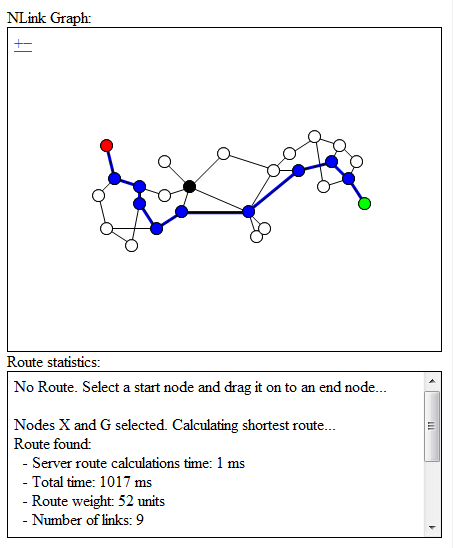
NLink creates an interactive graph of node and link data. The user can select a start node and an end node to find the shortest route between them.
This is my first and only Java project which I spent some time on in 2013. It could be useful for someone starting out with Netbeans / Java / MVC server technologies or for a university project.
Requires Netbeans + JDK Bundle which includes Apache Tomcat.
Using the Code
Link and node data is stored in the XML file, nlink.xml, located in the WEB-INF directory on the server. Currently, this data is hard-coded in the NodeLink class which is used to create the nlink.xml file. The NLink software could be configured to read correctly formatted XML data from an alternative source.
On start-up, NLink will parse the data from the XML file into lists, listNLinkNode and listNLinkLink, in the NodeLink class. The lists are stored for use by the application.
The Java Server Page file, index.jsp makes use of jstl to pass node and link data from the server to JavaScript functions, arrayAddNode and arrayAddLink, in NLinkMap.js. After which the function mapCreate is called.
The mapCreate function initializes and displays the map which includes calculating the bounds of the map, creating layers and interactive elements.
The following is the map creation which includes specifying the bounds of the map:
var arrayBounds = arrayGetNodesBounds();

map = new OpenLayers.Map({
    div: "map-id",
    allOverlays: true,
    maxExtent: new OpenLayers.Bounds(arrayBounds[0], arrayBounds[1], arrayBounds[2], arrayBounds[3])});
}
The following code creates four layers and adds them to the map. The 'Route Layer' is at the bottom and is only used to draw the links for a route using wider lines than the links drawn in the above 'Links Layer'. The two top layers draw the nodes in such a way that if a node in the 'Interactive Layer' layer is dragged using the mouse, there is still a node visible in its place in the 'Nodes Layer'.
arrayLayer[0] = new OpenLayers.Layer.Vector
    ("Route Layer", {isBaseLayer: true, styleMap: styles1});
arrayLayer[1] = new OpenLayers.Layer.Vector("Links Layer",
    {isBaseLayer: false, styleMap: styles2});
arrayLayer[2] = new OpenLayers.Layer.Vector("Nodes Layer",
    {isBaseLayer: false, styleMap: styles3});
arrayLayer[3] = new OpenLayers.Layer.Vector("Interactive Layer",
    {isBaseLayer: false, rendererOptions: {zIndexing: true}, styleMap: styles4});

map.addLayer(arrayLayer[0]);
map.addLayer(arrayLayer[1]);
map.addLayer(arrayLayer[2]);
map.addLayer(arrayLayer[3]);
The following code snippets show how a feature is created for the nodes and links. Due to the data from the arrayNodes and arrayLinks arrays being stored as attributes in the features, they are not needed for anything else.
var feature = new OpenLayers.Feature.Vector(new OpenLayers.Geometry.Point
    (arrayNodes[index].nodeX, arrayNodes[index].nodeY), null);
feature.attributes.name = arrayNodes[index].nodeName;
feature.attributes.data = {x:arrayNodes[index].nodeX, y:arrayNodes[index].nodeY};

layer.addFeatures(feature);

var arrayIndex1 = arrayGetIndexFromNodeName(arrayLinks[i].nodeStart);
var arrayIndex2 = arrayGetIndexFromNodeName(arrayLinks[i].nodeEnd);
var points = new Array(new OpenLayers.Geometry.Point(arrayNodes[arrayIndex1].nodeX,
arrayNodes[arrayIndex1].nodeY), new OpenLayers.Geometry.Point
(arrayNodes[arrayIndex2].nodeX, arrayNodes[arrayIndex2].nodeY));
var line = new OpenLayers.Geometry.LineString(points);
var style = {strokeColor: colorLink, strokeOpacity: opacity, strokeWidth: 1};
var feature = new OpenLayers.Feature.Vector(line, null, style);
feature.attributes.name = {start:arrayNodes[arrayIndex1].nodeName,
end:arrayNodes[arrayIndex2].nodeName, weight:arrayLinks[i].nodeWeight};

layer.addFeatures(feature);
The interactive elements are created and associated with the map as follows:
var controlDrag = new OpenLayers.Control.DragFeature(arrayLayer[3], {
    autoActivate: true,
    documentDrag: true,
    onComplete: onDragComplete,
    onDrag: onDrag,
    onLeave: onDragLeave,
    onEnd: onDragEnd,
    clickFeature: onClickFeature});

var controlHover = new OpenLayers.Control.Hover
({handlerOptions:{'delay': 250, 'pixelTolerance': null, 'stopMove': false}});

map.addControl(controlHover);
map.addControl(controlDrag);
controlHover.activate();
controlDrag.activate();
After the map is displayed, the user can then define a route by selecting a start node and dragging it onto an end node. The function requestRoute is called to request the server to calculate the shortest route between the nodes. These requests are handled by the IndexController class.
After the start node is dragged onto the end node, the function onDragEnd is called. In the following code, feature is the start node and featureSelected is the end node:
mapChangeNodeColor(featureSelected, colorNodeEnd);
requestRoute(feature.attributes.name, featureSelected.attributes.name);
The IndexController manages an instance of the NodeLink class which contains the node and link data in the listNLinkNode and listNLinkLink lists and carries out operations on these lists depending on the server requests. For instance, the following code initializes the lists and passes them to an instance of the ModelAndView class for the use of the Java Server Page:
nodeLink.Init(request.getSession().getServletContext().getRealPath("/"));

if(nodeLink.listNLinkNode.isEmpty() || nodeLink.listNLinkLink.isEmpty())
    return null;

ModelAndView modelAndView = new ModelAndView();
modelAndView.setViewName("index");
modelAndView.addObject("listNLinkNode", nodeLink.listNLinkNode);
modelAndView.addObject("listNLinkLink", nodeLink.listNLinkLink);

return modelAndView;
If a route is found, it is displayed in blue with the start node as green and the end node as red.
The route can be altered by clicking on nodes to either block or unblock the node causing the server to recalculate the route.
The route finding algorithms in the 'core' source package split possible routes into 'route segments'. These are used to calculate the shortest path to a node, i.e., there may be multiple paths to a given node and the shortest of these is selected canceling any other pre-existing paths.
The route segments are stored in an array. After the above calculations are completed, the array may contain multiple paths with a complete route which will be the shortest route. It is then a matter of iterating backwards through the array to reveal the shortest route.
