Introduction
It is a common requirement to create a database during the installation of a .NET application. I have used SQL-DMO and Custom Action in .NET Set Up project to achieve this. This article will show you how to create a database, table, stored procedure, Primary Key etc. Though the table here is simple, you may create as many tables and stored procedures as you wish, in the same fashion.
Using the demo application
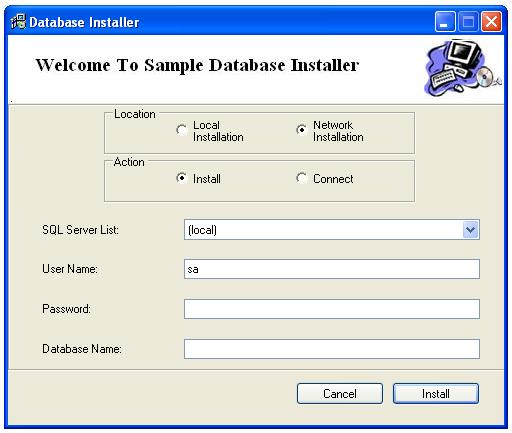
The demo application is provided with the required tool tips which will help you to use the application.
Using the source code
Some important functions are discussed below:
Add reference to SQL-DMO
You can do this by right clicking the project in Solution Explorer, then selecting 'Add Reference', COM components and the latest version of "Microsoft SQLDMO Object Library".
Create application and server objects in the declaration section
SQLDMO.Application sqlApp = new SQLDMO.ApplicationClass();
SQLDMO.SQLServer srv = new SQLDMO.SQLServerClass();
SQLDMO.Database nDatabase = new SQLDMO.Database();
SQLDMO.DBFile nDBFileData = new SQLDMO.DBFile();
SQLDMO.LogFile nLogFile = new SQLDMO.LogFile();
Listing the available SQL Servers in network
This function fillCmbServerList() lists all the available servers in the network. This function will not work for standalone machines:
private void fillCmbServerList()
{
try
{
SQLDMO.NameList sqlServers =
sqlApp.ListAvailableSQLServers();
for(int i=0;i<sqlServers.Count;i++)
{
object srv = sqlServers.Item(i + 1);
if(srv != null)
{
this.cmbServList.Items.Add(srv);
}
}
if(this.cmbServList.Items.Count > 0)
this.cmbServList.SelectedIndex = 0;
else
this.cmbServList.Text =
"<No available SQL Servers>";
}
catch(Exception ex)
{
MessageBox.Show(ex.Message);
}
}
Listing the available databases on the server
This code block btnData_Click lists all the available databases on a particular server. This can be useful in a LAN environment when you want to connect to an existing database instead of installing a new one:
private void btnData_Click(object sender,
System.EventArgs e)
{
try
{
System.Windows.Forms.Cursor.Current=
System.Windows.Forms.Cursors.AppStarting;
if(rbLocal.Checked==true)
srv.Connect(this.txtServName.Text.Trim(),
this.txtUserName.Text,this.txtPass.Text);
else
srv.Connect(this.cmbServList.Text.Trim(),
this.txtUserName.Text,this.txtPass.Text);
foreach(SQLDMO.Database db in srv.Databases)
{
if(db.Name!=null)
this.cmbDataName.Items.Add(db.Name);
}
if(this.cmbDataName.Items.Count!=0)
cmbDataName.SelectedIndex=0;
System.Windows.Forms.Cursor.Current =
System.Windows.Forms.Cursors.Default;
}
catch(Exception ex)
{
MessageBox.Show(ex.Message);
}
finally
{
srv.DisConnect();
}
}
Create a database on the server
This function createDB() will create a database and the associated files on a specified server:
private void createDB()
{
strDatabaseName = txtDBName.Text.ToString();
if (strDatabaseName == "")
{
MessageBox.Show("Enter the Name");
}
try
{
nDatabase.Name = strDatabaseName;
nDBFileData.Name = strDatabaseName;
nDBFileData.PhysicalName = srv.Registry.SQLDataRoot +
"\\DATA\\" + strDatabaseName + "_Data.mdf";
nDBFileData.PrimaryFile = true;
nDBFileData.Size = 2;
nDBFileData.FileGrowthType =
SQLDMO.SQLDMO_GROWTH_TYPE.SQLDMOGrowth_MB;
nDBFileData.FileGrowth = 1;
nDatabase.FileGroups.Item("PRIMARY").DBFiles.Add(nDBFileData);
nLogFile.Name = strDatabaseName + "Log";
nLogFile.PhysicalName = srv.Registry.SQLDataRoot +
"\\DATA\\" + strDatabaseName + "_Log.ldf";
nLogFile.Size = 2;
nDatabase.TransactionLog.LogFiles.Add(nLogFile);
srv.Databases.Add(nDatabase);
}
catch(Exception ex)
{
MessageBox.Show(ex.Message);
return;
}
}
Create tables in the database
We will discuss two methods of creating tables:
- This function
tblEmployees() will create a table in the database. It will also create a primary key on one column and assign the default value to a column.
private void tblEmployees()
{
try
{
SQLDMO.Table table = new SQLDMO.Table();
table.Name="Employees";
SQLDMO.Column Col1 = new SQLDMO.Column();
Col1.Name="EmpNo";
Col1.Datatype="int";
Col1.AllowNulls=false;
SQLDMO.Column Col2 = new SQLDMO.Column();
Col2.Name="Name";
Col2.Datatype="varchar";
Col2.Length=50;
Col2.AllowNulls=false;
SQLDMO.Column Col3 = new SQLDMO.Column();
Col3.Name="Surname";
Col3.Datatype="varchar";
Col3.Length=50;
Col3.AllowNulls=true;
SQLDMO.Column Col4 = new SQLDMO.Column();
Col4.Name="isPermanent";
Col4.Datatype="char";
Col4.Length=10;
Col4.DRIDefault.Text=strYes;
Col4.AllowNulls=true;
table.Columns.Add(Col1);
table.Columns.Add(Col2);
table.Columns.Add(Col3);
table.Columns.Add(Col4);
SQLDMO.Key PK = new SQLDMO.Key();
PK.Clustered=true;
PK.Type=
SQLDMO.SQLDMO_KEY_TYPE.SQLDMOKey_Primary;
PK.KeyColumns.Add("EmpNo");
table.Keys.Add(PK);
nDatabase.Tables.Add(table);
}
catch(Exception ex)
{
MessageBox.Show(ex.Message);
}
}
- Here, we will create a table from a script using the stored procedure
SP_Students. We will use the ExecuteImmediate method of the database to execute the stored procedure. After successful creation of the table we will remove the stored procedure from the database. This code is written in the Install button's click event. The code is as follows:
nDatabase.ExecuteImmediate("InsStudents",0,0);
nDatabase.StoredProcedures.Remove(2,"");
Create stored procedures in the database
- This function
SP_Employees() creates stored procedures in the database:
private void SP_Employees()
{
try
{
SQLDMO.StoredProcedure strProc = new SQLDMO.StoredProcedure();
strProc.Name="InsEmployees";
strProc.Text="CREATE procedure InsEmployees(" +
"@v_EmpNo int,@v_Name varchar(50),@v_Surname varchar(50),
@v_isPermanent char(10))"+
"as "+
"Begin Insert Into PersonalInfo(EmpNo,Name,Surname,isPermanent)"+
"values (@v_EmpNo,@v_Name,@v_Surname ,@v_isPermanent) end";
nDatabase.StoredProcedures.Add(strProc);
}
catch(Exception ex)
{
MessageBox.Show(ex.Message);
}
}
- This function
SP_Students() is a stored procedure which creates the table Students:
private void SP_Students()
{
try
{
SQLDMO.StoredProcedure strProc =
new SQLDMO.StoredProcedure();
strProc.Name="InsStudents";
strProc.Text="CREATE procedure InsStudents as begin
create table Students(Name Varchar(50),
Surname Varchar(50)) end";
nDatabase.StoredProcedures.Add(strProc);
}
catch(Exception ex)
{
MessageBox.Show(ex.Message);
}
}
How to use this application in Set Up projects?
- In Solution Explorer, right click on your set up project and select View --> Custom Actions:

- The Custom Actions Window will open:

- Now right click on Install and click "Add Custom Action":

- In the Dialog Box that will be opened, double click on the Application Folder:

- In the Dialog Box that will be opened, Click on the "Add File" button:

- In the Dialog Box that will be opened, navigate to DBI.exe file in the Release folder of your application. Select the .exe file, other dependencies will be added automatically:

- The Custom Actions Editor will look like this:

- Select the just added DBI.exe and press F4 or open the Properties Window. Set the
InstallerClass property to False as shown in figure. By default InstallerClass property is set to True:

Other considerations
It is possible that the above code might give an error saying "QueryInterface for interface SQLDMO.NameList failed". If such exceptions occur, it means that the server should be updated with the latest service pack (above SP 2).
History
- 3rd Sept, 2005 - First update, using scripts for creating a table.
