
Contents
AllegNet is a game programming library based on the famous C++ Allegro library. At first, AllegNet was a wrapper, but due to the need of dealing with lots of objects inside the managed environment, I have change it by re-creating a set of classes, structures and functions in order to have full managed objects to play with.
With AllegNet, you can create games and multimedia applications with the support of DirectX, when available on a user's PC. AllegNet provides the same functions of the Allegro library 4.2.0 but with some modifications in order to bring the power of the .NET Framework 2.0.
AllegNet is a full manage library, so you can use C#, VB.NET, C++.NET and J#. All examples in the Examples section are provided for C#, VB.NET and sometimes J#.
This article will explain how to start creating multimedia applications with DirectX support using the AllegNet library.
In order to install and run some code, you have to check two points:
- The file msvcr80.dll must be present in the %windir%\system32 directory.
- The file alleg42.dll must be present in the %windir%\system32 directory.
The two files can be found here.
Open Visual Studio Express, and create a new console application project. Next, add a reference to the AllegNet library. You can download a version here.
In order to have full access to the library easily, you can inherit the main class from the AllegNet.API class.
using using AllegNet;
class MainClass : API
{
}
imports AllegNet
Public Class MainClass inherits API
End Class
You have to initialize the library before using it. The Allegro_Init function can do it. You need to add keyboard events too.
if (Allegro_init() != 0)
return 1;
Install_keyboard();
If Allegro_init() <> 0 Then
Return 1
End If
Install_keyboard()
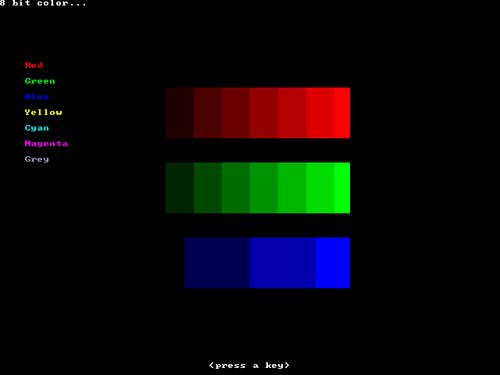
Now, you will create a function that will show a kind of gradual bar that shows the color depth of the screen.
public static void TestColor(COLOR_DEPTH colordepth)
{
int x;
PALETTE pal = new PALETTE();
API.Set_color_depth(colordepth);
Public Shared Sub TestColor(ByVal colordepth As COLOR_DEPTH)
Dim x As Integer Dim pal As PALETTE = New PALETTE()
Next, you will create a fake 332 palette to simulate the graduate palette for 8bits depth. You will create a 640*480 BITMAP buffer and set the screen to 640*480 resolution and set the color depth to the color depth variable.
BITMAP Buffer = API.Create_bitmap(SCREEN_RESOLUTIONS.SIZE_640_480);
if (API.Set_gfx_mode(GFX_MODES.GFX_DIRECTX_WIN,
SCREEN_RESOLUTIONS.SIZE_640_480) != 0)
return;
Generate_332_palette(ref pal); Set_palette(pal);
API.Clear_to_color(Buffer,API.Makecol(0,0,0));
Dim Buffer As BITMAP = _
API.Create_bitmap(SCREEN_RESOLUTIONS.SIZE_640_480)
If API.Set_gfx_mode(GFX_MODES.GFX_AUTODETECT_FULLSCREEN, _
SCREEN_RESOLUTIONS.SIZE_640_480) <> 0 Then
Return
End If
Generate_332_palette(pal)
Set_palette(pal)
API.Clear_to_color(Buffer, API.Makecol(0, 0, 0))
Now you can draw some colored string in the screen at the left side. You can use the Textout_ex function with the buffer, and with the default font object.
//C# Version

Textout_ex(Buffer, Font, ((int)colordepth).ToString() +
           " bit color...", 0, 0,
            Makecol(255, 255, 255), -1);

Textout_ex(Buffer, Font, "Red", 32, 80,
                   Makecol(255, 0, 0), -1);
Textout_ex(Buffer, Font, "Green", 32, 100,
                   Makecol(0, 255, 0), -1);
Textout_ex(Buffer, Font, "Blue", 32, 120,
                   Makecol(0, 0, 255), -1);
Textout_ex(Buffer, Font, "Yellow", 32, 140,
                   Makecol(255, 255, 0), -1);
Textout_ex(Buffer, Font, "Cyan", 32, 160,
                   Makecol(0, 255, 255), -1);
Textout_ex(Buffer, Font, "Magenta", 32, 180,
                   Makecol(255, 0, 255), -1);
Textout_ex(Buffer, Font, "Grey", 32, 200,
                   Makecol(128, 128, 128), -1);
Textout_ex(Buffer, Font, _
(CType(colordepth, Integer)).ToString() + _
" bit color...", 0, 0,
Makecol(255, 255, 255), -1)
Textout_ex(Buffer, Font, "Red", 32, 80, Makecol(255, 0, 0), -1)
Textout_ex(Buffer, Font, "Green", 32, 100, Makecol(0, 255, 0), -1)
Textout_ex(Buffer, Font, "Blue", 32, 120, Makecol(0, 0, 255), -1)
Textout_ex(Buffer, Font, "Yellow", 32, 140, Makecol(255, 255, 0), -1)
Textout_ex(Buffer, Font, "Cyan", 32, 160, _
Makecol(0, 255, 255), -1)
Textout_ex(Buffer, Font, "Magenta", 32, _
180, Makecol(255, 0, 255), -1)
Textout_ex(Buffer, Font, "Grey", 32, 200, _
Makecol(128, 128, 128), -1)
And then you can now draw the gradient colored bar into the buffer.
for (x = 0; x < 256; x++)
{
Vline(Buffer, 192 + x, 112, 176, Makecol(x, 0, 0));
Vline(Buffer, 192 + x, 208, 272, Makecol(0, x, 0));
Vline(Buffer, 192 + x, 304, 368, Makecol(0, 0, x));
}
Textout_centre_ex(Buffer, Font, "<press a key>",
Buffer.w / 2, Buffer.h - 16,
Makecol(255, 255, 255), -1);
For x = 0 To 256 - 1 Step x + 1
Vline(Buffer, 192 + x, 112, 176, Makecol(x, 0, 0))
Vline(Buffer, 192 + x, 208, 272, Makecol(0, x, 0))
Vline(Buffer, 192 + x, 304, 368, Makecol(0, 0, x))
Next
Textout_centre_ex(Buffer, Font,
"<press a key>",
Buffer.w / 2, Buffer.h - 16, Makecol(255, 255, 255), -1)
And now, to finish, you will draw the result on the screen and wait for the user to press a key. In the main function, you will just call the function for each depth you want to test.
Blit(Buffer,Screen,0,0,0,0,Screen.w,Screen.h);
Readkey();
{
if (Allegro_init() != 0)
return 1;
Install_keyboard();
TestColor(COLOR_DEPTH.BITS_8);
TestColor(COLOR_DEPTH.BITS_15);
TestColor(COLOR_DEPTH.BITS_16);
TestColor(COLOR_DEPTH.BITS_24);
TestColor(COLOR_DEPTH.BITS_32);
return 0;
}
Blit(Buffer, Screen, 0, 0, 0, 0, Screen.w, Screen.h)
Readkey()
Public Shared Function Main() As Integer
If Allegro_init() <> 0 Then
Return 1
End If
Install_keyboard()
TestColor(COLOR_DEPTH.BITS_8)
TestColor(COLOR_DEPTH.BITS_15)
TestColor(COLOR_DEPTH.BITS_16)
TestColor(COLOR_DEPTH.BITS_24)
TestColor(COLOR_DEPTH.BITS_32)
Return 0
End Function
- 12/01/2005 - First online version.
