
Table of Contents
Introduction
"Rx" stands for Reactive Extensions and it is one of the project initiatives held by Microsoft DevLabs. DevLabs is a place for embrionary technologies under development by Microsoft teams. Such prototype projects are released and then evaluated by the development community, and depending on their success, they one day may become a part of the .NET Framework, or become a new tool, etc.
Since the first version of the .NET Framework, and even long before that, developers have been dealing with various kinds of events: UI events (such as key pressing and mouse moves), time events (such as timer ticks), asynchronous events (such as Web Services responding to asynchronous calls), and so on. Reactive Extensions was born when DevLabs team envisaged "commonalities" between these many types of events. They worked hard to provide us with tools to deal with different events in a smarter way. This article shows some practical techniques you can use with Reactive Extensions, hoping they are useful for you in your future projects.
System Requirements
To use WPF ReactiveFace provided with this article, if you already have Visual Studio 2010, that's enough to run the application. If you don't, you can download the following 100% free development tool directly from Microsoft:
Also, you must download and install Rx for .NET Framework 4.0 by clicking the button with the same name from the DevLabs page:
The Reactive Face Project
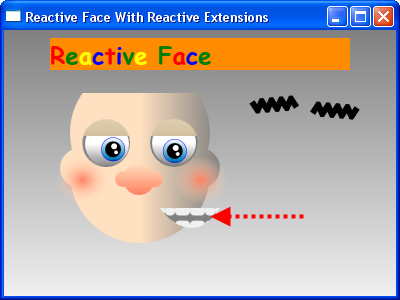
Reactive Face is a little WPF project that makes use of Reactive Extensions. This little ugly, creepy, incomplete head you see on the screen is just an excuse to illustrate some of the Rx features.
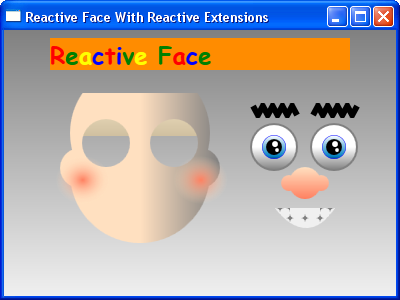
The first thing you'll notice when you run the project is that the eyelids are blinking (even without the eye balls!). As I said before, this little app was made to illustrate Rx features, so let's start with the blinking.
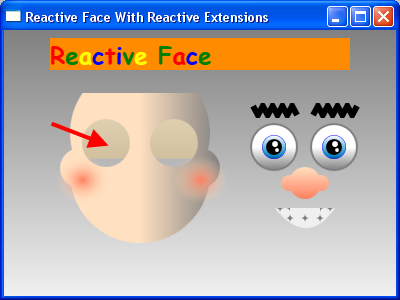
The blinking itself is done by an animation that moves a "skin", that is, rectangles that cover the back of the eye holes in the face. Once the animation is started, the rectangles go down and up quickly, emulating a blinking.
The animations are stored in storyboards, which in turn are stored in the window XAML:
<Window.Resources>
    ...
        <Storyboard x:Key="sbBlinkLeftEye">
            <DoubleAnimation x:Name="daBlinkLeftEye"
                Storyboard.TargetName="recEyelidLeft"
                Storyboard.TargetProperty="Height"
                From="18" To="48"
                Duration="0:0:0.100" AutoReverse="True">
            </DoubleAnimation>
        </Storyboard>
        <Storyboard x:Key="sbBlinkRightEye">
            <DoubleAnimation x:Name="daBlinkRightEye"
               Storyboard.TargetName="recEyelidRight"
               Storyboard.TargetProperty="Height"
               From="18" To="48"
               Duration="0:0:0.100" AutoReverse="True">
            </DoubleAnimation>
        </Storyboard>
</Window.Resources>
A Simple Timer
The following code will start the storyboards so that the blinking will occur every 2000 milliseconds (2 seconds). If you know a little about animation, I'm sure you're asking yourself now: "why didn't you set a RepeatBehavior to Forever in the XAML itself?". Well, while you're right, I must say this is just to illustrate how you could do that using Rx code.
var sbBlinkLeftEye = (Storyboard)FindResource("sbBlinkLeftEye");
var sbBlinkRightEye = (Storyboard)FindResource("sbBlinkRightEye");
var blinkTimer = Observable.ObserveOnDispatcher(
Observable.Interval(TimeSpan.FromMilliseconds(2000))
);
blinkTimer.Subscribe(e =>
{
sbBlinkLeftEye.Begin();
sbBlinkRightEye.Begin();
}
);
The first lines in the snippet above are straightforward: they find and instantiate storyboard variables from the XAML. Next, we have the Observable.ObserveOnDispatcher method, which I'll explain later on. Then comes the important part: Observable.Interval(TimeSpan.FromMilliseconds(2000)). This code returns an observable sequence that produces a value after each period (in this case, every 2 seconds). If you thought "It's a timer!", you are absolutely right. It's a timer, and we are using it as a timer. Notice that this is already a new feature provided by the Rx framework. So, while you could be using DispatcherTimer or other built-in .NET timers, you have now the new Observable.Interval method to perform the same task. But the advantage of using observable sequences, as you're going to see later on, is that you can use LINQ to manipulate how the sequence is generated.
The last lines in the code sample above tells the app to start the blinking storyboards every time a value is produced by the observable sequence. That is, every 2 seconds, our ugly face will blink. And remember the Observable.ObserveOnDispatcher line above? That method was used so that we don't get a wrong thread exception while accessing the storyboard objects (which were created in a different thread from the timer thread).
Gathering Data
Along with MainWindow.xaml.cs, you'll see a private class, ElementAndPoint, and you might be wondering why it is there. It's just a POCO (Plain Old CLR Object) that will help us in storing information about controls and points as we move the mouse and push/release mouse buttons. In the next section, you will see this more clearly.
private class ElementAndPoint
{
public ElementAndPoint(FrameworkElement element, Point point)
{
this.Element = element;
this.Point = point;
}
public FrameworkElement Element { get; set; }
public Point Point { get; set; }
}
Sequences From Events
Now we are facing a new Rx method: Observable.FromEvent. This method returns an observable sequence that contains the values of the underlying .NET event. That is, we are telling the app to create observable sequences from the MouseMove and MouseUp events, and the values and the sequence are the points returned by the GetPosition function:
var mouseMove = Observable.FromEvent<mouseeventargs />(this, "MouseMove").Select(
e => new ElementAndPoint(null, e.EventArgs.GetPosition(mainCanvas)));
var mouseUp = Observable.FromEvent<mousebuttoneventargs />(this, "MouseUp").Select(
e => new ElementAndPoint(null, e.EventArgs.GetPosition(mainCanvas)));
Let's take a closer look at these lines:
- The
Observable.FromEvent<MouseEventArgs>(this, "MouseMove") part tells the app to create an observable sequence of MouseEventArgs from the MouseMove event, having the current window (this) as the target element. This instruction alone will return a sequence of MouseEventArgs values, but in this case, we are modifying the sequence value type, by using the Select method to return a new ElementAndPoint object for each value in the sequence. Basically, we are saying that the element is null (that is, we don't care about the element) and that the Point is the position of the mouse relative to the mainCanvas element, when the mouse is moving. - The
Observable.FromEvent<MouseButtonEventArgs>(this, "MouseUp") uses the same logic, but in this case, we must be careful and define the source type as MouseButtonEventArgs, which is the type returned by the MouseUp event.
The next two lines also define an observable sequence for two different events: MouseEnter and MouseLeave. Whenever you enter the mouse in the grid face area (delimited by the grdFace element), the first sequence produces a single value. And when you leave this area, the second sequence produces a value. Again, I'm going to explain how we use these sequences later on.
var mouseEnterFace = Observable.FromEvent<mouseeventargs />(grdFace, "MouseEnter").Select(
e => new ElementAndPoint(null, e.EventArgs.GetPosition(mainCanvas)));
var mouseLeaveFace = Observable.FromEvent<mouseeventargs />(grdFace, "MouseLeave").Select(
e => new ElementAndPoint(null, e.EventArgs.GetPosition(mainCanvas)));
Using More Complex Queries
Then comes the lines where we create a list of user controls that define the face parts (eyes, eyebrows, nose, mouth):
var controlList = new List<usercontrol />();
controlList.Add(ucLeftEyeBrow);
controlList.Add(ucLeftEye);
controlList.Add(ucRightEyeBrow);
controlList.Add(ucRightEye);
controlList.Add(ucNose);
controlList.Add(ucMouth);
Once we have the list, we can easily iterate their elements to create observable sequences from events that target those face parts:
foreach (var uc in controlList)
{
Canvas.SetZIndex(uc, 1);
Canvas.SetLeft(uc, 0);
Canvas.SetTop(uc, 0);
. . .
Now that we are iterating over the list of user controls, we create the observable sequences based on the MouseDown and MouseUp UI events. Notice also that we are using the the Select method to return a sequence of ElementAndPoint objects, having the (FrameworkElement)e.Sender value as the element. In other words, each value in the sequence now has:
- The
Point where the mouse button was pressed or released - The
Element where that mouse down / mouse up event occurred
var mouseDownControl = Observable.FromEvent<mousebuttoneventargs />(uc, "MouseDown").Select(
e => new ElementAndPoint((FrameworkElement)e.Sender, e.EventArgs.GetPosition(mainCanvas)));
var mouseUpControl = Observable.FromEvent<mousebuttoneventargs />(uc, "MouseUp").Select(
e => new ElementAndPoint((FrameworkElement)e.Sender, e.EventArgs.GetPosition(mainCanvas)));
The syntax may look a bit strange in the beginning, but I'm sure you'll be used to it if you practice with small examples with this.
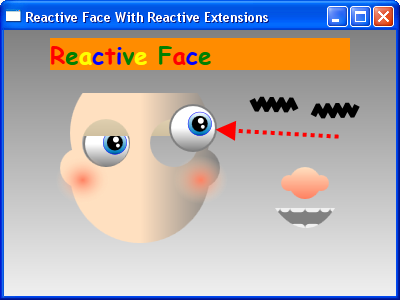
Another important piece in our application is the drag/drop functionality. Each face part can be subjected to drag'n'drop, and this is done basically by two pieces of code: the first piece is a LINQ query that creates an observable sequence that is populated when the face part is being dragged. And the second piece of code subscribes to that observable sequence and moves the face part accordingly:
var osDragging = from mDown in mouseDownControl
from mMove in mouseMove.StartWith(mDown).TakeUntil(mouseUp)
.Let(mm => mm.Zip(mm.Skip(1), (prev, cur) =>
new
{
element = mDown.Element,
point = cur.Point,
deltaX = cur.Point.X - prev.Point.X,
deltaY = cur.Point.Y - prev.Point.Y
}
))
select mMove;
osDragging.Subscribe(e =>
{
Canvas.SetLeft(e.element, Canvas.GetLeft(e.element) + e.deltaX);
Canvas.SetTop(e.element, Canvas.GetTop(e.element) + e.deltaY);
}
);
The above code snippet can be translated in plain English as: "After the user has pressed the mouse button over some element, and while the user has not released the button, whenever the user moves the mouse over the current window, return a sequence of values containing the element being dragged, the point where the mouse pointer is located at, and the deltas representing the coordinates movement since the last time the mouse moved. And for each value returned, move the X, Y coordinates of the affected element according to the calculated X, Y deltas." Easy, isn't it?
Now let's pay closer attention to what we've just done here:
- The core of the above LINQ query is the
mouseMove observable sequence (which we declared before). - The
StartWith and TakeUntil method tells our application when the observable sequence must start/stop producing values. - The
mm.Zip(mm.Skip(1), (prev, cur) part is an instruction that merges two sequence values into a single sequence value: this is very handy because it enables us to use both the previous sequence value and the current sequence value and combine them to calculate the deltas. - The anonymous type starting with new { element... modifies the returned type, so that we can have more information about the dragging operation.
- The
Subscribe method describes an action that is executed every time a face part is dragged. In our case, the Left and Top properties of that element are set, so the element can be moved around.
Subscribe As You Wish
Moving on to the next part: let's say we want to make the selected part to move above other elements on the screen: in this case, we could set the ZIndex to a height value, let's say 100. Then all we have to do is to subscribe another action to the mouseDownControl observable sequence, and modify the element's property with:
...
var mouseDownControl = Observable.FromEvent<mousebuttoneventargs />(uc, "MouseDown").Select(
e => new ElementAndPoint((FrameworkElement)e.Sender,
e.EventArgs.GetPosition(mainCanvas)));
...
mouseDownControl.Subscribe(e =>
{
Canvas.SetZIndex(e.Element, 100);
}
);
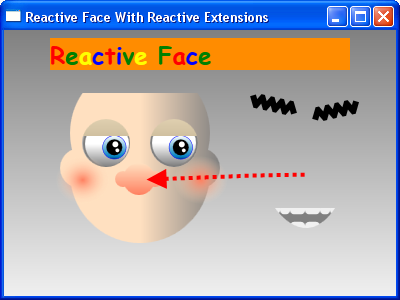
Using the same technique, we can put the element to its correct ZIndex value when the user has released it. This allows the eyeballs to stay behind the eyelids, in our example. We do this by subscribing to the mouseUpControl sequence:
...
var mouseUpControl = Observable.FromEvent<mousebuttoneventargs />(uc, "MouseUp").Select(
e => new ElementAndPoint((FrameworkElement)e.Sender,
e.EventArgs.GetPosition(mainCanvas)));
...
mouseUpControl.Subscribe(e =>
{
switch (e.Element.Name)
{
case "ucLeftEye":
case "ucRightEye":
Canvas.SetZIndex(e.Element, -1);
break;
default:
Canvas.SetZIndex(e.Element, 1);
break;
}
}
);
}
Completing the Face
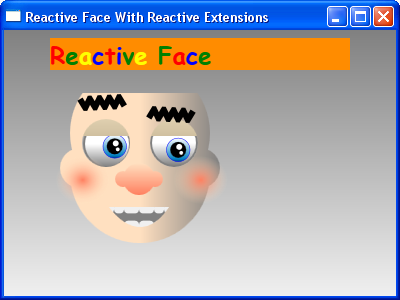
Finally, we subscribe to the mouseMove observable sequence. Notice that there are many things going on here: the eyebrows are moving, the eyes are looking at the mouse cursor, and the teeth are going up and down. Our beautiful ugly face is done and paying attention to our mouse movements.
Of course, we could use separate actions, and even separate functions. Just use it the way it serves you better.
var leftPupilCenter = new Point(60, 110);
var rightPupilCenter = new Point(130, 110);
mouseMove.Subscribe(e =>
{
double leftDeltaX = e.Point.X - leftPupilCenter.X;
double leftDeltaY = e.Point.Y - leftPupilCenter.Y;
var leftH = Math.Sqrt(Math.Pow(leftDeltaY, 2.0) + Math.Pow(leftDeltaX, 2.0));
var leftSin = leftDeltaY / leftH;
var leftCos = leftDeltaX / leftH;
double rightDeltaX = e.Point.X - rightPupilCenter.X;
double rightDeltaY = e.Point.Y - rightPupilCenter.Y;
var rightH = Math.Sqrt(Math.Pow(rightDeltaY, 2.0) + Math.Pow(rightDeltaX, 2.0));
var rightSin = rightDeltaY / rightH;
var rightCos = rightDeltaX / rightH;
if (!double.IsNaN(leftCos) &&
!double.IsNaN(leftSin))
{
ucLeftEye.grdLeftPupil.Margin =
new Thickness(leftCos * 16.0, leftSin * 16.0, 0, 0);
}
if (!double.IsNaN(rightCos) &&
!double.IsNaN(rightSin))
{
ucRightEye.grdRightPupil.Margin =
new Thickness(rightCos * 16.0, rightSin * 16.0, 0, 0);
}
var distFromFaceCenter = Math.Sqrt(Math.Pow(e.Point.X - 90.0, 2.0) +
Math.Pow(e.Point.Y - 169.0, 2.0));
ucLeftEyeBrow.rotateLeftEyebrow.Angle = -10 + 10 * (distFromFaceCenter / 90.0);
ucRightEyeBrow.rotateRightEyebrow.Angle = 10 - 10 * (distFromFaceCenter / 90.0);
ucMouth.pnlTeeth.Margin =
new Thickness(0, 10 * (distFromFaceCenter / 90.0) % 15, 0, 0);
}
);
Final Considerations
As I said before, this was just a glimpse of Rx power. There is certainly much more that Reactive Extensions can do, but I'll be happy if this article can be useful for you in some way. For more approaches on Rx, please read the other great Rx articles here at The Code Project:
History
- 2011-02-27: Initial version.
