Introduction
SQL and C# is very user friendly and an easy database development tool. It works for SQL Server as backend and C# as frontend.
What It Can Do?
- Automatically creates all the basic stored procedures (i.e.
Select, Update, Delete, Insert) for a particular Table in SQL Server. - Auto generates the
Connection class for C# which is needed to connect SQL Server with C#. - Auto generates Stored Procedures calling class which calls the stored procedures created by this tool for Data Manipulation.
- Auto generates the Windows Form (which provides an interface) for manipulating data in a particular table.
- Auto generates code, if a stored procedure is provided.
- You can modify a stored procedure according to your requirements and can save it to the database.
Background
In order to deal with SQL Server, we should need an interface which makes us communicatable with it and that is SQLDMO.dll (new SMO.dll with VS2010 is also available) which is installed when we install SQL Server. With the help of SQL DMO (SMO), you can do almost anything with SQL Server from creation of stored procedures to deletion of stored procedures, etc.
Using the Code
When you run SQLAndCSharp, you will be welcomed by a window named as connection profiles. There are four buttons on it (Edit, Add, Remove, Ok and Cancel) and currently two are active (Add, Cancel).
Click on Add Button to add a database profile.
The only choice available in provider section is "Microsoft Oledb For SQL Server", so just select it and click Next.
Enter user name & password of SQL Server and choose a database. Then press OK.
Now you have added a connection in your connection profiles.
Just select it and then press OK.
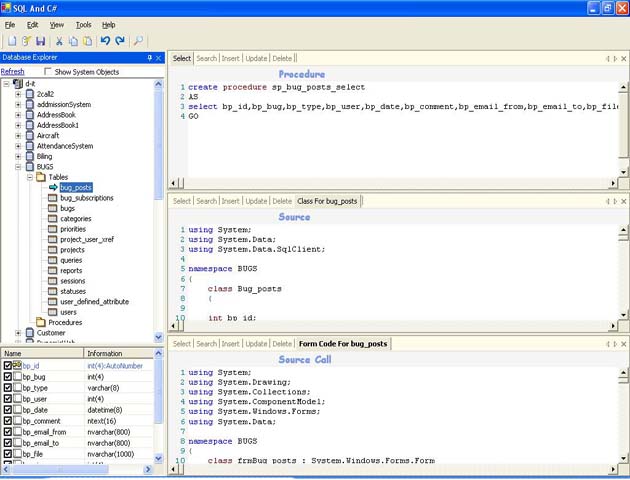
You are in the main window now (you can see it in the picture above).
According to functionality, we can divide it into five parts.
1. Database Explorer (Up-Left)
It shows all the databases of yours present in your SQL Server. If you want to see system databases, just check the "Show System Objects" check box. This explorer will show databases with their Procedures and Tables.
2. Table Field Info (Down-Left)
It is basically a part of database explorer. When you click on a particular table, its fields information is loaded in this area.
3. Procedure (Up-Right)
In this section, all the auto generated stored procedures will reside. You can save it on your hard disk as well as in the database.
4. Source (Middle-Right)
It will contain the source in C# required to call the above stored procedures. You can save it on your hard disk.
5. Source Call (Down-Right)
It will contain the form code for a particular table. You can save it on your hard disk.
It is time to show you some magic. Just select a table from a database and you will see that its desired stored procedures, CSharp class, and Window Form are generated in respective sections. Just save it and enjoy.
Saving a Stored Procedure is a very simple step. Just right click on that stored procedure and then select save.
Select your desired target to save. Mostly, we save it to database so click "Save To Database".
A message will appear that a stored procedure is successfully created.
Repeat the same procedure for source and source call and save them to your hard disk and include them into your CSharp project.
Also generate Connection Class from Tools-> Generate Connection Class Menu.
If you want to see your created stored procedures in "Database Explorer", you have to refresh it by clicking on Link Button "Refresh", present on database Explorer.
If you want to create CSharp calling source from a stored procedure, just click on the desired stored procedure.
This is the very short help on this tool. You can find a few more things when you explore it and you will recognize its power and time saving ability during database development.
Please note that: a how to use file is also included with SQLAndCSharpExe.zip. So if you download the executable, you will not need to download howToUse.pdf.
Points of Interest
By writing this code, I understood how to make tools which can control the behaviour of SQL Server.
History
- This article was written on 24th May, 2007 and modified on 25th May, 2007.
