Introduction
I have noticed in various (and lots of) places scattered all across the Internet, requests on how to embed multiple icons into a .NET executable, not embedded in the .NET resources (resx files) but accessible by the Windows Explorer and the like.
After chance comment on a page with nothing to do with the subject at hand, I realised that this capability is built into Visual Studio 2005. This article outlines the procedure required to compile multiple icons into an executable without having to resort to the command-line.
The Process
Step 1: The Resource File
For reasons that shall become apparent later, Visual Studio requires that the icons be compiled into a resource file. It is up to you how you generate this, but I shall use the designers with VS2005.
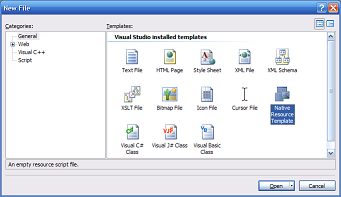
- Create a new "Native Resource Template" from the File | New dialog box.

- Right click anywhere in the designer, and select "Add Resource..." to reach the following dialog box:

- You can, at this point, import any resources you wish to embed, but we will import some icons, so click "Import..." and select the icon files.

If you wish, you can change the ID associated with the resources in the Properties window.
- Now, we must save the resource template as a 32-bit Resource File. This is done via File | Save As..., making sure that "32-bit Resource File (*.res)" is selected in the "Save as type" box. Save it somewhere logical, e.g., in your project's directory.

Step 2: Compiling into the Executable
Visual Studio 2005 provides two ways of providing icons for .NET executables. One is via the Application Icon property in the Property pages. The second is via a resource file, and it is this method that we utilise.
- Open up the Application tab of the Properties page of your project.
- In the "Resources" group box, change the selection to point to Resource File, and browse for the resource file you just saved.

Step 3: Compiling
Once the previous step has been completed, Visual Studio will now embed the Win32 resource into the executable when it compiles. To see the changes, simply recompile the application.

You can see by the above screenshot that multiple icons have been embedded (natively) into the executable. Where this would be useful, for example, is if your application registers a file type, the files can have a different icon associated with them rather than the same as the executable. Or you won't have to distribute an icon file with your program, it can simply be embedded.
Summary
Hopefully, that has explained clearly enough how to accomplish the task of embedding multiple icons into a .NET executable without resorting to the command-line. If you have any suggestions for improvements / comments, don't hesitate to post them, I've probably made quite a few spelling mistakes along the way as well (no Intellisense).
