Introduction
I read in this article by Bob Bradley that hard things are easy with XNA, and easy things are quite hard. By now that's absolutely true and XNA integration with Windows Forms is an example of that.
Note: This example is based on this ZiggyWare tutorial, and adds to it several features like:
- Inheritable WinForm ready to render XNA
- A
RefreshMode allows to select an "always" refresh option (see program.cs for details) or an OnPanelPaint option, which will refresh the render each time the panel is painted. You can always call the public Render() method manually - Cleans the viewport's background color to the Panel Control's back color
- Implements
OnFrameMove, OnFrameRender, OnDeviceResetting and OnDeviceReset events, in a DirectX Framework way
Note 2: I've just realized there's another article on this same topic here. It's also a very good approach and handles both roads that we discuss later. Check it out!
Background
As XNA is a cross-platform game development Framework, ready to work both with PC-Windows and XBox360, its core cannot rely on Windows Forms like DirectX has been doing for years.
So, when we create our first XNA Game Project, we'll find no Window at all. Even System.Windows.Forms.dll is not referenced in the project. The window just magically pops up when we launch the application.
In fact, all this stuff is done internally by the XNA Framework, which works as an abstraction layer for us, building the appropriate environment for the platform the application runs in.
That's great but, what if I don't need XBox support? What if I want to add a simple TextBox to let the user enter his name? Of course all these questions will be answered in future versions of XNA, including native support for Windows-only projects, probably through a new Project Template, but for now, we are alone. So how do we fix that?
Basically, there are two different roads:
- Build a Windows Application project which uses XNA objects to handle rendering in a control, keeps all the WinForms designer functionality, but lacks all the XNA extensions for Visual Studio.
- Build a Game For Windows project, which uses Windows Controls to make the UI. This keeps all the XNA and extensions functionality, but will force you to design your controls "by hand".
In this article, we will follow the first path, and leave the second one for a next post.
Using the Code
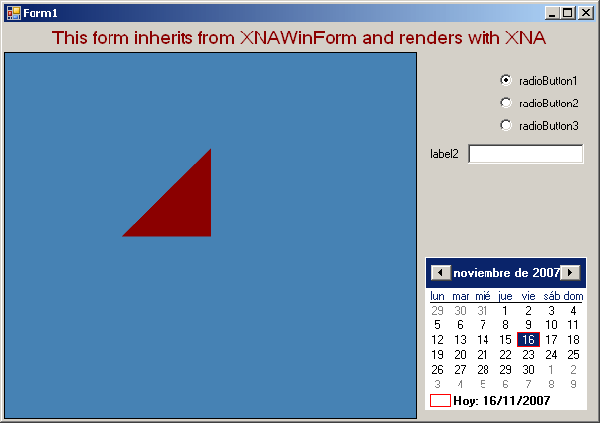
What I provide in the ZIP is a full Visual Studio Express project you can use as an empty template for your own applications. It includes XNAWinForm: a base Form you can inherit from, or you can change it, to include as many elements you may need. In the sample code you will also find Form1: and an example of using XNAWinForm.
So, for those of you who are familiar with DirectX or MDX, XNA exposes several useful events if you don't want to include all your rendering logic inside the Form:
OnFrameMove: It is called before rendering, to allow you to update anything you may need. OnFrameRender: Include in its handler any rendering code you may want. DeviceResetting: This event is called when the device is going to be reset, so you can dispose objects or whatever. DeviceReset: Called after the device is reset, to allow you to update device-dependent elements.
In order to code your own XNA ready form, the first thing you have to do is to create a New WindowsApplication project, add the references to XNA DLLs, and add to your empty form the control you want to render in (in the example: panelViewport).
As you will see later, we will have to handle the events Resize and Paint of the panel viewport, so add a handler for them by double-clicking on the events in the designer.
After that, a little bit of coding will be necessary:
- Add
using statements, just for comfort:
using Microsoft.Xna.Framework;
using Microsoft.Xna.Framework.Graphics;
- Create a local variable of the type
GraphicsDeviceObject:
private GraphicsDevice mDevice;
- Override the
OnLoad method of the Form to put all the XNA initialization there (basically call two methods, for device creation and reset):
protected override void OnLoad(EventArgs e)
{
    base.OnLoad(e);
    CreateGraphicsDevice();
    ResetGraphicsDevice();
}
- In the
Resize event handler created, call ResetGraphicsDevice:
private void OnViewportResize(object sender, EventArgs e)
{
    ResetGraphicsDevice();
}
- Include the typical rendering code that you want in the
Paint event handler:
private void OnVieweportPaint(object sender, PaintEventArgs e)
{
mDevice.Clear(Microsoft.Xna.Framework.Graphics.Color.SteelBlue);
mDevice.Present();
}
- Now, we will create the methods called earlier, needed to handle device creation and reset. The following method creates a
GraphicsDevice object, with certain creation parameters:
private void CreateGraphicsDevice()
{
PresentationParameters pp = new PresentationParameters();
pp.BackBufferCount = 1;
pp.IsFullScreen = false;
pp.SwapEffect = SwapEffect.Discard;
pp.BackBufferWidth = panelViewport.Width;
pp.BackBufferHeight = panelViewport.Height;
pp.AutoDepthStencilFormat = DepthFormat.Depth24Stencil8;
pp.EnableAutoDepthStencil = true;
pp.PresentationInterval = PresentInterval.Default;
pp.BackBufferFormat = SurfaceFormat.Unknown;
pp.MultiSampleType = MultiSampleType.None;
mDevice = new GraphicsDevice(GraphicsAdapter.DefaultAdapter,
DeviceType.Hardware, this.panelViewport.Handle,
CreateOptions.HardwareVertexProcessing,
pp);
}
- The following one will be called each time the
panelViewport is resized, to re-create the GraphicsDevice with the new viewport size:
private void ResetGraphicsDevice()
{
if (mDevice == null || panelViewport.Width == 0 ||
panelViewport.Height == 0)
return;
mDevice.PresentationParameters.BackBufferWidth = panelViewport.Width;
mDevice.PresentationParameters.BackBufferHeight =
panelViewport.Height;
mDevice.Reset();
}
That's it, you have a Windows Form ready to render graphics with XNA.
Points of Interest
Note: This example is based on this ZiggyWare tutorial.
ZiggyWare should be a must for any XNA or general developer. They have great tutorials.
I've just realized there is another article on this same topic here. It's also a very good approach and handles both ways we discussed previously. Check it out!
History
- First version: November 16, 2007
