Introduction
Our objective is to provide an AJAX equivalent to WinForms MessageBox and JavaScript alerts, which is adapted to both the HTTP submit pattern and the display of messages of AJAX callbacks. The function is fulfilled by an information box ASP.NET server control which displays messages within the page. Our environment is ASP.NET 2.0 on Windows and IIS, and our information box uses ASP.NET AJAX Extensions 1.0, which you can download and install from here.
Background
This article refers to the open-source controls of “Memba Velodoc XP Edition”, which you can download from here (this page provides links to Codeplex, Google code, and Sourceforge.NET) and which are distributed under the GPL license. These controls include an information box which we use in this article. You can experiment these controls live at this link.
Using the code
In Visual Studio 2005, create a new ASP.NET AJAX-Enabled Web Site, and add a reference to Memba.WebControls.XP.dll which contains the InfoBox server control. Memba.WebControls.XP.dll is part of the Memba Velodoc XP Edition. The source code is available at the download location cited above.
Open the Default.aspx page, and add the InfoBox server control, either by dragging and dropping the control after adding it to the toolbox, or simply by adding the following code between the existing <form> tags:
<form id="form1" runat="server">
<asp:ScriptManager ID="ScriptManager" runat="server" />
<mbui:InfoBox ID="InfoBox" runat="server"
Text="Hello World"
Width="400px"
CssClass="cssInfoBox"
TextCssClass="cssInfoBoxText">
</mbui:InfoBox>
<br /><br />
<select id="cboType">
<option>Error</option>
<option selected="selected">Information</option>
<option>Ok</option>
<option>Warning</option>
</select>
<input id="txtMessage" type="text" value="Test message" />
<input id="btnAll" type="button" value="set all" />
<input id="btnTemp" type="button" value="set temp" />
<asp:Button ID="btnSubmit" runat="server" OnClick="btnSubmit_Click" Text="submit" />
</form>
You may have to register the control at the top of the page, using the following statement:
<%@ Register Assembly="Memba.WebControls.XP"
    Namespace="Memba.WebControls" TagPrefix="mbui" %>
Also, add an HTML drop-down list (cboType), an HTML text box (txtMessage), two HTML buttons (btnAll and btnTemp), and an ASP.NET submit button (btnSubmit).
The InfoBox control is a table with one row and two cells, where the first cell contains the image and the second cell embeds a span for the text. Note that the text property of the InfoBox control can use localized resources, and the control can be skinned using ASP.NET themes. Add the following styles just above the </head> closing tag of your page:
<style type="text/css">
<!--
table.cssInfoBox{
border:solid 1px SteelBlue;
background-color:LemonChiffon;
padding:5px;
}
span.cssInfoBoxText{
color:DarkRed;
}
</style>
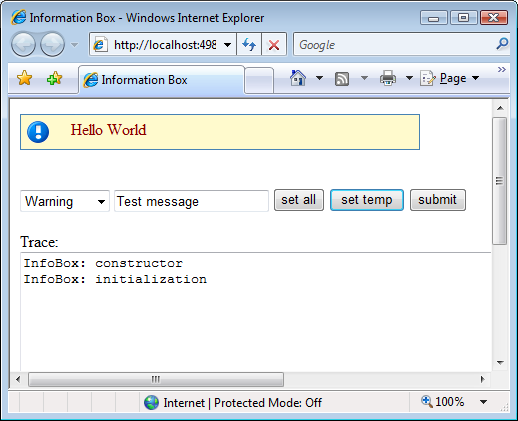
Your InfoBox control should now look like:

Obviously, you can set the icon and text using server-side code. Double click the ASP.NET Submit button, and implement the Click event handler as follows:
protected void btnSubmit_Click(object sender, EventArgs e)
{
    InfoBox.Type = Memba.WebControls.InfoBoxType.OK;
    InfoBox.Text = "Submission complete";
}
Click F5 to run the page, and click the Submit button. The response should display “Submission complete” with a green icon.
More interestingly, the icon and text can also be changed client-side using JavaScript code. Add the following script just before the </body> closing tag of your page:
<script type="text/javascript">
<!--
var g_InfoBox;
var g_cboType;
var g_txtMessage;
var g_btnAll;
var g_btnTemp;
function pageLoad()
{
g_InfoBox = $find("<%= InfoBox.ClientID %>");
g_cboType = $get("cboType");
g_txtMessage = $get("txtMessage");
g_btnAll = $get("btnAll");
g_btnTemp = $get("btnTemp");
if(g_btnAll)
$addHandler(g_btnAll, "click", onBtnAll);
if(g_btnTemp)
$addHandler(g_btnTemp, "click", onBtnTemp);
}
function pageUnload()
{
if(g_btnAll)
$clearHandlers(g_btnAll);
if(g_btnTemp)
$clearHandlers(g_btnTemp);
}
function onBtnAll()
{
if(g_InfoBox && g_cboType && g_txtMessage)
{
var _t = g_cboType.options[g_cboType.selectedIndex].text;
g_InfoBox.set_text(g_txtMessage.value);
g_InfoBox.set_type(getType(_t));
}
}
function onBtnTemp()
{
if(g_InfoBox && g_cboType && g_txtMessage)
{
var _t = g_cboType.options[g_cboType.selectedIndex].text;
g_InfoBox.setTemp(getType(_t), g_txtMessage.value, 500);
}
}
function getType(value)
{
switch(value)
{
case "Error":
return Memba.WebControls.InfoBoxType.Error;
case "Ok":
return Memba.WebControls.InfoBoxType.OK;
case "Warning":
return Memba.WebControls.InfoBoxType.Warning;
default:
return Memba.WebControls.InfoBoxType.Information;
}
}
</script>
ASP.NET AJAX extensions provide two important JavaScript event handlers:
pageLoad is called by the framework when the page DOM and scripts are loaded and initialized. This is a good place to get references to controls and add event handlers.pageUnload is called by the framework when the page unloads. It is recommended to clear handlers at this stage.
The script implements event handlers for the Click event of the two HTML buttons (btnAll and btnTemp). In both cases, the Click event handler assigns to the InfoBox the values of the icon selected in the drop-down list and the message text entered in the text box.
Press F5 to run the project, and click the various buttons to experiment with the InfoBox..
Points of interest
This information box is a very simple, yet useful, server control based on the ASP.NET AJAX Extensions. It demonstrates the creation and use of ASP.NET server controls. For more advanced developers, the source code of the information box is available at Codeplex, Google code, and Sourceforge.NET, and is commented in great details.
History
- Version 1.0 - dated 18 Dec 2007.
