Introduction
This article presents expand/collapse functionality for GridView rows using JavaScript. To demonstrate this functionality, I’ve used an Image on the GridView header. Rows of the GridView will expand and collapse on successive clicks on this Image.
Using the HTML code
Add a TemplateField inside the GridView and put an Image in the HeaderTemplate of the TemplateField. The HTML code for the GridView will look like this:
<asp:GridView ID="gvTab" BackColor="WhiteSmoke" runat="server"
     AutoGenerateColumns="False" GridLines="Vertical" ShowFooter="True">
   <Columns>
      <asp:TemplateField>
         <HeaderStyle Width="25px" />
         <ItemStyle Width="25px" BackColor="White" />
         <HeaderTemplate>
            <asp:Image ID="imgTab" onclick="javascript:Toggle(this);"
                 runat="server" ImageUrl="~/minus.gif" ToolTip="Collapse" />
         </HeaderTemplate>
      </asp:TemplateField>
      <asp:BoundField HeaderText="n" DataField="n">
         <HeaderStyle Width="25px" />
         <ItemStyle Width="25px" />
      </asp:BoundField>
      <asp:BoundField HeaderText="sqrt(n)" DataField="sqrtn">
         <HeaderStyle Width="150px" />
         <ItemStyle Width="150px" />
      </asp:BoundField>
      <asp:BoundField HeaderText="qbrt(n)" DataField="qbrtn">
         <HeaderStyle Width="150px" />
         <ItemStyle Width="150px" />
      </asp:BoundField>
   </Columns>
   <HeaderStyle Height="25px" Font-Bold="True" BackColor="DimGray"
                ForeColor="White" HorizontalAlign="Center"
                VerticalAlign="Middle" />
   <RowStyle Height="25px" BackColor="Gainsboro"
             HorizontalAlign="Center" VerticalAlign="Middle" />
   <AlternatingRowStyle Height="25px" BackColor="LightGray"
             HorizontalAlign="Center" VerticalAlign="Middle" />
   <FooterStyle BackColor="Gray" />
</asp:GridView>
Attach an onclick event to the GridView header’s Image.
<asp:Image ID="imgTab" onclick="javascript:Toggle(this);" runat="server"
           ImageUrl="~/minus.gif" ToolTip="Collapse" />
Using the JavaScript code
Put the following code in the script tag:
<script type="text/javascript">
 var Grid = null;
 var UpperBound = 0;
 var LowerBound = 1;
 var CollapseImage = 'minus.gif';
 var ExpandImage = 'plus.gif';
 var IsExpanded = true;
 var Rows = null;
 var n = 1;
 var TimeSpan = 25;

 window.onload = function()
 {
    Grid = document.getElementById('<%= this.gvTab.ClientID %>');
    UpperBound = parseInt('<%= this.gvTab.Rows.Count %>');
    Rows = Grid.getElementsByTagName('tr');
 }

 function Toggle(Image)
 {
    ToggleImage(Image);
    ToggleRows();
 }

 function ToggleImage(Image)
 {
    if(IsExpanded)
    {
       Image.src = ExpandImage;
       Image.title = 'Expand';
       Grid.rules = 'none';
       n = LowerBound;

       IsExpanded = false;
    }
    else
    {
       Image.src = CollapseImage;
       Image.title = 'Collapse';
       Grid.rules = 'cols';
       n = UpperBound;

       IsExpanded = true;
    }
 }

 function ToggleRows()
 {
    if (n < LowerBound || n > UpperBound)  return;

    Rows[n].style.display = Rows[n].style.display == '' ? 'none' : '';
    if(IsExpanded) n--; else n++;
    setTimeout("ToggleRows()",TimeSpan);
 }
</script>
In the above code, global variables have been initialized in the window.onload event. There are three methods: Toggle, ToggleImage, and ToggleImage. The Toggle method is invoked on successive clicks on the header Image. This method first toggles the header image and then toggles the rows of the GridView by invoking the ToggleImage and ToggleImage methods. Note that the ToggleRows method is invoked here recursively, using the setTimeout method. I’ve invoked it recursively here in order to create a dynamic effect during the expanding/collapsing of the GridView rows.
In order to make a delay in each recursion, each call to the ToggleRows method has been delayed for 25 milliseconds. You can change it by altering the TimeSpan value depending on your needs.
Conclusion
In this article, I've used the setTimeout method in order to achieve a smooth expand/collapse functionality.
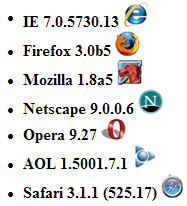
I have tested this script on the following browsers:

