Introduction
The purpose of this article is to demonstrate how to modify a ClickOnce Deployment Application Manifest to include CAB and other resource files normally not permitted through ClickOnce.
Background
Suppose you have a Visual Studio 2005 or 2008 project that contains a CAB file and you wish to include that CAB file as part of your ClickOnce Deployment package. By default, there is no way in Visual Studio 2005 to do this. Thankfully, there is an Open Source Utility called “Manifest Manager Utility” available which can be used to do this.
Details
Step 1 – Manifest Manager: Download the “Manifest Manager Utility” source code from the following URL:
Extract the zip file and open the solution file “ManifestManagerUtility.sln” in Visual Studio and compile the code to generate the “ManifestManagerUtility.exe” file. Alternatively, you can use the Windows Installer I have included in this tutorial to install a compiled version of this utility on your machine.
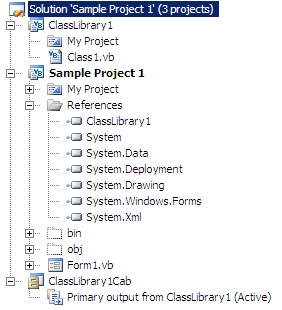
Step 2 – Sample Project: The sample project I have included in this tutorial consists of the following subprojects:

ClassLibrary1: is a sample Class Library DLL, which we wish to distribute with our ClickOnce Deployment. - Sample Project 1: is the main subproject of the solution, which is set as the startup project for our solution.
- Cab1: is a CAB Project, which takes the primary output from
ClassLibrary1 and adds the DLL to the output of the solution.
Step 3 - Right-click on the main subproject name (in this case “Sample Project 1”) in the Solution Explorer window in Visual Studio and Choose “Properties”.

Step 4 – Click on the “Publish” Tab and enter the “Publish Location” and “Install URL” of your application. This can either be a web location, a shared network location, or a location on your local machine.
Step 5 – Click on the “Publish Now” button to publish your application. Here is what you will have in your directory:

Step 6 – Run the Manifest Management Utility and click on the “Open” folder icon:

Step 7 – Select the .application file of your ClickOnce Installer and click on the “Open” button:

Step 8 – Click on the “Add Files” button in the toolbar.

Step 9 – Navigate to the project directory and select the CAB file you wish to include with your ClickOnce Deployment to add. You will be asked about the destination of the CAB file. Select the subfolder “Sample Project 1_1_0_0_0”, inside the same folder you opened the “.application” file from. Here is what your screen should look like:

Step 10 – Click the “Save” button to save your changes. You will be asked to provide the Key (Digital ID / Authenticode) for the application. By default, when you first publish your application, a Key is created for you and added to the source code folder of your project. Click the “Browse” button and navigate and select this Key file. Here is what your screen should look like:

Step 11 – If you have a password associated with your Key file, enter it in the password Textbox. Otherwise leave the password field empty and click on “Save and Sign” to complete your modification.
Step 12 – Navigate to your “Sample Project 1_1_0_0_0” folder, you should see an additional file called “ClassLibrary1Cab.CAB.deploy” added to your list of deployment files. This file is basically your original CAB file with a “.deploy” added to the end of it to allow ClickOnce to deploy it along with your other files to the user’s machine.
That’s it! All you have to do now is to upload the files to your web server, shared network folder or deployment location and run the ClickOnce installer to watch it do its magic.
Points of Interest
Feel free to post questions or comments regarding the above tutorial below in the comments section, and don’t forget to rate the article!
History
- 09/26/2008 - Initial article creation
