

Introduction
OdcTreeView is a templated ASP.NET AJAX Server Control with hierarchical data binding.
This article covers the following topics:
- Static nodes
- Populate on demand
IHierarchicalDataSource binding- Templates
NodeBinding event- AJAX server controls
- JavaScript namespaces, classes, properties, and custom events
- Custom style
Static Nodes
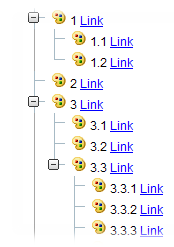
Like the ASP.NET TreeView, you can either use a data source to retrieve the nodes, or you simply specify them in the ASPX source like this:
<odc:OdcTreeView ID="OdcTreeView1"
    runat="server" EnableViewState="true">
<Nodes>
<odc:OdcTreeNode Text="1">
<odc:OdcTreeNode Text="1.1" ImageUrl="~/ColorHS.png" />
<odc:OdcTreeNode Text="1.2" />
</odc:OdcTreeNode>
<odc:OdcTreeNode Text="2" />
<odc:OdcTreeNode Text="3">
<odc:OdcTreeNode Text="3.1" />
<odc:OdcTreeNode Text="3.2" />
<odc:OdcTreeNode Text="3.3">
<odc:OdcTreeNode Text="3.3.1" />
<odc:OdcTreeNode Text="3.3.2" />
<odc:OdcTreeNode Text="3.3.3" />
<odc:OdcTreeNode Text="3.3.4" ImageUrl="~/ColorHS.png" />
<odc:OdcTreeNode Text="3.3.5" ShowCheckBox="true" />
<odc:OdcTreeNode Text="3.3.6"
  ShowCheckBox="true" IsChecked="true" />
</odc:OdcTreeNode>
</odc:OdcTreeNode>
<odc:OdcTreeNode Text="4">
<odc:OdcTreeNode Text="4.1" />
<odc:OdcTreeNode Text="4.2"
  PopulateOnDemand="true" IsExpanded="true" />
<odc:OdcTreeNode Text="4.3" />
<odc:OdcTreeNode Text="4.4" />
<odc:OdcTreeNode Text="4.5" />
</odc:OdcTreeNode>
</Nodes>
</odc:OdcTreeView>
Populate on Demand
In conjunction with static nodes, you can also enable population on demand, which means that you don’t need to declare all possible nodes at once, and add child nodes to a parent node only when the parent expands for the very first time. Therefore, you simply set the PopulateOnDemand property of an OdcTreeNode to true, which causes the OdcTreeView to raise a NodePopulate event. This event can be implemented like so:
protected void OdcTreeView1_NodePopulate(object sender, OdcTreeNodeEventArgs e)
{
    OdcTreeNode node = e.Node;
    node.PopulateOnDemand = false;
    for (int i = 1; i < 6; i++)
    {
        OdcTreeNode sub = new OdcTreeNode();
        sub.Text = node.Text + "." + i.ToString();
        sub.IsExpanded = false;
        sub.PopulateOnDemand = i==3;
        node.ChildNodes.Add(sub);
    }
}
Note that this method also sets the PopulateOnDemand to false, so it will not cause another NodePopulate when the node gets collapsed and later expanded, since it stores it state in the View State together with the populated tree nodes.
Data Binding
Of course, OdcTreeNode also supports data binding with any IHierarchicalDataSource. You can fighter declare a DataSourceID with the name of a DataSource that implements IHierarchicalDataSource, or set the DataSource property to any IHierarchicalDataSource at runtime. Additionally, you need to declare at least one OdcTreeNodeBinding class unless you don’t use a customized node template to bind the embedded controls directly. This class specifies how to bind the properties of a data item with the properties of a OdcTreeNodeItem, or it declares what default values a OdcTeeNodeItem should be assigned to. If you don’t set the OdcTreeNodeBinding.Level to a value, then this binding is used as the template for all nodes. If you specify a level, however, this OdcTreeNodeBinding only affects the nodes that are in this hierarchical level.
This example demonstrates declarative data binding with an XML file:
<odc:OdcTreeView ID="OdcTreeView1"
  runat="server" DataSourceID="XmlDataSource1">
<TreeNodeBindings>
<odc:OdcTreeNodeBinding Level="0" TextField="Title"/>
<odc:OdcTreeNodeBinding Level="1" TextField="Title" />
<odc:OdcTreeNodeBinding Level="2" TextField="Title"
  ShowCheckBox="true" IsChecked="true" />
<odc:OdcTreeNodeBinding Level="3" TextField="Value"
  ShowCheckBox="true" IsChecked="false" />
</TreeNodeBindings>
</odc:OdcTreeView>
<asp:XmlDataSource ID="XmlDataSource1" runat="server"
  DataFile="~/Xml.xml"></asp:XmlDataSource>
Templates
OdcTreeView knows three different templates:
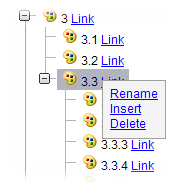
NodeTemplate - a data template for each node.EditNodeTemplate - a data template for the node that is in edit mode, which can be only one.ContextMenuTemplate - a template for a context menu that appears when you right click the mouse on a node (unless you are not working with Opera). If you don’t specify a NodeTemplate or EditNodeTemplate, OdcTreeView generates a default template.
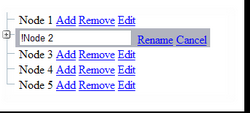
The following example demonstrates how to use templates:
<odc:OdcTreeView ID="treeView" runat="server" AutoPostBack="False" >
<ContextMenuTemplate>
<asp:LinkButton ID="btnOkay" runat="server" CommandName="ok" Text="Okay" /><br />
<asp:LinkButton ID="btnCancel" runat="server" CommandName="cancel" Text="Cancel" />
</ContextMenuTemplate>
<EditNodeTemplate>
<asp:TextBox runat="server" ID="tbText" Text='<%# Bind("Text") %>' />
<asp:LinkButton ID="btnRename" runat="server" CommandName="rename" Text="Rename" />
<asp:LinkButton ID="btnCancel" runat="server" CommandName="cancel" Text="Cancel" />
</EditNodeTemplate>
<NodeTemplate>
<%# Container.Node.Text %><asp:LinkButton
  Style="padding-left: 4px" ID="btnAdd" runat="server"
CommandName="add" Text="Add" />
<asp:LinkButton ID="btnRemove" runat="server" CommandName="remove" Text="Remove" />
<asp:LinkButton ID="btnEdit" runat="server" CommandName="edit" Text="Edit" />
</NodeTemplate>
</odc:OdcTreeView>
As you can see, there are two ways used to bind the OdcTreeNode.Text property:
<%# Bind("Text") %>Using Bind() enables you to access the properties of the data bound item, rather than the OdcTreeNode itself, so this means that the node must be bound to an object that has a Text property. If not data bound, Bind() retrieves the properties from the node itself.
<%# Container.Node.Text %>This is the usage to access the properties of the tree node directly. Since Container is of type OdcTreeNodeContainer that exposes Node, DataItem would be the data bound object.
OdcTreeNodeBinding also offers a NodeTemplate to specify. This enables you to modify the look of nodes of different levels. The following example demonstrates how to apply a button to the root node:
<odc:OdcTreeView ID="OdcTreeView1" runat="server" DataSourceID="XmlDataSource1">
<TreeNodeBindings>
<odc:OdcTreeNodeBinding Level="0" TextField="Title">
<NodeTemplate>
<asp:Button runat="server" Text="this is the root" UseSubmitBehavior="False" />
</NodeTemplate>
</odc:OdcTreeNodeBinding>
<odc:OdcTreeNodeBinding Level="1" TextField="Title" />
<odc:OdcTreeNodeBinding Level="2" TextField="Title"
   ShowCheckBox="true" IsChecked="true" />
<odc:OdcTreeNodeBinding Level="3" TextField="Value"
   ShowCheckBox="true" IsChecked="false" />
</TreeNodeBindings>
</odc:OdcTreeView>
NodeBinding Event
It is even possible to attach any OdcTreeNodeBinding of the NodeBindings collection to a node determined in an event named NodeBinding. This works both for data binding and static nodes, or population on demand. Thus, you can vary the template of a node by using any terms you want.
The following example illustrates how to use NodeBinding:
ASPX part:
<odc:OdcTreeView ID="OdcTreeView1" runat="server" EnableViewState="true" Font-Size="9"
Font-Names="Arial" EnableDragDrop="true" AutoPostBack="false" DisableTextSelection="true"
EnableClientExpand="true" AllowNodeEditing="false" ExpandDepth="7"
onnodebinding="OdcTreeView1_NodeBinding"
onnodepopulate="OdcTreeView1_NodePopulate">
<TreeNodeBindings>
<odc:OdcTreeNodeBinding Name="Root" ShowCheckBox="true">
<NodeTemplate>
<asp:Label ID="Label2" isText="true" runat="server"
   Text="<%# Container.Node.Text %>" />
</NodeTemplate>
</odc:OdcTreeNodeBinding>
</TreeNodeBindings>
Code part:
protected void OdcTreeView1_NodeBinding(object sender,
Odyssey.Web.TreeView.OdcTreeNodeBindingEventArgs e)
{
OdcTreeNode node = e.Node;
if (node.HasChildNodes) e.Binding = e.Bindings.GetNamedBinding("Root");
}
AJAX Server Control
OdcTreeView is an AJAX Server Control, which means that it requires a ScriptManager on the page. With AJAX, the tree view can perform many operations directly in the browser without requiring any postback. So, it is possible to select a node, and expand and collapse nodes completely inside the browser. It is even possible to edit the text of a node in the browser if you set AllowNodeEditing to true. The OdcTreeView adds a hidden field to the page, and registers it to the client part of the control. The client uses JavaScript to update the changes to the hidden field, and on a postback, the server side reads the value of the hidden field and updates the values to reflect the changes that were made at the client side. However, if you want to have a postback when a node is selected, edited, expanded, or collapsed, then you must set the AutoPostBack to false. Note that a postback always occurs when a node gets expanded that has PopulateOnDemand set to true.
JavaScript Namespaces, Classes, Properties, and Custom Events
The client part of the OdcTreeView contains of a JavaScript class named TreeViewControl, a TreeNode class, and a TreeContextMenuEventArgs class. All classes belong to the Odyssey.Web namespace. I don’t want to go in to the details of how to make JavaScript look like C# having namespaces, classes, interfaces, properties, and events, since there are a lot of good books that capture that functionality. The TreeViewControl is the client part of the AJAX control. It catches HTML events, and performs the required postbacks depending on what event has been raised. You can also specify the client events for the OdcTreeView that execute not at the server side, but at the client side by calling a JavaScript function. The following events are currently available:
ClientContextMenuOpening(treeView, e);This event occurs before the context menu opens, and allows you to modify the look or behavior of the context menu, and exposes two parameters:
treeView of type Odyssey.Web.TreeViewControl.e of type Odyssey.Web.TreeContextMenuEventArgs. e contains the node for which the context menu should be opened and the HTML element that covers the context menu itself. Since e is derived from CancelEventArgs, you can also cancel to open the context menu.
ClientNodeSelectionChanged(node, e);Occurs when a node is selected.
ClientNodeExpanded(node,e);Occurs when a node is expanded.
ClientNodeCollapsed(node, e);Occurs when a node is collapsed.
ClientNodeCheckedChanged(node, e);Occurs when a node has changed its get_checked() state.
ClienEditModeChanged(node, e);Occurs when a node has changed its isEditable() state.
The following snippet illustrates how to use the client events and how to retrieve properties from the AJAX classes:
<odc:OdcTreeView ID="OdcTreeView1" runat="server" EnableViewState="true"
ClientNodeTextChanged="nodeTextChanged"
ClientNodeExpanded = "expanded"
ClientContextMenuOpening="myContextMenu"
ClientNodeCollapsed="collapsed"
ClientNodeSelectionChanged="nodeSelected"
…
</form>
<script type="text/javascript">
function expanded(node, e) {
if (node.getText()>="4")
alert("Expanded: "+node.getText());
}
function collapsed(node, e) {
if (node.getText() >= "4")
alert("Collapsed: " + node.getText());
}
function nodeTextChanged(node, e) {
var txt = node.getText();
var e = document.getElementsByName("custom");
e[0].innerHTML = "changed: "+txt;
}
function nodeSelected(node, e) {
var value = node.get_selected();
if (value) {
var txt = node.getText();
var e = document.getElementsByName("custom");
e[0].innerHTML = "selected: " + txt;
}
}
function myContextMenu(tree, e) {
var cm = e.menuElement;
var node = e.node;
var text = node.getText();
if (node.isFirst()) {
e.set_cancel(true);
alert("no menu for the first item!");
}
if (text == "3.3.1")
cm.style.backgroundColor =
"Red"; else cm.style.backgroundColor = "";
}
</script>
</body>
</html>
Custom Style
Unlike the ASP.NET TreeView which uses inline styles to render a table to look like a tree, OdcTreeView uses the <ul> and <li> tags that natively represent a tree view and completely relies on style sheets to manipulate the look. By default, OdcTreeView uses "odcTreeView" as the base style class which is included as an embedded resource, and contains all the necessary styles for rendering, including background images to be attached, like expand and collapse buttons. If you want to customize the style, you simply need to copy the TreeView.css from the source code, rename all .odcTreeView occurrences with your own class name, add a reference to your style sheet to the page, and set the ClassName property of the OdcTreeView to that name. For the sake of smaller HTML code, OdcTreeView uses very short names for class names of sub elements, like class="ul". You might think that this could lead to collisions with other controls that might decide to use the same short name, but since the style sheet always uses the base class in conjunction with the sub class, this risk is eliminated:
.odcTreeView
{
    clear:both;
    vertical-align:top;
    padding:2px;
}


.odcTreeView .ul
{
    list-style-type: none;
    list-style-image: none;
    list-style-position: outside;
    padding: 0px 0px 0px 20px;
    margin:0px;
}

.odcTreeView .Ln
{
    background-image: url('<%=WebResource("Odyssey.Web.TreeView.images.line.gif")%>');
    background-repeat:repeat-y;
    background-position: 0px 0px;
}
…
The HTML code would look like this:
<div class="odcTreeView" id="OdcTreeView1" EnableClientExpand="true">
<ul class="ul">
<li class="Mid" key="1"><div class="div">
<span class="Collapse" event="collapse"></span>
<span event="click" class="span" id="OdcTreeView1_K1">
<img src="ColorHS.png" style="border-width:0px;" />
<span isText="true">1</span>
…
Points of Interest
The source code contains how to create an AJAX server control, how to add client properties and client events to the control, how to read from an IHierarchicalDataSource, how to implement a DataTemplate, and many more.
History
This is the initial release.
