Introduction
One of the things you will notice in ASP.NET today is that, by default, out of the box, there is no standard control representing a rich text editor. You will also notice that your only viable options are quite limited to:
- FREETEXTBOX --while the name suggests it's free, what is free is only a subset of features, while the full version is on a pay basis.
- FCKEditor --This is the most highly used editor in the market today due to it being Open Source; however, mainly it's just a client-side product with several contributors having written server-side wrappers around the client-side library. The problem with this though is that the web control is simply a wrapper.
- You purchase a commercial license from third parties (quite pricey).
Jiffycms HTML Editor is a rich text Open Source HTML editor with commercial grade features, and is a great alternative to all three points above. It's written for ASP.NET, and uses ASP.NET AJAX Extensions to the full potential. It is also a rich server-side Web control requiring you to make very little effort to get it running as it uses the VS.NET designer at full potential too. There are just too many features, and to list each here is not going to be possible; instead, this article will focus on first time usage, and specifically how to move the CSS generated by the WebControl to an external CSS file.
Unlike most HTML editors, Jiffycms HTML Editor is a true Web Control without any extra dependencies, and is packaged as a single DLL. Since it is built on top of the AJAX Extensions library, which many people are already referencing in their pages due to their using the UpdatePanel or what not, the payload in the client library download size is minimized: something which you will incur on other third party editors out there today since they tend to use their own custom libraries.
Here in this post, I want to showcase how easy it is to use the Jiffycms HTML Editor in your pages and how to perform some optimizations to get the best performance from your web apps by using an external CSS stylesheet file.
Usage
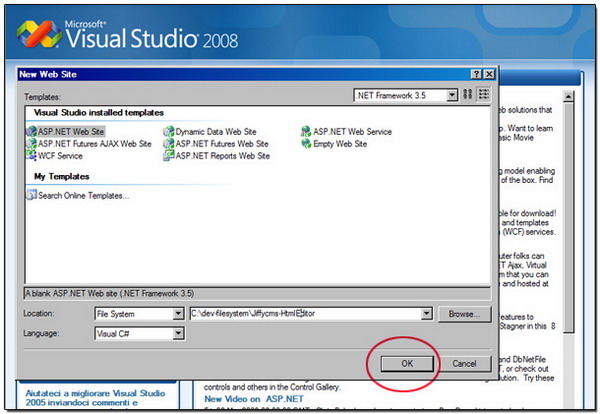
First, let's try to start from the basics and define a new WebSite Project for the purposes of this tutorial:

Let's now download the Jiffycms HTML Editor DLL from CodePlex. Now that we have the DLL, which is Jiffycms.Net.Toolkit.dll, we are ready to add it to our Toolbox in VS.NET. Before you add it to your Toolbox, to help you in better organizing all your custom controls, you may want to create a new tab in the toolbox first and then add the control in there.

Now, right click into your newly created tab empty area, and select "Choose Items" from the context menu. You can also simply drag and drop the DLL into the empty area.


When you are done browsing to the DLL you downloaded from CodePlex, you should see it in your toolbox at this point, and you are ready to start using this fine component.

While you may not like working in Design view in VS.NET, dragging and dropping the control from the Toolbox onto your web form is going to allow the editor to make the initial configs in your web.config file automatically. The registrations it makes can be made manually, it's just a registration for a simple HttpHandler in web.config.
If you prefer to do this manually, then make the following entry under the path Configuration/httpHandlers section; for IIS 6, this is as follows:
<add verb="*" path="jiffycms.axd"
     type="Jiffycms.Net.Toolkit.WebResourceHandler" />
For IIS 7, you need to make an entry under the Configuration/system.webServer/Handlers section, as follows:
<add verb="*" path="jiffycms.axd" name="WebResourceHandler"
  type="Jiffycms.Net.Toolkit.WebResourceHandler"
  preCondition="integratedMode" />
Note: If you are dragging and dropping the component from the Toolbox, this is already done for you.
After dragging and dropping the control at Design time, this is what the HTML editor looks like in Design view:

Oh great, we got design-time rendering of the editor. Now, it's a matter of playing with the various properties in the property grid. Upon running the page, you will notice lots of CSS output in the head section of your rendered page. While this is the default, you can chose to put the CSS in an external CSS file. Doing this will not only decrease the page payload, but since the CSS is in an external CSS file, it will get cached by the browser, so that subsequent requests will be served from the cache automatically.
Fortunately, this kind of change is not hard to do. You can use a design-time feature to collect all the runtime CSS generated by the control and manually copy it into an external CSS file.

Just copy the CSS and paste it into an external style sheet, then reference the CSS file via the ExternalStyleSheet property:

Note that every time you make a modification to the editor such as modify the styles in the designer or modify style dependent properties such as IconsMode, ToolbarMode etc., you will need to regenerate the CSS and update your CSS file manually. Fortunately, if you have decided to go this route, you might also be editing the CSS yourself so this may not be an inconvenience after all.
History
Update: 22 - March - 2009
A new article is now available dealing with the Image Gallery in Jiffycms HTML Editor.
