Introduction
As we all know, the DataGridView control doesn't allow us to merge cells, and if we think a little on that, we can ask ourselves the question, "Why?” Well, the DataGridView is bound to a data source (even if you don't define that), and each cell represents a field in a record, so what field will that merged cell belong to? Maybe, it was because of this that Microsoft didn't include this feature. But, sometimes, we may want to show some extra information, and the only solution is to popup a form/message box, or “steal” some space in the current form and fill it with textboxes, combo’s, etc.
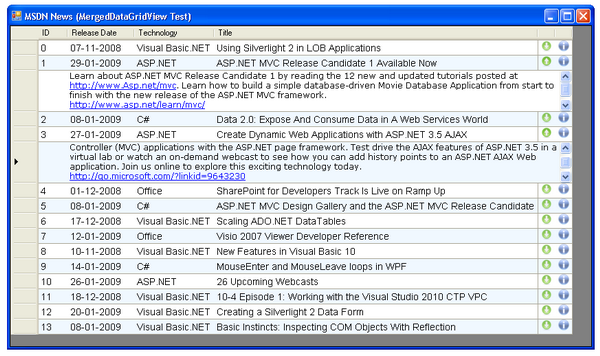
The goal of this customization is to show some extra information in a DataGridView. It basically uses a RichTextBox that is inserted in the grid and sized according to the parent row. The parent row must have a unique ID that will be the textbox name. This will then be used to size and position the RichTextBox in the right place.
I have also included some icon animation and grid customization to improve the end look.
Using the code
To start, you must include the class MergedDataGridView in your application. After you build the project, the MergedDataGridView control will be available in the toolbox. Then, just drag it to your form.
Next, you need to define the custom properties for the MergedDataGridView:
With Me.MergedDataGridView1
.DataSource = ds.Tables(0).DefaultView
.StartColumnIndex = 1
.EndColumnIndex = 7
.RowHeight = 60
.AllowUserToAddRows = False
.AllowUserToDeleteRows = False
.RowsDefaultCellStyle.BackColor = Color.White
.AlternatingRowsDefaultCellStyle.BackColor = Color.AliceBlue
.AutoResizeColumns(DataGridViewAutoSizeColumnsMode.DisplayedCells)
End With
After this, you can include the two DataGridViewImageColumns that will be used to show the RichTextBox and to display a MessageBox containing the information.
Dim ImageColumn1 As New DataGridViewImageColumn
ImageColumn1.DefaultCellStyle.Alignment = DataGridViewContentAlignment.TopCenter
ImageColumn1.Image = My.Resources.DownArrow
ImageColumn1.Width = 25
Dim ImageColumn2 As New DataGridViewImageColumn
ImageColumn2.DefaultCellStyle.Alignment = DataGridViewContentAlignment.TopCenter
ImageColumn2.Image = My.Resources.Info
ImageColumn2.Width = 25
Me.MergedDataGridView1.Columns.AddRange(New _
DataGridViewImageColumn() {ImageColumn1, ImageColumn2})
Finally, in the CellMouseClick event, check to see if the user clicked on the right column; if so, add the new row:
Dim rowPos As Integer = e.RowIndex + 1
Dim dv As DataView = Me.MergedDataGridView1.DataSource
Dim row As DataRow = dv.Table.NewRow()
dv.Table.Rows.InsertAt(row, rowPos)
Dim mergedRowText As New System.Text.StringBuilder
mergedRowText.AppendLine(Me.MergedDataGridView1("Description", e.RowIndex).Value.ToString)
mergedRowText.AppendLine(Me.MergedDataGridView1("Link", e.RowIndex).Value.ToString)
Me.MergedDataGridView1.AddMergedRow(rowPos, mergedRowText.ToString)
Or delete it:
Dim rowPos As Integer = e.RowIndex + 1
Dim dv As DataView = Me.MergedDataGridView1.DataSource
dv.Table.Rows.RemoveAt(rowPos)
Me.MergedDataGridView1.RemoveMergedRow(Me.MergedDataGridView1(0, _
e.RowIndex).Value)
The other code used in the form, as you can see in the attached example, is for validation, error handling, and generic animation.
Looking at the control

The control has only two methods: AddMergedRow and RemoveMergedRow, and three properties. The properties just get the indication of the column where the RichTextBox will start, end, and what height it will have.
The AddMergedRow looks for the number (the ID) of the previous row, that will be the parent one, and creates a new RichTextBox in the new row, with that ID as the name.
Public Sub AddMergedRow(ByVal rowIndex As Integer, ByVal cellText As String)
Try
Me.SuspendLayout()
Dim x As Integer = _
Me.GetColumnDisplayRectangle(Me.StartColumnIndex, False).Left + 1
Dim y As Integer = Me.GetRowDisplayRectangle(rowIndex, False).Top
Dim w As Integer = _
Me.GetColumnDisplayRectangle(Me.EndColumnIndex, False).Right - x - 2
Dim h As Integer = Me.GetRowDisplayRectangle(rowIndex, False).Size.Height - 1
Dim parentRowID As Integer = Me(0, rowIndex - 1).Value
Dim rtb As New RichTextBox
With rtb
.Name = parentRowID
.Text = cellText
.Multiline = True
.BorderStyle = BorderStyle.None
.ScrollBars = ScrollBars.Vertical
.ReadOnly = True
.Font = New Font(Me.DefaultCellStyle.Font, Me.DefaultCellStyle.Font.Style)
.SetBounds(x, y, w, h)
End With
Me.Controls.Add(rtb)
rtb.BackColor = Me(0, rowIndex).InheritedStyle.BackColor
Me.Rows(rowIndex).Height = Me.RowHeight
Dim arrow As DataGridViewImageCell = Me(Me.ColumnCount - 2, rowIndex - 1)
arrow.Value = My.Resources.UpArrow
Catch ex As Exception
Throw New ArgumentException(ex.Message)
Finally
Me.ResumeLayout()
End Try
End Sub
The second method, RemoveMergedRow, looks for the parent row and removes it from the grid.
Public Sub RemoveMergedRow(ByVal rowID As Integer)
Try
Dim ctrl() As Control = Me.Controls.Find(rowID.ToString, False)
If ctrl.Length = 1 Then
Me.Controls.Remove(ctrl(0))
End If
Dim arrow As DataGridViewImageCell = Me(Me.ColumnCount - 2, Me.CurrentRow.Index)
arrow.Value = My.Resources.DownArrow
Catch ex As Exception
Throw New ArgumentException(ex.Message)
Finally
Me.ResumeLayout()
End Try
End Sub
The Paint event arranges the position of the RichTextBoxes, and adjusts the size.
Since it’s not easy to calculate the positions and keep the empty rows below the parent rows after you sort it, I have turned sorting off in the ColumnAdded event.
Points of interest
This control not only shows some extra information on a DataGridView control, but also demonstrates how to customize the grid and handle row positioning, which may be useful for other projects.
I really hope that this can help improve your projects, or help you get some new ideas.
