

Introduction
With Windows Vista, my enthusiasm immediately turned to building and publishing Sidebar Gadgets. Those neat little frameless applications positioned all over my display sure added color to the dreary old conventional Windows Desktop.
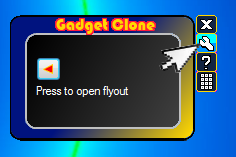
Soon I was fed up with coding HTML, CSS and JavaScript. After all, haven’t I moved on to better things like C# and .NET? Sure I know and yes I’ve also done it. Of course, I’m talking about Interop ActiveX programming and registering my programs “on the fly” with JavaScript. But still, I wasn’t satisfied with the limitations and tiresome debugging capabilities, so here I am back using Windows Forms. Only this time, I decided to use some of the Gadget’s features in my Windows Forms. These are all tied up in an easy to use Windows Forms User Control. They include:
- A PopOut Side Menu with buttons for “Close”, “Settings”, “About”, and “Move”
- Thumbnail Image when showing the “Settings” and “About” forms
- Automatic positioning of the main window
- Automatic positioning of "Flyouts" and other dialogs
Implementation of the Library
First of all, in a graphics program, such as Paint.Net, create your Gadget’s background image.
Extend the right side of the image by 24 pixels for adding the clone user control. This area should be filled with a background color TransparencyKey. In this case, I choose RGB 255; 0; 220.

Create a new VS Windows Forms project.
Make the project’s form windowless by setting the FormBorderStyle to “None”.

Resize the form to the height and width of the background image.

Import the background image into your project and set the form’s background to the background
image.

Set the Form’s TransparencyKey color.

Download and save the gadgetControll Library.
In Visual Studio's Solution Explorer, add a reference to the gadgetControl Library.

In the form’s class, create an instance of the “gadgetClone” control.
public partial class Form1 : Form
{
private gadgetControlsLibrary.gadgetClone gclone
= new gadgetControlsLibrary.gadgetClone();
In the form’s constructor, add the “gadgetClone“ control.
Set the properties to determine which optional buttons are to be shown on the PopOut Side Menu. The "AltSizeButton" should be set to false. "Close" and "Move" are always shown.
Create EventHandlers for all of the buttons shown in the PopOut Side Menu. Create an EventHandler for "moveLeftMouseUp" if you wish to do something after moving the form. For instance, saving the form’s coordinates for positioning by the next application start.
Initialize the PopOut Menu.
public Form1()
{
InitializeComponent();
this.Controls.Add(gclone);
gclone.showAboutButton = true;
gclone.showAltSizeButton = false;
gclone.showSettingsButton = true;
gclone.initializePopOutMenu();
gclone.closeClicked += new EventHandler(gclone_closeClicked);
gclone.settingsClicked += new EventHandler(gclone_settingsClicked);
gclone.aboutClicked += new EventHandler(gclone_aboutClicked);
gclone.moveLeftMouseUp += new MouseEventHandler(gclone_moveLeftMouseUp);
}
You can position the form when the application starts by calling the "setLocation" method in the form’s "Load" event.
private void Form1_Load(object sender, EventArgs e)
{
gclone.setLocation(Properties.Settings.Default.locationX,
Properties.Settings.Default.locationY);
}
PopOut Side Menu
Displaying and hiding the Popout Side Menu is done by handling "MouseEnter" and "MouseLeave" events on the main form.
private void Form1_MouseEnter(object sender, EventArgs e)
        {
            gclone.showMenu();
        }

private void Form1_MouseLeave(object sender, EventArgs e)
        {
            if (!this.DesktopBounds.Contains(Cursor.Position))
                gclone.hideMenu();
        }
The Settings and About Dialogs
The "Settings" and "About" Dialogs are both handled in the same way. First create your form. Then, in the clicked Event Handler declared in your form's constructor, create an instance of your new dialog. Set the dialog’s "StartPosition" to "Manual". Call the gadgetClone’s method "minimizeForm" to create a thumbnail of the main window. Use the method "settingsLocation" to position the dialog. Finally, show the dialog.
After the dialog is ended, call the "maximizeForm" to restore the original window.
private void gclone_settingsClicked(object sender, EventArgs e)
{
FormSettings dialog = new FormSettings();
dialog.StartPosition = FormStartPosition.Manual;
gclone.minimizeForm(dialog.Width, dialog.Height, false);
dialog.Location = gclone.settingsLocation(dialog.Width);
if (dialog.ShowDialog() == DialogResult.OK)
{
}
gclone.maximizeForm(false);
}
Flyouts
Flyouts are shown in a similar manner. However, the "minimizeForm" and "maximizeForm" methods are excluded.
private void buttonFlyout_Click(object sender, EventArgs e)
        {
            FormFlyout dialog = new FormFlyout();
            dialog.StartPosition = FormStartPosition.Manual;
            dialog.Location = gclone.flyoutLocation(dialog.Width);
            dialog.ShowDialog();
        }
That's it!
Points of Interest
This is just the start. I invite everyone to feel free in taking this all one or more steps further such as “Alternate Sizes” and “Background Shadows” or maybe implementing an adaption for WPF.
History
- 4th April, 2010: Initial post
