
Introduction
This article covers the basics of writing a simple application using Extended MAPI. The main purpose of this article is to show developers how they can enhance their applications with Extended MAPI. To have this application working, you need to download and install a free component, the MAPI Store Accessor for .NET.
The MAPI Store Accessor
The MAPI Store Accessor is a .NET component which allows you to subscribe to such events as OnNewMail, OnObjectChanged, OnObjectCopied, etc. It also lets you access MAPI stores, folders, items, and attachments. You will see that the use of the MAPI Store Accessor effectively hides the complexities of MAPI.
Currently, the MAPI Store Accessor for .NET supports:
- Visual Studio 2005 ( Standard and Professional )
- Visual Studio 2008 ( Standard and Professional )
The fundamental classes in the AddinExpress.MAPI library are:
Store - represents a store in a profileFolder - represents a folder in a storeMapiItem - represents an item in a folderHiddenItem - represents a hidden item in a folderAttachment - represents an attachment
There are also corresponding collections such as Stores, Folders etc. To start using these classes, you should get the collection of stores from the component when it is connected to the MAPI subsystem.
First steps
To start working with the MAPI Store Accessor, find it in the Toolbox window and drop it onto the Windows Form, or declare the component in your code manually.
There are two important things you should do:
- Call
Initialize - Call
LogOff
They are like start and stop commands. When calling Initialize with the boolean parameter, the component connects to the default profile. Your application creates or connects to the existing MAPI session depending on the value which you pass to the method. If you want to create a new session, pass True. If you need to connect to the existing session, pass False. When you pass False, make sure that the session exists. Another overload of the Initialize method accepts a profile name and password.
Coding
Add Initialize and LogOff where appropriate. I do it in the Load and FormClosing event handlers of the form, respectively.
VB.NET
Private Sub Form1_Load(ByVal sender As System.Object, ByVal e As System.EventArgs) _
Handles MyBase.Load
AdxmapiStoreAccessor1.Initialize(True)
Dim folders As Folders = _
AdxmapiStoreAccessor1.MsgStores(0).RootFolder.Folders(1).Folders
Dim folder As Folder
For Each folder In folders
Dim folderName As Object = folder.GetProperty(ADXMAPIPropertyTag._PR_DISPLAY_NAME)
If folderName IsNot Nothing Then
ipmTreeView.Nodes.Add(folderName.ToString())
End If
Next
End Sub
Private Sub Form1_FormClosing(ByVal sender As System.Object, _
ByVal e As System.Windows.Forms.FormClosingEventArgs) _
Handles MyBase.FormClosing
AdxmapiStoreAccessor1.LogOff()
End Sub
C#
private void Form1_Load(object sender, EventArgs e)
{
adxmapiStoreAccessor1.Initialize(true);
foreach (Folder folder in
adxmapiStoreAccessor1.MsgStores[0].RootFolder.Folders[1].Folders)
{
object folderName = folder.GetProperty(ADXMAPIPropertyTag._PR_DISPLAY_NAME);
if (folderName != null)
{
ipmTreeView.Nodes.Add(folderName.ToString());
}
}
}
private void Form1_FormClosing(object sender, FormClosingEventArgs e)
{
adxmapiStoreAccessor1.LogOff();
}
Now, we are ready to add business logic to our application. We need a TreeView and a ListBox. Drop them onto the form. Add the appropriate settings of your choice. Finally, add the following event handlers:
- The
AfterSelect event handler for the TreeView control: VB.NET
Private Sub ipmTreeView_AfterSelect(ByVal sender As System.Object, _
ByVal e As System.Windows.Forms.TreeViewEventArgs) _
Handles ipmTreeView.AfterSelect
listBoxItems.Items.Clear()
current = _
AdxmapiStoreAccessor1.MsgStores(0).RootFolder.Folders(1).Folders(e.Node.Index)
Dim item As MapiItem
For Each item In current.MapiItems
Dim subject As Object = item.GetProperty(ADXMAPIPropertyTag._PR_SUBJECT)
If subject IsNot Nothing Then
listBoxItems.Items.Add(subject.ToString())
End If
Next
End Sub
C#
private void ipmTreeView_AfterSelect(object sender, TreeViewEventArgs e)
{
listBoxItems.Items.Clear();
current = ((Folders)adxmapiStoreAccessor1.MsgStores[0].
RootFolder.Folders[1].Folders).Add(e.Node.Text);
foreach (MapiItem item in current.MapiItems)
{
object subject = item.GetProperty(ADXMAPIPropertyTag._PR_SUBJECT);
if (subject != null)
{
listBoxItems.Items.Add(subject.ToString());
}
}
}
The DoubleClick event handler for the ListBox control:VB.NET
Private Sub listBoxItems_DoubleClick(ByVal sender As System.Object, _
          ByVal e As System.EventArgs) Handles listBoxItems.DoubleClick
     If listBoxItems.SelectedIndex >= 0 Then
         Dim item As MapiItem = current.MapiItems(listBoxItems.SelectedIndex)
         Dim body As Object = item.GetProperty(ADXMAPIPropertyTag._PR_BODY)
         If body IsNot Nothing Then
            MsgBox(body.ToString(), "The body of the mail item", _
               MessageBoxButtons.OK, MessageBoxIcon.Information)
         End If
     End If
End Sub
C#
private void listBoxItems_DoubleClick(object sender, EventArgs e)
{
    if (listBoxItems.SelectedIndex >= 0)
    {
        MapiItem item = current.MapiItems[listBoxItems.SelectedIndex];
        object body = item.GetProperty(ADXMAPIPropertyTag._PR_BODY);
        if (body != null)
        {
            System.Windows.Forms.MessageBox.Show(body.ToString(),
              "The body of the mail item", MessageBoxButtons.OK,
              MessageBoxIcon.Information);
        }
    }
}
Conclusion
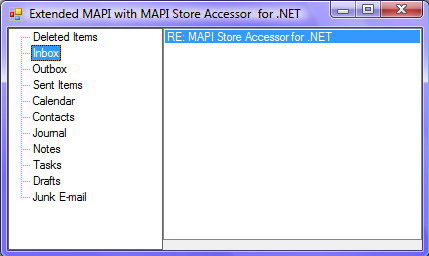
That's it. Our application is ready to go. The TreeView control on the left shows the folder tree of the first message store of the profile we are logged in to. You can see the same tree in your default mail agent (it may be, for example, Microsoft Outlook). The ListBox control on the right shows all the items contained in the selected folder in the TreeView control. By clicking on an item in the right panel, you get the body (PR_BODY) of the MAPI item.
