Introduction
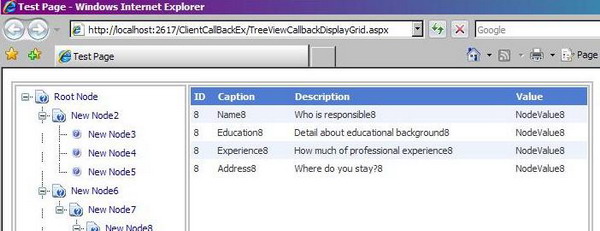
There are scenarios where we have a list of items on one side of a page (the list can be ordered or hierarchical) and on selection of an item from this list, all the details related to it is shown on the other half of the page. All this without a postback or a flicker would give a smooth and good feel to the user.
For example, we have a finance related Web application. We need to see the details related to a stock script in our portfolio (a number of scripts are listed on the same page). The moment a script is selected, all the details and the current status of the script is shown on the same page without any postback or flicker.
Out here, the above described scenario was achieved using the Client Callback feature introduced in ASP.NET 2.0. I found that a good amount of code related to this feature can be embedded inside a custom control such that it is easy to use. Moreover, if we use callback a number of times on a page, it would reduce lots of code. So, I tried to develop a "user friendly" custom control to use the Client Callback feature.
Background
In my current project, we had a scenario where different manufacturing parts were categorized (because of the hierarchical structure in the categorization, we decided to go with a tree view control). On selection of any one part (node), we were supposed to show the status and the data related to it in a grid placed on the same page. Performance was one of the major demands from the client. So, based on the needs, we decided to go with the Client Callback feature. The sample is based on this experience of mine.
Using the code
First, the important code parts of the custom control:
Apart from inheriting the control from WebControl, we also inherit it from ICallbackEventHandler.
public class MyCustomCallBackControl : WebControl, ICallbackEventHandler {}
The OnInit() method of the control is overridden. The callback scripts related to the control are embedded here.
protected override void OnInit(EventArgs e)
{
base.OnInit(e);
string callback = Page.ClientScript.GetCallbackEventReference(this, "input",
string.Concat(ID, "OnSuccess"), "context");
Page.ClientScript.RegisterClientScriptBlock(typeof(MyCustomCallBackControl),
ID, string.Concat("function ", ID,
"Callback(input, context) { ", callback, "; }"), true);
}
We will need to write the GetCallBackResult and RaiseCallBackEvent methods related to implement the ICallbackEventHandler interface.
public event EventHandler MyCallBackEvent;
public void RaiseCallbackEvent(string eventArgument)
{
argumentParameter = eventArgument;
if (MyCallBackEvent != null)
{
MyCallBackEvent(this, EventArgs.Empty);
}
}
public string GetCallbackResult()
{
return renderedOutput;
}
The Client Callback custom control is now ready to use.
We will now work on how to use the control on our web page. We drag drop the control on the page, and define the code-behind handler for it, basically, the server code that will run when the callback control is called.
protected void CallBackControl_Perform(object sender, EventArgs e)
{
DataTable dt = RetrieveDataTable(((
MyCustomControls.MyCustomCallBackControl)sender).ArgumentParameter);
gvTest.DataSource = dt;
gvTest.DataBind();
using (System.IO.StringWriter sw = new System.IO.StringWriter())
{
gvTest.RenderControl(new HtmlTextWriter(sw));
((MyCustomControls.MyCustomCallBackControl)sender).RenderedOutput = sw.ToString();
}
}
In our sample, we will bind the tree nodes to this callback control. This is done using JavaScript.
tNode.NavigateUrl = "javascript:OnNodeClick('" + tNode.Value + "');";
We are just left with defining the JavaScript functions that are attached to the custom callback control. The functions will be bound in the OnNodeClick method defined above.
function OnNodeClick(nodeID)
{
MyCustomCallBackControl1Callback(nodeID, null);
}
function MyCustomCallBackControl1OnSuccess(responseText)
{
document.getElementById("tdGridView").style.display = "block";
document.getElementById("gvTest").outerHTML = responseText;
}
We are finished with using the control now. The naming conventions for the JavaScript functions are defined, and need to be given accordingly.
Points of interest
Performance came out really good, that too with a simple and sleek UI. It was a good experience learning the comparisons and differences between using an UpdatePanel and a callback control.
Making it a custom control helped a lot. Even a beginner can use it without knowing much of what is happening inside it (it can be used multiple times on the same page). The control was easy to use and came out to be a good weapon in my Web stock! :)
History
- 19th December, 2008: Initial post.
