Introduction
Usually sending mails from Windows application is a tedious task. Moreover, many times you may have to enable IIS on each machine. The article describes an alternate mechanism of sending mail from Windows application.
Background
The above described mechanism (of enabling IIS on each machine) would be feasible for applications having a small user pool. However, in applications where the number of users is high, enabling the IIS and setting up SMTP on each desktop would not be feasible. Also, sending mail from CDO conflicts with Exchange Server. This article describes an alternate approach for the same.
Using the Code
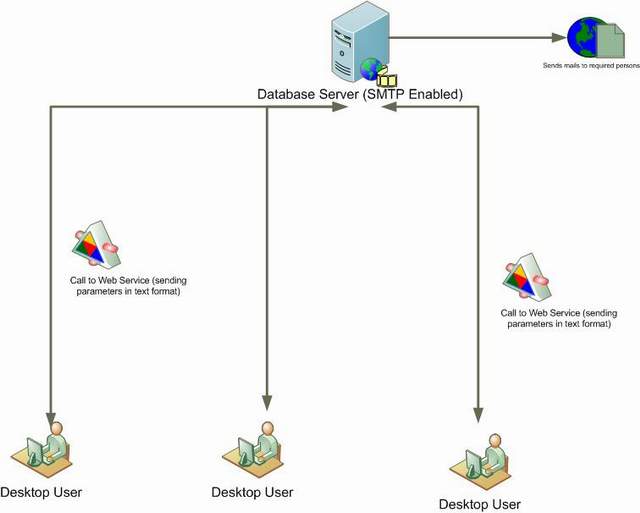
Developers may find thousands of sites on the Internet mentioning how to send mail through Windows applications. Majority of them would need the IIS to be enabled on each desktop. Details of the same can be found here. I tried to search for an alternative mechanism where we need to force each user to enable SMTP. In this article, we use a Web Service which is hosted on the Database Server. Developers can host the service on any other specific web server as well.
The diagram below shows the architecture involved:

To implement this functionality, we follow the steps given below:
- To create a Web Service which would have the web method accepting the related parameters and would send mail to the assigned person: Add references of
System.Web.Mail and System.Net. Later add the web method to send mail to the concerned person like the one shown below:
string sTo = "mysmtp@inf.com";
string sFrom = conn;
string sBody = "";
try
{
MailMessage mail = new MailMessage();
mail.From = sFrom.ToString();
mail.To = sTo.ToString();
mail.Subject = "Request To Work on Item";
mail.Body = sBody.ToString();
mail.BodyFormat = System.Web.Mail.MailFormat.Html;
SmtpMail.SmtpServer = "10.66.236.54";
SmtpMail.Send(mail);
return "Sent";
}
catch (Exception e)
{
return "error";
}
In the application, we have added a lot of formatting in the body. If you wish, you can opt for the same as shown below:
string sBody = "<table><tr><td colspan ='2'>Dear " + sSenderName + "," +
"</td></tr>" + "<tr><td colspan ='2'> </td></tr>" +
"<tr><td colspan ='2'>" +
"The details of the Item is shown in the table." + "</td></tr>" + "<tr><td
colspan ='2'> </td></tr>" +
"<tr><td><font color = green>Date Raised </td><td>:
</font>" + sDateRaised + "</td>" + "</tr>" + "<br>" +
"<tr><td><font color =
green>Index </td><td>: </font>" + sIndex + "</td>" + "</tr>" + "<br>" +
"<tr><td><font color = green>Description </td><td>:
</font>" + sDescription +
"</td></tr>" + "<br>" + "<br>" + "<tr><td><font color = green>Priority
</td><td>: </font>" + sPriority + "</td>" + "</tr>"
+ "<br>" + "<tr><td><font
color = green>Status </td><td>: </font>"
+ sStatus + "</td>" + "</tr>" + "<br>"
+ "<tr><td><font color = green>Status Comments </td><td>: </font>" +
sStausComments + "</td>" + "</tr>" + "<br>" +
"<tr><td colspan ='2'>Thanks," +
"</td></tr>" + "<tr><td colspan ='2'>Sushant Joshi."
+ "</td></tr>" +
"</table>";
- In the next step, we create the Windows form and create all the fields.
- Later, we need to create the proxy for the Web Service.
To create the proxy, you need to open Microsoft Visual Studio command prompt and run the following command:
wsdl /language:C# /out:MyProxyClass.cs ttp://localhost/ASP.NET/MyWebService.asmx
Details on creating Web Proxy can be found here.
- In the last step, we add the proxy to the Windows Form project or any Business Layer project - in case of n tier application.
After this, we can call individual web methods of the web service. Call to the mailing functionality is as shown below:
Service1 MYCLS = new Service1();
MYCLS.SendMail(sSenName, sDateRaised, sIndex, sDescription,
				sPriority, sStatus, sStausComments);
Finally, the entire communication looks as shown below:

Pop-up of Windows form (expecting inputs):

Pop-up of Windows form (expecting inputs) along with Web Service page:

Points of Interest
Sending mails to users using Windows application can be done by enabling SMTP on each machine for a small set of users. However, in case of a large user pool, we use Web Service/Remoting call to send mail, which involves only enabling SMTP on one machine and could be a preferred option.
History
- 15th September, 2009: Initial post
